Unbrick Synology DS918+
Posted by superchromix
|
Unbrick Synology DS918+ December 10, 2021 10:33AM |
Registered: 2 years ago Posts: 17 |
Hi,
I'm attempting to unbrick a Synology DS918+. Purchased this unit second hand, and it arrived DOA. No information on its history.
Upon connecting power and pressing the power button, the blue power light switches on and blinks. The fans spin up. The unit does not beep, and the blue light blinks endlessly. The network connection is never active and the hard disk activity lights to not illuminate.
I have connected to the serial port header through an opening on the bottom of the unit. As described elsewhere, I connected to pins 2, 4, and 6 using a USB to UART adapter. The connection is correct, as I am able to test it using an identical, working, DS918+ unit.
On the working unit I get a long boot sequence output that starts with the following text:
On the bricked unit, there is no output on the serial connection when it is powered on.
If I remove the memory DIMM from the bricked unit, and power on, a repeating error message appears on the serial output of the bricked unit while the blue power light is flashing:
This confirms, at least, that the serial port of the bricked unit is functional.
From what I've read on this and other forums, I think I should attempt to restore the U-boot to this device? I have downloaded the .pat file containing the firmware for the DS918, and I can find the U-boot files contained in that package.
I also have a Raspberry Pi available to help with this process.
I read in other threads a procedure involving "kwboot", which is used to restore the Uboot firmware.
Otherwise, I'm completely new to all of this. If anyone has suggestions, including how to proceed with kwboot, I would greatly appreciate it.
Thanks!
Edited 2 time(s). Last edit at 12/10/2021 10:37AM by superchromix.
I'm attempting to unbrick a Synology DS918+. Purchased this unit second hand, and it arrived DOA. No information on its history.
Upon connecting power and pressing the power button, the blue power light switches on and blinks. The fans spin up. The unit does not beep, and the blue light blinks endlessly. The network connection is never active and the hard disk activity lights to not illuminate.
I have connected to the serial port header through an opening on the bottom of the unit. As described elsewhere, I connected to pins 2, 4, and 6 using a USB to UART adapter. The connection is correct, as I am able to test it using an identical, working, DS918+ unit.
On the working unit I get a long boot sequence output that starts with the following text:
                             GNU GRUB  version 2.00

   Press "CTRL-C" for boot menu or it boots automatically in 0s.
  Booting `SYNOLOGY_2'

  Checking file [/zImage]...Passed.
  Checking file [/rd.gz]...Passed.

          Serial: xxxxxxxxxxxxx
   Custom Serial: Empty or invalid checksum.
            MAC1: xxxxxxxxxxxx
            MAC2: xxxxxxxxxxxx
            MAC3: Empty or invalid checksum.
            MAC4: Empty or invalid checksum.
            MAC5: Empty or invalid checksum.
            MAC6: Empty or invalid checksum.
            MAC7: Empty or invalid checksum.
            MAC8: Empty or invalid checksum.
[    0.000000] Initializing cgroup subsys cpuset
[    0.000000] Initializing cgroup subsys cpu
[    0.000000] Initializing cgroup subsys cpuacct
[    0.000000] Linux version 4.4.59+ (root@build3) (gcc version 4.9.3 20150311 (prerelease) (crosstool-NG 1.20.0) ) #25556 SMP PREEMPT Thu Mar 18 13:00:35 CST 2021
[    0.000000] Command line: root=/dev/md0 earlyprintk=apl console=ttyS2,115200n8 ihd_num=4 netif_num=2 HddHotplug=1 SataPortMap=23 sata_remap=0>2:1>3:2>0:3>1 syno_hw_version=DS918+ vender_format_version=2 syno_hdd_detect=18,179,176,175 syno_hdd_enable=21,20,19,9 syno_usb_vbus_gpio=13@0000:00:15.0@1,11@0000:00:15.0@2 sn=xxxxxxxxxxxxx macs=xxxxxxxxxxxx,xxxxxxxxxxxx
[    0.000000] KERNEL supported cpus:
[    0.000000]   Intel GenuineIntel
[    0.000000] x86/fpu: xstate_offset[3]:  960, xstate_sizes[3]:   64
[    0.000000] x86/fpu: xstate_offset[4]: 1024, xstate_sizes[4]:   64
[    0.000000] x86/fpu: Supporting XSAVE feature 0x01: 'x87 floating point registers'
[    0.000000] x86/fpu: Supporting XSAVE feature 0x02: 'SSE registers'
[    0.000000] x86/fpu: Supporting XSAVE feature 0x08: 'MPX bounds registers'
[    0.000000] x86/fpu: Supporting XSAVE feature 0x10: 'MPX CSR'
[    0.000000] x86/fpu: Enabled xstate features 0x1b, context size is 1088 bytes, using 'standard' format.
[    0.000000] e820: BIOS-provided physical RAM map:
[    0.000000] BIOS-e820: [mem 0x0000000000000000-0x0000000000057fff] usable
[    0.000000] BIOS-e820: [mem 0x0000000000058000-0x0000000000058fff] reserved
[    0.000000] BIOS-e820: [mem 0x0000000000059000-0x0000000000085fff] usable
[    0.000000] BIOS-e820: [mem 0x0000000000086000-0x00000000000fffff] reserved
[    0.000000] BIOS-e820: [mem 0x0000000000100000-0x000000000fffffff] usable
[    0.000000] BIOS-e820: [mem 0x0000000010000000-0x0000000012150fff] reserved
[    0.000000] BIOS-e820: [mem 0x0000000012151000-0x0000000067c17fff] usable
[    0.000000] BIOS-e820: [mem 0x0000000067c18000-0x0000000067c18fff] ACPI NVS
[    0.000000] BIOS-e820: [mem 0x0000000067c19000-0x0000000067c42fff] reserved
[    0.000000] BIOS-e820: [mem 0x0000000067c43000-0x0000000067c7dfff] usable
[    0.000000] BIOS-e820: [mem 0x0000000067c7e000-0x0000000068c7dfff] reserved
[    0.000000] BIOS-e820: [mem 0x0000000068c7e000-0x000000007822efff] usable
[    0.000000] BIOS-e820: [mem 0x000000007822f000-0x000000007aebefff] reserved
[    0.000000] BIOS-e820: [mem 0x000000007aebf000-0x000000007afbefff] ACPI NVS
[    0.000000] BIOS-e820: [mem 0x000000007afbf000-0x000000007affefff] ACPI data
[    0.000000] BIOS-e820: [mem 0x000000007afff000-0x000000007affffff] usable
[    0.000000] BIOS-e820: [mem 0x000000007b000000-0x000000007fffffff] reserved
[    0.000000] BIOS-e820: [mem 0x00000000d3709000-0x00000000d370afff] reserved
[    0.000000] BIOS-e820: [mem 0x00000000e0000000-0x00000000e3ffffff] reserved
[    0.000000] BIOS-e820: [mem 0x00000000fed01000-0x00000000fed01fff] reserved
[    0.000000] BIOS-e820: [mem 0x00000000ff800000-0x00000000ffffffff] reserved
[    0.000000] BIOS-e820: [mem 0x0000000100000000-0x000000017fffffff] usable
[    0.000000] bootconsole [earlyser0] enabled
[    0.000000] NX (Execute Disable) protection: active
[    0.000000] extended physical RAM map:
[    0.000000] reserve setup_data: [mem 0x0000000000000000-0x0000000000057fff] usable
[    0.000000] reserve setup_data: [mem 0x0000000000058000-0x0000000000058fff] reserved
[    0.000000] reserve setup_data: [mem 0x0000000000059000-0x0000000000085fff] usable
[    0.000000] reserve setup_data: [mem 0x0000000000086000-0x00000000000fffff] reserved
[    0.000000] reserve setup_data: [mem 0x0000000000100000-0x0000000001d646c7] usable
[    0.000000] reserve setup_data: [mem 0x0000000001d646c8-0x0000000001d646d7] usable
[    0.000000] reserve setup_data: [mem 0x0000000001d646d8-0x000000000fffffff] usable
[    0.000000] reserve setup_data: [mem 0x0000000010000000-0x0000000012150fff] reserved
[    0.000000] reserve setup_data: [mem 0x0000000012151000-0x0000000067c17fff] usable
[    0.000000] reserve setup_data: [mem 0x0000000067c18000-0x0000000067c18fff] ACPI NVS
[    0.000000] reserve setup_data: [mem 0x0000000067c19000-0x0000000067c42fff] reserved
[    0.000000] reserve setup_data: [mem 0x0000000067c43000-0x0000000067c7dfff] usable
[    0.000000] reserve setup_data: [mem 0x0000000067c7e000-0x0000000068c7dfff] reserved
[    0.000000] reserve setup_data: [mem 0x0000000068c7e000-0x000000007822efff] usable
[    0.000000] reserve setup_data: [mem 0x000000007822f000-0x000000007aebefff] reserved
[    0.000000] reserve setup_data: [mem 0x000000007aebf000-0x000000007afbefff] ACPI NVS
[    0.000000] reserve setup_data: [mem 0x000000007afbf000-0x000000007affefff] ACPI data
[    0.000000] reserve setup_data: [mem 0x000000007afff000-0x000000007affffff] usable
[    0.000000] reserve setup_data: [mem 0x000000007b000000-0x000000007fffffff] reserved
[    0.000000] reserve setup_data: [mem 0x00000000d3709000-0x00000000d370afff] reserved
[    0.000000] reserve setup_data: [mem 0x00000000e0000000-0x00000000e3ffffff] reserved
[    0.000000] reserve setup_data: [mem 0x00000000fed01000-0x00000000fed01fff] reserved
[    0.000000] reserve setup_data: [mem 0x00000000ff800000-0x00000000ffffffff] reserved
[    0.000000] reserve setup_data: [mem 0x0000000100000000-0x000000017fffffff] usable
[    0.000000] efi: EFI v2.50 by INSYDE Corp.
[    0.000000] efi:  ACPI 2.0=0x7affe014  SMBIOS=0x78757000  SMBIOS 3.0=0x78755000
[    0.000000] SMBIOS 3.0.0 present.
[    0.000000] Kernel/User page tables isolation: disabled
[    0.000000] e820: last_pfn = 0x180000 max_arch_pfn = 0x400000000
[    0.000000] x86/PAT: Configuration [0-7]: WB  WT  UC- UC  WB  WT  UC- UC
[    0.000000] e820: last_pfn = 0x7b000 max_arch_pfn = 0x400000000
[    0.000000] Using GB pages for direct mapping
[    0.000000] RAMDISK: [mem 0x3746a000-0x37a2cfff]
[    0.000000] ACPI: Early table checksum verification disabled
[    0.000000] ACPI: RSDP 0x000000007AFFE014 000024 (v02 INSYDE)
On the bricked unit, there is no output on the serial connection when it is powered on.
If I remove the memory DIMM from the bricked unit, and power on, a repeating error message appears on the serial output of the bricked unit while the blue power light is flashing:
Memory training failed. Stuck in a dead loop: Acting
This confirms, at least, that the serial port of the bricked unit is functional.
From what I've read on this and other forums, I think I should attempt to restore the U-boot to this device? I have downloaded the .pat file containing the firmware for the DS918, and I can find the U-boot files contained in that package.
I also have a Raspberry Pi available to help with this process.
I read in other threads a procedure involving "kwboot", which is used to restore the Uboot firmware.
Otherwise, I'm completely new to all of this. If anyone has suggestions, including how to proceed with kwboot, I would greatly appreciate it.
Thanks!
Edited 2 time(s). Last edit at 12/10/2021 10:37AM by superchromix.
|
Re: Unbrick Synology DS918+ December 10, 2021 02:47PM |
Admin Registered: 13 years ago Posts: 18,543 |
superchromix,
I'm not familiar with this box. But its specifications states that it is a quad-core Intel Celeron, thus it has BIOS and uses GRUB instead of u-boot as boot loader. Your serial log confirmed that.
> This confirms, at least, that the serial port of
> the bricked unit is functional.
Yes.
> this device? I have downloaded the .pat file
> containing the firmware for the DS918, and I can
> find the U-boot files contained in that package.
Not sure why there are u-boot files there.
> I read in other threads a procedure involving
> "kwboot", which is used to restore the Uboot
> firmware.
kwboot only works with Marvell Kirkwood, Dove, and Armada SoCs. It is not applicable to your box.
Sorry, not sure I can help. I can only guess that the fact that you dont get the GRUB banner, means that it might have been corrupted.
Try this: run serial console, and when your serial console terminal wait for input/output, repeatedly type Control-C while power up. If GRUB was not too damaged then it might stop at some point and give you the menu.
============
And perhaps you can find a recovery FW and procedure at Synology site. They are good in providing GPL sources and recovery procedures for their boxes.
-bodhi
===========================
Forum Wiki
bodhi's corner (buy bodhi a beer)
|
Re: Unbrick Synology DS918+ December 10, 2021 05:07PM |
Registered: 2 years ago Posts: 17 |
Thanks for the info!
Regarding the uboot files in the Synology .pat file:
You're correct - there are no "uboot" files in the package I downloaded from Synology. I must have been confused after reading other posts describing recovering other Synology models which do use the uboot system.
What I did find in the Synology package is a folder called "flashupdate_6.2-25556-s2_all", where 6.2-25556 is the version number of the Synology OS (DSM). The folder contains the following files:
The H2OFFT-Lx64 is the updater program for the Insyde H2O BIOS. It seems like when you download a system update for the Synology, one of the things it does is re-flash the onboard BIOS. It looks like these files are all that's required to do that.
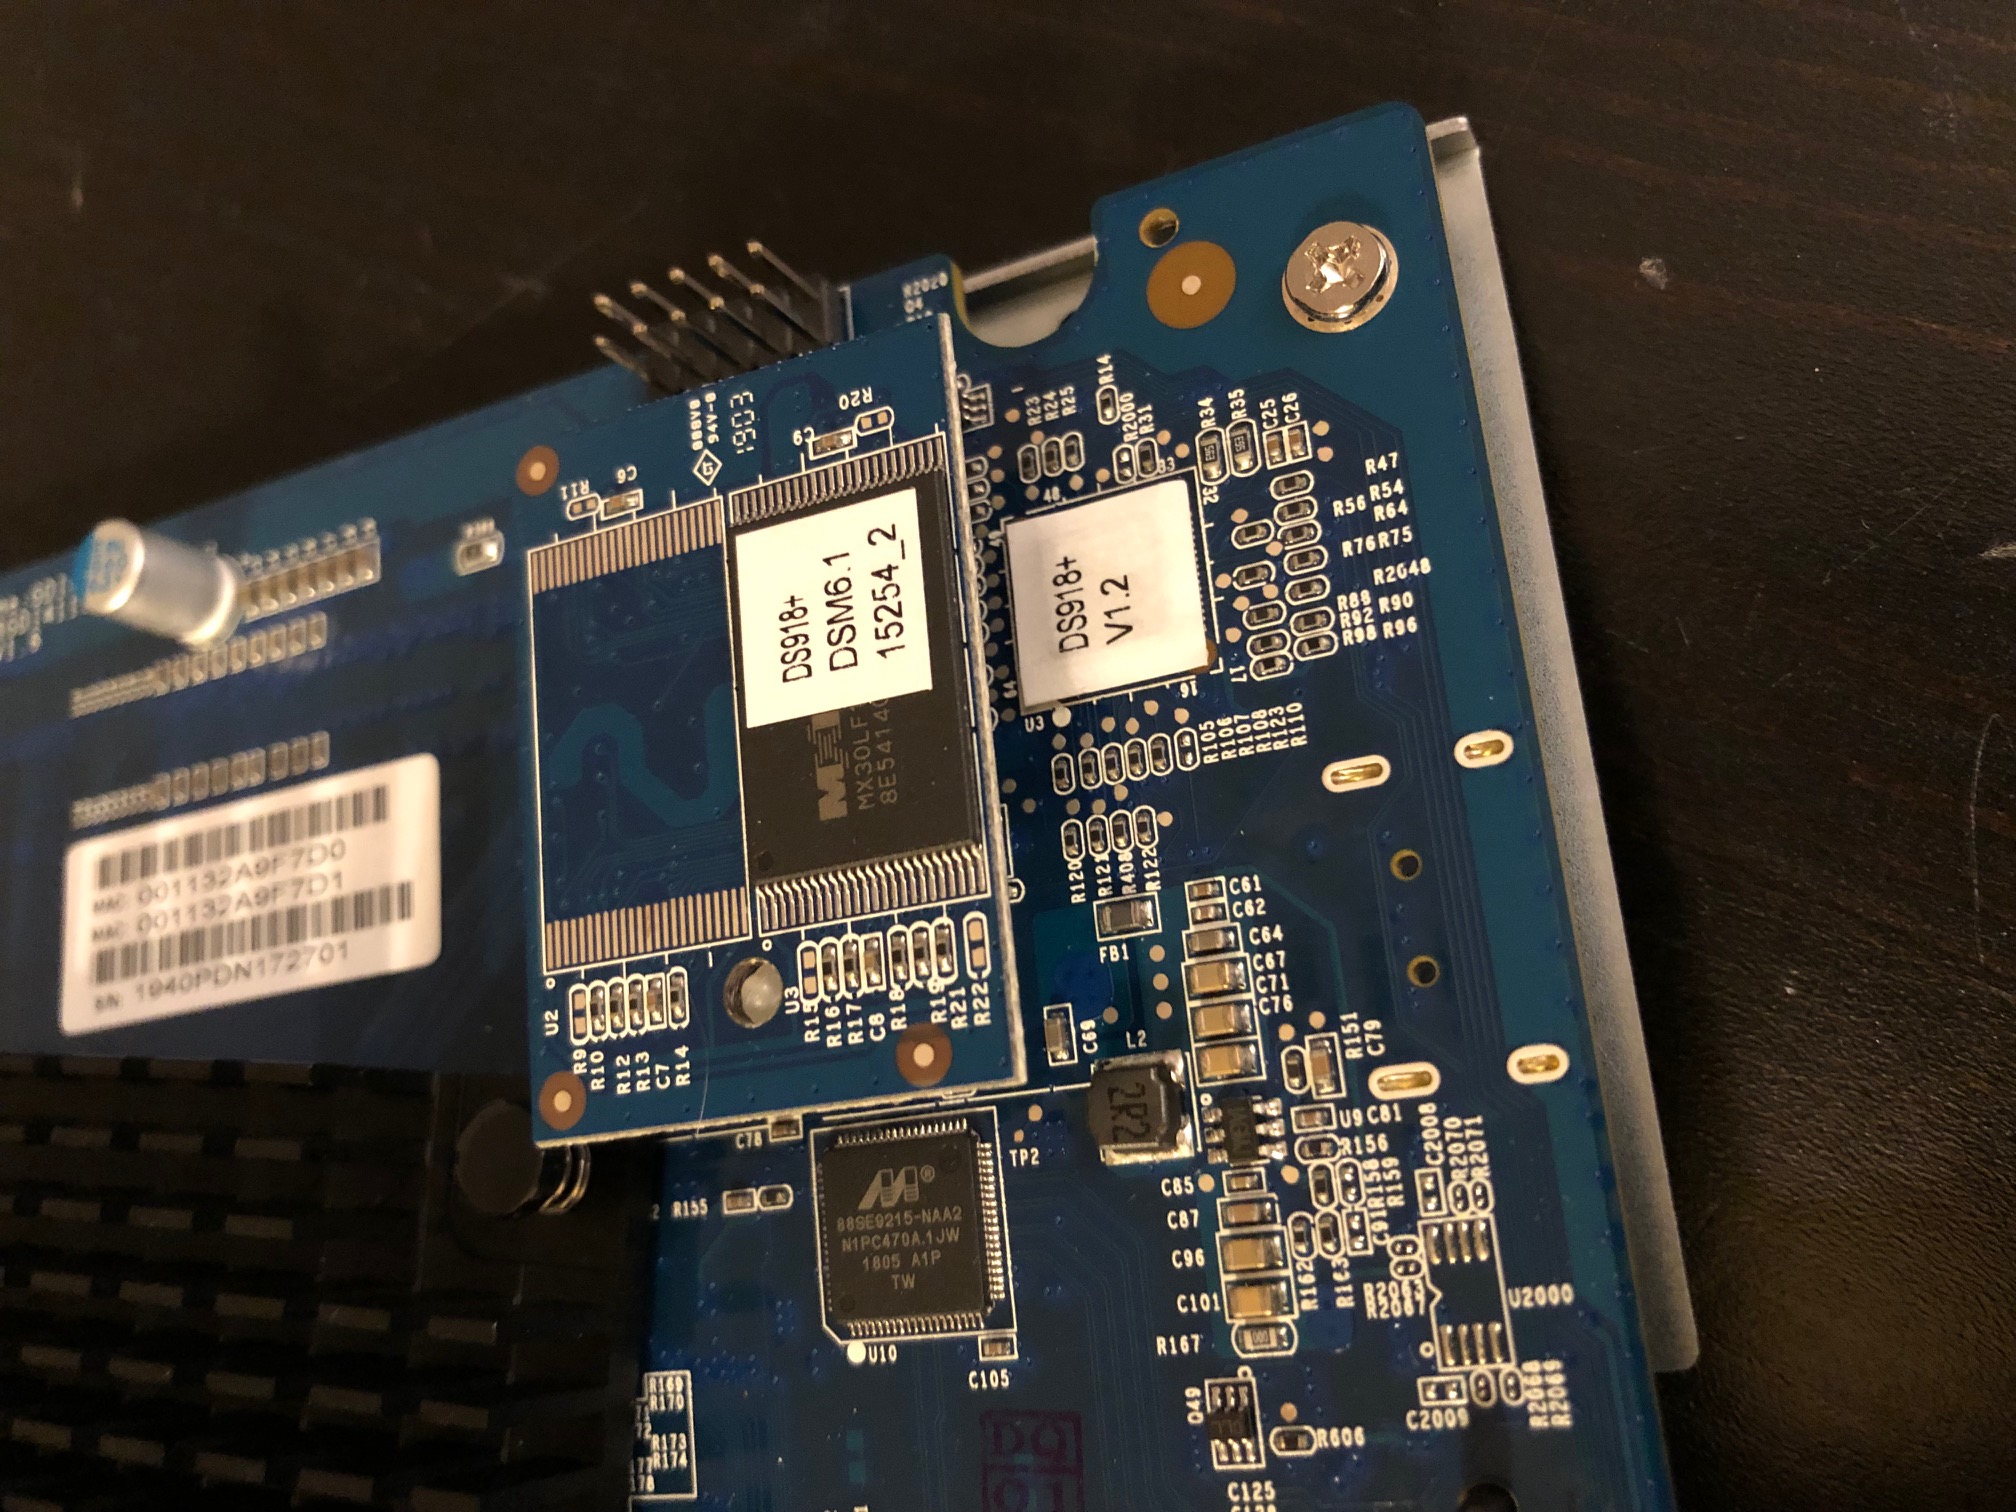
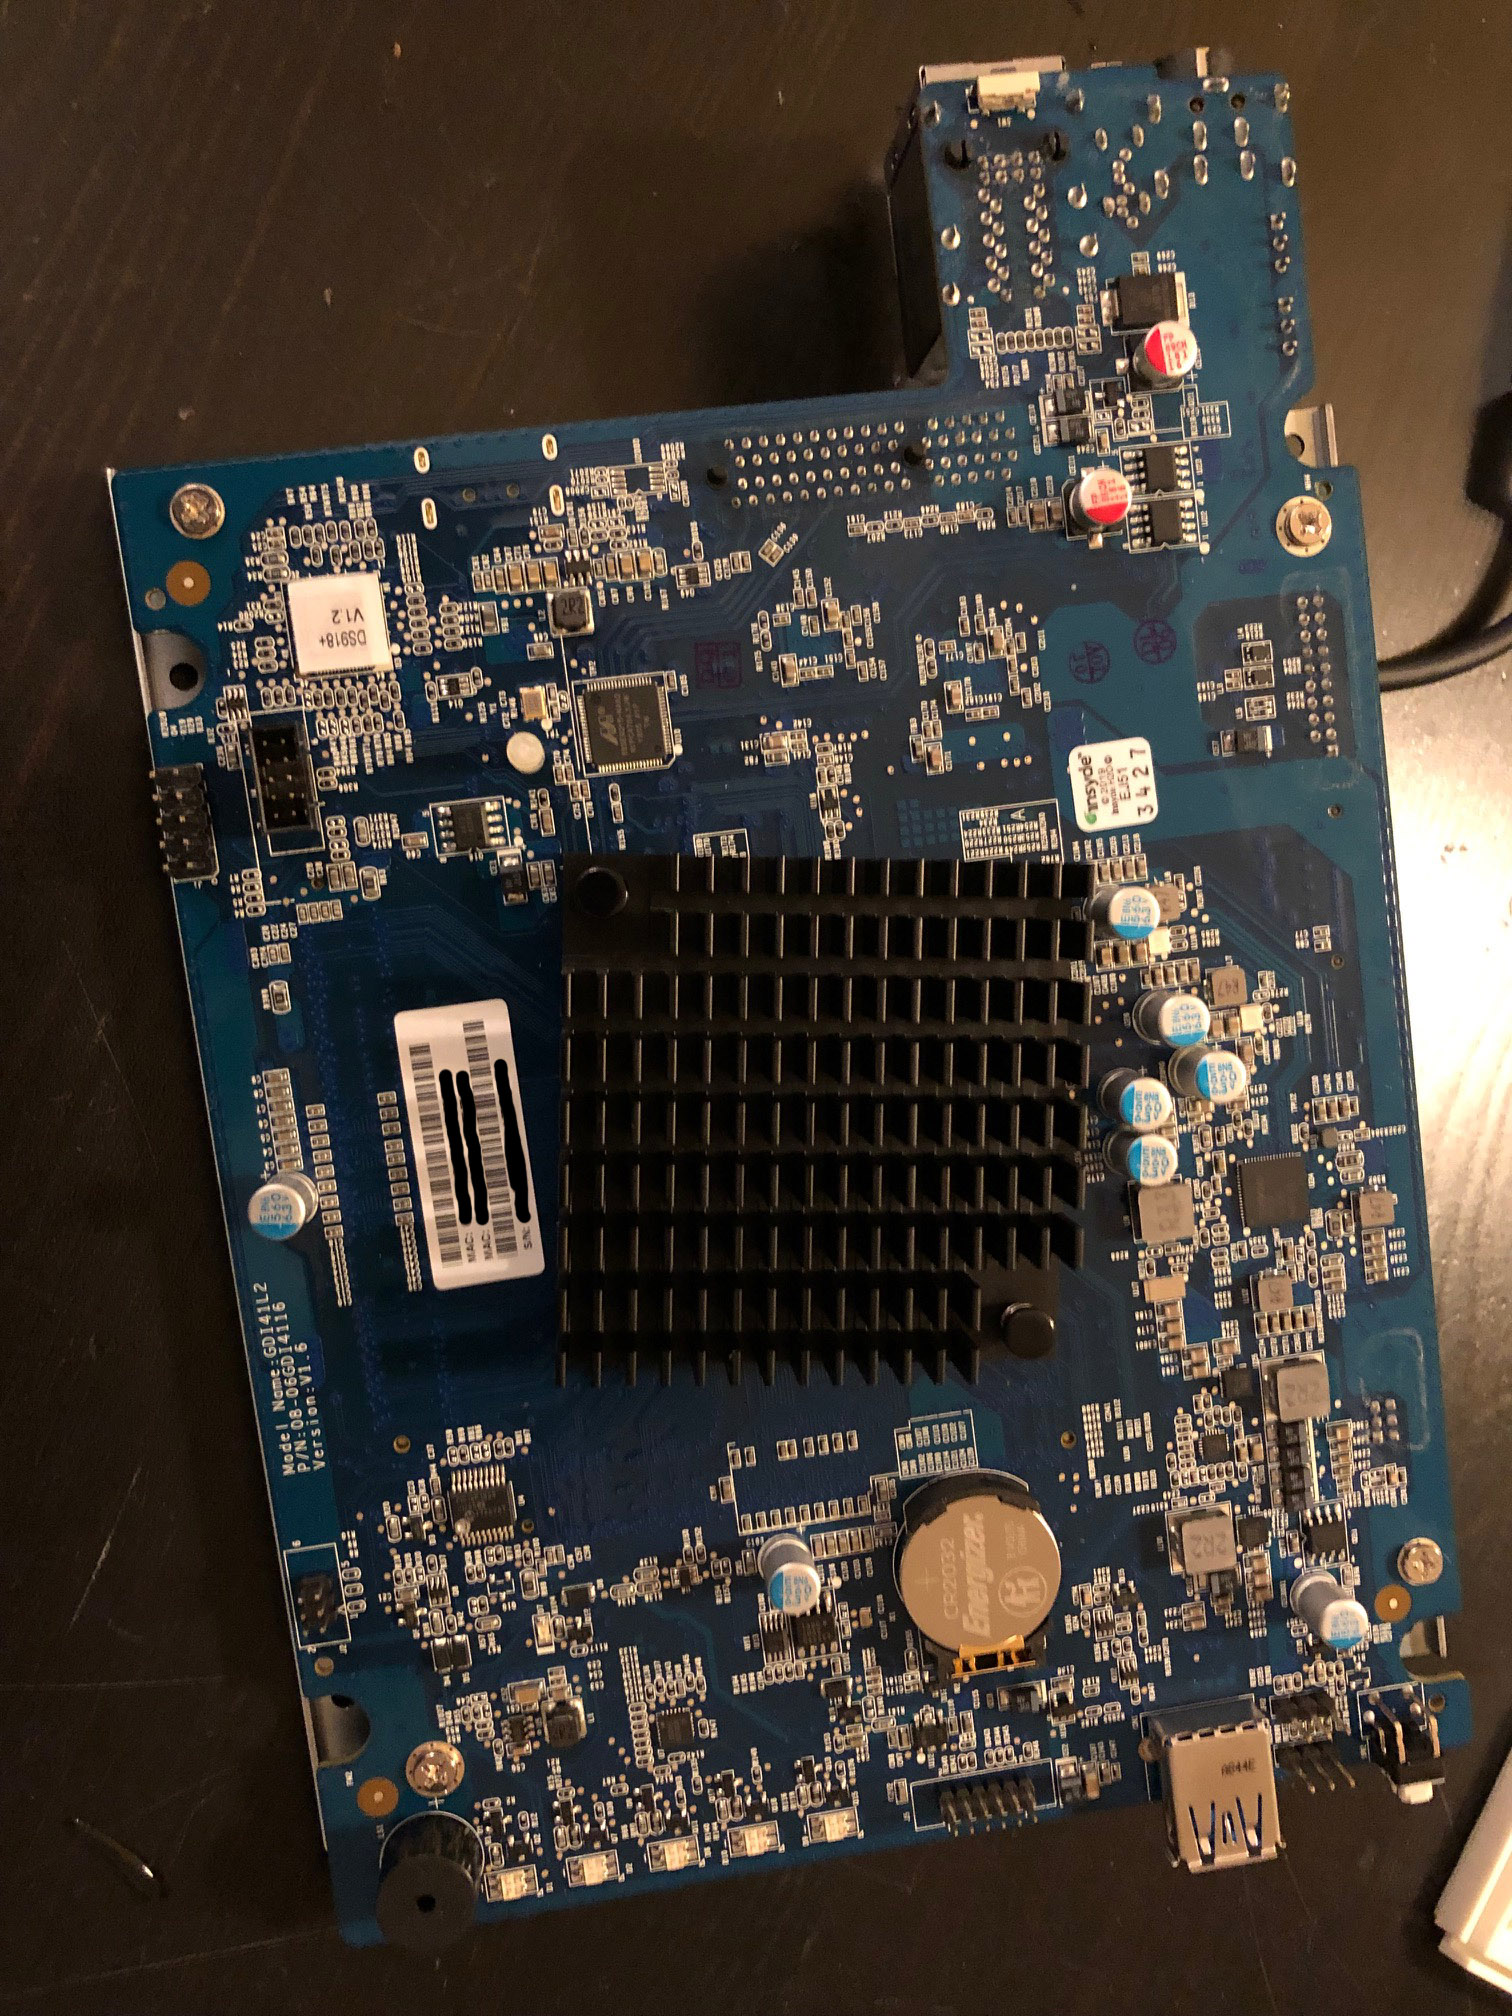
What I don't understand is where this is all physically stored on the motherboard. I've attached some pictures to this post.
There is a Altera Max V FPGA chip (5M80Z) with a white label (DS918+ V1.2) located close to a 10-pin header which is a JTAG port (can be connected to with e.g. a Byteblaster USB).
There is also a removable daughter board, which is essentially a USB flash drive. The memory chip on that board is labeled with the model number of the NAS and the DSM version (DSM 6.1 15254_2).
From what I understand so far, these are the flash-able components on the motherboard. It looks like the USB flash drive could store a full copy of the DSM OS. Where is the Insyde BIOS stored, however? Is that the FPGA?
If this NAS isn't booting due to a problem with the BIOS, or a problem with the GRUB bootloader, I might be able to fix it by re-writing one, or both, of these components.
Connecting to the daughter board is simple enough, since it should mount on any PC just like a regular flash disk. How to use H2OFFT-Lx64 to flash the BIOS, however, I have no idea.
This is where I've gotten to. Thanks again for your advice and suggestions! Any further insights would be most welcome.
Regarding the uboot files in the Synology .pat file:
You're correct - there are no "uboot" files in the package I downloaded from Synology. I must have been confused after reading other posts describing recovering other Synology models which do use the uboot system.
What I did find in the Synology package is a folder called "flashupdate_6.2-25556-s2_all", where 6.2-25556 is the version number of the Synology OS (DSM). The folder contains the following files:
27-Aug-21  08:01 PM         9,142,600     bios.ROM
27-Aug-21  08:01 PM               333     checksum.syno
27-Aug-21  08:01 PM                55     grub_cksum.syno
27-Aug-21  08:01 PM                98     GRUB_VER
27-Aug-21  08:01 PM         1,046,607     H2OFFT-Lx64
27-Aug-21  08:01 PM            40,543     platform.ini
27-Aug-21  08:01 PM         6,060,520     rd.gz
27-Aug-21  08:01 PM         4,400,070     updater
27-Aug-21  08:01 PM               441     VERSION
27-Aug-21  08:01 PM         3,470,752     zImage
The H2OFFT-Lx64 is the updater program for the Insyde H2O BIOS. It seems like when you download a system update for the Synology, one of the things it does is re-flash the onboard BIOS. It looks like these files are all that's required to do that.
What I don't understand is where this is all physically stored on the motherboard. I've attached some pictures to this post.
There is a Altera Max V FPGA chip (5M80Z) with a white label (DS918+ V1.2) located close to a 10-pin header which is a JTAG port (can be connected to with e.g. a Byteblaster USB).
There is also a removable daughter board, which is essentially a USB flash drive. The memory chip on that board is labeled with the model number of the NAS and the DSM version (DSM 6.1 15254_2).
From what I understand so far, these are the flash-able components on the motherboard. It looks like the USB flash drive could store a full copy of the DSM OS. Where is the Insyde BIOS stored, however? Is that the FPGA?
If this NAS isn't booting due to a problem with the BIOS, or a problem with the GRUB bootloader, I might be able to fix it by re-writing one, or both, of these components.
Connecting to the daughter board is simple enough, since it should mount on any PC just like a regular flash disk. How to use H2OFFT-Lx64 to flash the BIOS, however, I have no idea.
This is where I've gotten to. Thanks again for your advice and suggestions! Any further insights would be most welcome.
|
Re: Unbrick Synology DS918+ December 10, 2021 05:47PM |
Registered: 2 years ago Posts: 17 |
|
Re: Unbrick Synology DS918+ December 10, 2021 06:09PM |
Admin Registered: 13 years ago Posts: 18,543 |
superchromix Wrote:
-------------------------------------------------------
> A short update:
>
> I've identified another chip on the motherboard
> which may potentially be the BIOS chip.
>
> The chip is a Winbond 25Q128FWSQ
>
> 128M-BIT SERIAL FLASH MEM ORY WITH DUAL/QUAD SPI &
> QPI
>
> It has 8 pins and is soldered to the back side of
> the motherboard.
That's probably the BIOS. Winbond 8-pin serial flash chips are commonly for BIOS.
-bodhi
===========================
Forum Wiki
bodhi's corner (buy bodhi a beer)
|
Re: Unbrick Synology DS918+ January 17, 2022 04:52PM |
Registered: 2 years ago Posts: 17 |
|
Re: Unbrick Synology DS918+ January 17, 2022 06:24PM |
Admin Registered: 13 years ago Posts: 18,543 |
> If I want to reflash the bios chip, how to figure
> out at what offset to start reflashing..?
>
> and, where is the checksum stored...?
No idea.
Anybody can chime in?
-bodhi
===========================
Forum Wiki
bodhi's corner (buy bodhi a beer)
> out at what offset to start reflashing..?
>
> and, where is the checksum stored...?
No idea.
Anybody can chime in?
-bodhi
===========================
Forum Wiki
bodhi's corner (buy bodhi a beer)
|
Re: Unbrick Synology DS918+ January 18, 2022 10:30AM |
Registered: 2 years ago Posts: 76 |
|
Re: Unbrick Synology DS918+ February 15, 2022 06:15PM |
Registered: 2 years ago Posts: 2 |
|
Re: Unbrick Synology DS918+ February 16, 2022 01:52AM |
Registered: 2 years ago Posts: 17 |
|
Re: Unbrick Synology DS918+ February 16, 2022 08:05PM |
Registered: 2 years ago Posts: 2 |
|
Re: Unbrick Synology DS918+ February 27, 2022 11:29PM |
Registered: 2 years ago Posts: 3 |
Hey Superchromix I have the exact same situation with a Synology DS218+ (Dual core Celeron with Insyde BIOS) can you share with us what you did to fix your problem please?
I had done the same troubleshooting steps when I found your post. I have the same serial port output with and without SO-DIMM memory as you did. I assumed that I was chasing a h/w (measured all power rails at inductors) or memory problem (replaced with other RAM) but started leaning more towards corrupt internal flash. It would be great to get this DS218+ unit to do more than flash a blue light.
I had done the same troubleshooting steps when I found your post. I have the same serial port output with and without SO-DIMM memory as you did. I assumed that I was chasing a h/w (measured all power rails at inductors) or memory problem (replaced with other RAM) but started leaning more towards corrupt internal flash. It would be great to get this DS218+ unit to do more than flash a blue light.
|
Re: Unbrick Synology DS918+ March 03, 2022 03:16PM |
Registered: 2 years ago Posts: 17 |
I fixed my system by removing the Winbond chip from the motherboard and reflashing it.
I also had to figure out which address range in the bios.rom file needs to be written to the chip.
When I soldered the chip back onto the motherboard and powered her up, I almost fell out of my chair when the boot sequence started outputting over the UART.
XD
To flash the chip you will need something like a TL866-II+ (this is what I used).
Removing and replacing the chip also requires some soldering experience.
Since the repair, my Synology is working perfectly.
cheers
Edited 2 time(s). Last edit at 03/03/2022 03:18PM by superchromix.
|
Re: Unbrick Synology DS918+ March 03, 2022 09:12PM |
Admin Registered: 13 years ago Posts: 18,543 |
superchromix,
Congrats :) hope you will visit this forum from time to time to help out new comers. It seem this problem occurs frequently with these Intel-based Synology boxes.
-bodhi
===========================
Forum Wiki
bodhi's corner (buy bodhi a beer)
Quote
Since the repair, my Synology is working perfectly.
Congrats :) hope you will visit this forum from time to time to help out new comers. It seem this problem occurs frequently with these Intel-based Synology boxes.
-bodhi
===========================
Forum Wiki
bodhi's corner (buy bodhi a beer)
|
Re: Unbrick Synology DS918+ March 19, 2022 01:16AM |
Registered: 2 years ago Posts: 3 |
I want to first thank Superchromix for the hints as I now have a working DS218+ :) It took a little bit to figure everything out and some learning Linux as well! I want to provide a little more detail for those people out there that may still have a problem. I am by no means an expert and only have experience with the DS218+ but here is what I did in more detail.
Superchromix suggested the TL866-II+ which obviously works. I went looking for a cheaper alternative and found the CH341A programmer on Amazon for about $14 with multiple accessories including a 1.8V level shift adapter and SOIC clip. There is tons of information on these programmers out there for you to look up all their capabilities and compatibility.
This is the one I purchased ACEIRMC SOIC8 SOP8 Test Clip For EEPROM 93CXX / 25CXX / 24CXX + CH341A 24 25 Series EEPROM Flash BIOS USB +1.8V Adapter + Soic8 Adapter Programmer Module Kit (1 sets)
The only thing you must check and watch for is +5V logic levels due to an error on the PCB. Here is a site I found that easily shows how to check and modify the programmer for 3.3V logic levels.
3.3V CH341a Signal Output Modification
I then found a website where someone using this programmer with the same Winbond W25Q128FWSIQ SPI flash to write their BIOS very helpful. This also provided a very important note about not connecting WP and HOLD directly to GND or VCC. This page is a great reference for how to connect the programmer to the Winbond IC and also a little bit of how to use flashrom in Linux.
Upgrading a motherboard's BIOS/UEFI (the hard way)
I used the SOIC that came with the programmer to connect directly to the Winbond IC on the PCB. I did not modify the SOIC clip with a 1K ohm resistor as described on the website. Instead, I used a couple long header pins to connect the socket to the 1.8V adapter ZIF socket. I left pins 3(WP) and 7(HOLD) out so they were not connected to the SOIC clip. This way I didn't have to modify my SOIC clip and I didn't have any concerns of those 2 pins connecting to somewhere that should be no connection.
I read the bios using the CH341a and flashrom on Ubuntu creating a backup.bin file. I did this twice using a new filename with the 2nd file and checked that both files were the same, and they were. I then started looking at the BIOS.ROM file from the Synology.pat file and the backup.bin file that was read from the Winbond IC using a hex editor. I did a manual review of the files side by side and noted that the start of the backup.bin file was the same as 0xAD1D0 in the BIOS.ROM file (There is also ASCII text just before that offset that says "$_IFLASH_BIOSIMG". I cut everything from from offset 0x0 to 0xAD1CF so that the BIOS.ROM matched the start of the backup.bin file.
I then continued to review the file and found they had a matching "pattern of data" until offset 0x8AD1D0. This section after this offset reads "$_IFLASH_INI_IMG. I cut the file again from offset 0x8AD1D0 to the end of the file. After cutting this and the previous section I was left with a file that matched the pattern of the backup.bin file more closely. I saved the modified file with the cut header and footer and found that file was 8,388,608 bytes in size which is half of the 16,777,216 bytes available on the Winbond flash.
I reviewed the backup.bin file and found that it was padded with all 0x "00" from offset 0x800000 to the end of the file (the remaining 8,388,608 bytes).
I used the "truncate" command to pad the modified file with 8,388,608 bytes of zeros which made the file the exact size of the backup.bin and size available on the Winbond flash(16,777,216 bytes).
I then used flashrom to write the modified file back to the Winbond flash using the SOIC clip. I powered the unit on and just like superchromix was thrilled to see it boot up from the serial output. The unit turned on, beeped, and is alive. I did look at the serial output and noted that the MAC and serial number came up correctly when the unit was booting. This is a unit I purchased non-functional that I am excited to setup and use now!
I can't thank you all enough and especially superchromix for your help and information! I hope this information helps someone else in the future with this problem on the same or similar unit to bring their Synology DS unit back from paperweight status!
|
Re: Unbrick Synology DS918+ March 19, 2022 03:12AM |
Registered: 2 years ago Posts: 17 |
|
Kevin09
Re: Unbrick Synology DS918+ June 16, 2022 09:59AM |
Could you please add some pictures in your words? I have tried many times, but never got the right result. I use the command "flashrom -p ch341a_spi", it replies:
Calibrating delay loop... OK.
Found Winbond flash chip "unknown Winbond (ex Nexcom) SPI chip" (0 kB, SPI) on ch341a_spi.
===
This flash part has status NOT WORKING for operations: PROBE READ ERASE WRITE
The test status of this chip may have been updated in the latest development
version of flashrom. If you are running the latest development version,
please email a report to flashrom@flashrom.org if any of the above operations
work correctly for you with this flash chip. Please include the flashrom log
file for all operations you tested (see the man page for details), and mention
which mainboard or programmer you tested in the subject line.
Thanks for your help!
No operations were specified.
Help me please.
|
Re: Unbrick Synology DS918+ June 16, 2022 05:51PM |
Registered: 2 years ago Posts: 3 |
I am by no means an expert and only have experience with this once. That being said, here are a couple suggestions of things I noticed when I was repairing my Synology unit and for you to check in your setup.
1. The Chinese SOIC clips are VERY finicky and I had to be very careful to make sure the clip was connected well to the Winbond IC and then I attempted not to move or touch anything.
2. Did you also make sure to check/modify the programmer for +3.3V logic levels from +5V?
3. I did have issues where I had to restart my Linux VM due to unknown glitches of not finding the Winbond chip. You might want to try restarting your Linux OS when/if there is a glitch.
4. Did you make sure that pins 3 and 7 are either not connected or using a 1K resistor as instructed in the "Upgrading a motherboard's BIOS/UEFI (the hard way)" link I posted previously?
It's possible that if you have done all these things and the Winbond IC is not recognized there might be more problems with the IC.
I hope this helps in your repair efforts.
|
Andrei
Re: Unbrick Synology DS918+ February 24, 2023 03:23PM |
|
Andrei
Re: Unbrick Synology DS918+ February 24, 2023 04:48PM |
|
WK
Re: Unbrick Synology DS918+ February 25, 2023 02:46PM |
Many thanks to PH3 for the excellent pointers.
Another DS918+ has been unbricked.
First I performed the 3V3 Vcc mod on the programmer, but I didn't bother with the series resistors as no in-circuit action was attempted. Instead, I unsoldered and removed the flash device for reading and flashing
The CH341 kit came with a nice SOIC socket with retractable hooks which I used to drop
the unsoldered flash device into. The SOIC socket in turn was directly seated in the 1V8 ZIF socket.
Don't use - as I initially did - a replacement W25Q128FWSSiG, which has the Quad Enable bit factory-set to 0.
This device won't work as-is in the DS918+ which, apparently, uses Quad SPI and/or QPI operation.
(Chapter 7.1.10 in the Winbond data sheet)
Also, don't be tempted to use the clothespeg clip on a loose device. It will squash the legs :-)
|
Jim Knopf
Re: Unbrick Synology DS918+ March 04, 2023 10:26AM |
Hello erverybody
I have a DS718+ bought on ebay not working.
I read the Winbond chip and noticed that its content contains the same data that is in the ROM file in the Synology *.pat file.
Has anyone the header and footer described in PH3 excelent article for a DS718+, or a complete file from a working box?
I have a DS718+ bought on ebay not working.
I read the Winbond chip and noticed that its content contains the same data that is in the ROM file in the Synology *.pat file.
Has anyone the header and footer described in PH3 excelent article for a DS718+, or a complete file from a working box?
|
Re: Unbrick Synology DS918+ March 04, 2023 10:34AM |
Registered: 2 years ago Posts: 17 |
|
Jim Knopf
Re: Unbrick Synology DS918+ March 04, 2023 11:01AM |
|
Re: Unbrick Synology DS918+ March 04, 2023 11:08AM |
Registered: 2 years ago Posts: 17 |
The complete bios file is in there - you have to cut it out from the .pat file. The .pat file has additional data before and after the region containing the bios.
You can figure out which region of the file to extract by comparing the data you read from the winbond chip with the contents of the pat file.
You can figure out which region of the file to extract by comparing the data you read from the winbond chip with the contents of the pat file.
|
Re: Unbrick Synology DS918+ March 04, 2023 11:11AM |
Registered: 2 years ago Posts: 17 |
|
Jim Knopf
Re: Unbrick Synology DS918+ March 04, 2023 12:12PM |
|
Re: Unbrick Synology DS918+ March 04, 2023 12:19PM |
Registered: 2 years ago Posts: 17 |
|
Jarugut
Re: Unbrick Synology DS918+ June 07, 2023 03:40PM |
|
Re: Unbrick Synology DS918+ June 09, 2023 04:21AM |
Registered: 10 months ago Posts: 2 |
Thank you a lot Superchromix,
I've tried with your Bios file, it's little different of mine but it's neither works in my nas. It's strange because after first try boot without luck when I've check the bios again it seems like the synology lock the winbond chip, I've need to unlock with the neoprammer software to write again the bios.
I'm starting to think that is not a bios problem, maybe this mainboard have other problems. In the source of the problem the system inform about system corruption, after reboot the nas never comes again to boot. :(
I don't know if you have some other ideas, I'm trying to get something from the serial port without luck.
