|
Zyxel NAS326 Installation Instruction August 20, 2019 05:48PM |
Admin Registered: 14 years ago Posts: 19,720 |
Zyxel NAS326 Installation for rootfs Debian-5.2.9-mvebu-tld-1-rootfs-bodhi.tar.bz2
Updated 08 Jul 2020
Credit
Thanks cyraxxx for testing this new installation instruction.
Installation Instruction
Installation for NAS326 box can be done with serial console connected (section A), or inside stock OS and without serial console (section B for USB rootfs, section C for SATA rootfs). Note: for section A and B, the USB rootfs must be inserted to the front USB port (USB 2.0).
Prerequisite
Prepare the rootfs Debian-5.2.9-mvebu-tld-1-rootfs-bodhi.tar.bz2 on USB or HDD as described in the rootfs release thread (scroll down to section Updated 10 Sep 2019).
A. Instruction for the booting the NAS326 with a USB rootfs (serial console setup)
A1. Requirements
1. Serial console connected during set up (which should be removed later during normal operation).
2. Download either the latest ARM32 version or the x86-64 version of kwboot. Use it depending on the architecture of serial console converter host. Please see this post for ARM32 kwboot. (I'll need to recompile the x86-64 version and reupload).
3. Prepare the rootfs Debian-5.2.9-mvebu-tld-1-rootfs-bodhi.tar.bz2 as described in the Debian rootfs release section:
A2. Installation
Warning: Step 4 in the instruction in this section uses a "env/code injection" to replace the Zyxel NAS326 stock u-boot bootcmd with a different command during boot. It's a simple trick that change u-boot env bootcmd (it does not touch u-boot binary in NAND). However, this hack should not be used on a different MVEBU box (any box other than the NAS326). Doing this without examining your box's stock u-boot source code could likely messing up your u-boot envs and prevent booting, or in the worse case bricking it. Please post questions regarding installation for other MVEBU boxes, it might be possible to do this.
1. Start kwboot on the serial console host
For ARM32 kwboot:
For x86-64 kwboot:
2. Power up the NAS326, and wait at serial console, observe kwboot spinning / while waiting for handshake.
3. After a period of time, the NAS326 will time out and start booting its stock u-boot. Interrupt u-boot at countdown. Get a listing of your current u-boot envs, and save it to a notepad in case you want to restore it later.
4. Enter the following commands (copy/paste each line to the u-boot prompt).
5. Reset the NAS326, exit kwboot.
6. Start kwboot again on the serial console host (use the same command as in step 1)
7. After a period of time, the NAS326 will time out and start booting its stock u-boot. Observe kernel loading and booting until seeing the Debian prompt. At this point we can either login directly with serial console, or by SHH. If login is through SSH, find the NAS:
When the ping returns successful response, then login (root password is root);
If for whatever reason (e.g. firewall), the NAS326 cannot be found as debian.local, then find its IP in the router webpage. Or use a scanning app such as Linux nmap or IOS Fing to find the IP.
8. DONE.
A3. Normal Operation
The USB rootfs should be plugged in permanently, and the serial console module should be removed.
1. Whenever the NAS326 is rebooted or cold started, to boot without manual intervention, the serial console module must be unplugged from the NAS326. If the serial console module is plugged in, then step 1 in the installation instruction A2 must be executed (so that the NAS326 will continue booting when it detected the serial console present). Note that reboot in some instance will work with serial console plugged in.
2. If you want to boot back to stock OS in NAND, just shutdown the box, unplug the USB and power up the box. It will boot the kernel 1 in NAND and then if not successful, it will try kernel 2.
This also serves as a rescue system. Whenever the rootfs on USB has problem and cannot boot (the effect is just like the USB drive is not plugged in), the NAS326 will fall back to booting the kernel 1 or 2 in NAND. When this occurs, the u-boot envs in step 4 must be reentered at serial console again to allow booting back to USB rootfs.
3. Setup WOL and Auto Resume
For WOL, see this post.
For Auto Resume and other i2c commands, see this post.
A4. Reverse to stock OS permanently
To reverse the setup, and boot back to stock NAND kernel permanently, execute the following instructions at serial console:
B. Instruction for booting the NAS326 with a USB rootfs (setup without serial console)
B1. Deprecated
B2. Installation
Warning: Step 4 in the instruction in this section uses a "env/code injection" to replace the Zyxel NAS326 stock u-boot bootcmd with a different command during boot. It's a simple trick that change u-boot env bootcmd (it does not touch u-boot binary in NAND). However, this hack should not be used on a different MVEBU box (any box other than the NAS326). Doing this without examining your box's stock u-boot source code could likely messing up your u-boot envs and prevent booting, or in the worse case bricking it. Please post questions regarding installation for other MVEBU boxes, it might be possible to do this.
1. Gain SSH to the NAS326 box.
Use the Zyxel NAS326 instruction (came with the box) for logging as admin user through the web page of the box, set password, and Enable SSH.
2. Open a termimal and connect to the NAS326 with SSH, and login to the box as root user.
3. After logging in, get a listing of your current u-boot envs, and save it to a notepad in case you want to restore it later.
4. Enter the following commands (copy/paste each line to the stock OS command line).
And then list the u-boot envs again, and save it to a notepad in case there is problem with booting and it needs to be referenced.
5. Plug in the USB rootfs Debian-5.2.9-mvebu-tld-1-rootfs-bodhi.tar.bz2, and reboot
6. Deprecated.
7. After a period of time, the NAS326 will start rebooting. Wait for about 30 seconds and login through SSH.
To find the NAS:
When the ping returns successful response, then login (root password is root);
If for whatever reason (e.g. firewall), the NAS326 cannot be found as debian.local, then find its IP in the router webpage. Or use a scanning app such as Linux nmap or IOS Fing to find the IP.
8. DONE.
B3. Normal Operation
The USB rootfs should be plugged in permanently, and if there is serial console module attached before then it should be removed during booting.
1. Whenever the NAS326 is rebooted or cold started, to boot without manual intervention, the serial console module must be unplugged from the NAS326. If the serial console module is plugged in, then step 1 in the Section A2 installation instruction must be executed (so that the NAS326 will continue booting when it detected the serial console present). Note that reboot in some instance will work with serial console plugged in.
2. If you want to boot back to stock OS in NAND, just shutdown the box, unplug the USB and power up the box. It will boot the kernel 1 in NAND and then if not successful, it will try kernel 2.
This also serves as a rescue system. Whenever the rootfs on USB has problem and cannot boot (the effect is just like the USB drive is not plugged in), the NAS326 will fall back to booting the kernel 1 or 2 in NAND. When this occurs, the u-boot envs in step 4 must be reentered at Debian command line again to allow booting back to USB rootfs.
3. Setup WOL and Auto Resume
For WOL, see this post.
For Auto Resume and other i2c commands, see this post.
B4. Reverse to stock OS permanently
To reverse the setup, and boot back to stock NAND kernel permanently, execute the following instructions at the Debian command line:
C. Instruction for booting the NAS326 with rootfs on internal HDD (setup without serial console)
C1. Deprecated
C2. Installation
Warning: Step 4 in the instruction in this section uses a "env/code injection" to replace the Zyxel NAS326 stock u-boot bootcmd with a different command during boot. It's a simple trick that change u-boot env bootcmd (it does not touch u-boot binary in NAND). However, this hack should not be used on a different MVEBU box (any box other than the NAS326). Doing this without examining your box's stock u-boot source code could likely messing up your u-boot envs and prevent booting, or in the worse case bricking it. Please post questions regarding installation for other MVEBU boxes, it might be possible to do this.
1. Gain SSH to the NAS326 box.
Use the Zyxel NAS326 instruction (came with the box) for logging as admin user through the web page of the box, set password, and Enable SSH.
2. Open a termimal and connect to the NAS326 with SSH, and login to the box as root user.
3. After logging in, get a listing of your current u-boot envs, and save it to a notepad in case you want to restore it later.
4. Enter the following commands (copy/paste each line to the stock OS command line).
And then list the u-boot envs again, and save it to a notepad in case there is problem with booting and it needs to be referenced.
5. Insert the HDD with rootfs Debian-5.2.9-mvebu-tld-1-rootfs-bodhi.tar.bz2. If the HDD is not already inside the box during installation then shutdown this NAS326, insert the HDD and power up, else go ahead and reboot:
6. Deprecated.
7. After a period of time, the NAS326 will start rebooting. Wait for about 30 seconds and login through SSH.
To find the NAS:
When the ping returns successful response, then login (root password is root);
If for whatever reason (e.g. firewall), the NAS326 cannot be found as debian.local, then find its IP in the router webpage. Or use a scanning app such as Linux nmap or IOS Fing to find the IP.
8. DONE.
C3. Normal Operation
The HDD rootfs should be plugged in permanently, and if there is serial console module attached before then it should be removed during booting.
1. Whenever the NAS326 is rebooted or cold started, to boot without manual intervention, the serial console module must be unplugged from the NAS326. If the serial console module is plugged in, then step 1 in the Section A2 installation instruction must be executed (so that the NAS326 will continue booting when it detected the serial console present). Note that reboot in some instance will work with serial console plugged in.
2. If you want to boot back to stock OS in NAND, just shutdown the box, remove the HDD rootfs and power up the box. It will boot the kernel 1 in NAND and then if not successful, it will try kernel 2.
This also serves as a rescue system. Whenever the rootfs on HDD has problem and cannot boot (the effect is just like the HDD drive is not plugged in), the NAS326 will fall back to booting the kernel 1 or 2 in NAND. When this occurs, the u-boot envs in step 4 must be reentered at Debian command line again to allow booting back to HDD rootfs.
3. Setup WOL and Auto Resume
For WOL, see this post.
For Auto Resume and other i2c commands, see this post.
C4. Reverse to stock OS permanently
To reverse the setup, and boot back to stock NAND kernel permanently, execute the following instructions at the Debian command line:
D. Notes
D.1. HDD rootfs quirks
For HHD booting issues after your installation, see this thread.
D.2. NAS326 Serial console pinouts
D.3. NAS326 Serial console header Pic
The Zyxel NAS326 and the NSA325 serial header pinouts and locations are identical on these boards. I've attached the NSA2325 board pic to this post here to show the header location.
Also see the NAS326 board pic here.
=========== Old Installation Instruction, kept for posterity ============
Zyxel NAS326 Installation
Updated 23 Jan 2020
Updated 20 Aug 2019
For 1st time installation, please use the instruction below to install using Debian-4.9.0-mvebu-tld-12-rootfs-bodhi.tar.bz2 rootfs. And then upgrade the kernel to the latest version (see Section E at the end of the instruction).
Installation Instruction
Installation for NAS326 box can be done with serial console connected (section A), or inside stock OS and without serial console (section B for USB rootfs, section C for SATA rootfs). Note: for section A and B, the USB rootfs must be inserted to the front USB port (USB 2.0).
A. Instruction for the booting the NAS326 with a USB rootfs (serial console setup)
A1. Requirements
1. Serial console connected during set up (which should be removed later during normal operation).
2. Download either the latest ARM32 version or the x86-64 version of kwboot. Use it depending on the architecture of serial console converter host. Please see this post for ARM32 kwboot. (I'll need to recompile the x86-64 version and reupload).
3. Prepare the rootfs Debian-4.9.0-mvebu-tld-12-rootfs-bodhi.tar.bz2 as described in the Debian rootfs release section:
A2. Installation
Warning: Step 4 in the instruction in this section uses a "env/code injection" to replace the Zyxel NAS326 stock u-boot bootcmd with a different command during boot. It's a simple trick that change u-boot env bootcmd (it does not touch u-boot binary in NAND). However, this hack should not be used on a different MVEBU box (any box other than the NAS326). Doing this without examining your box's stock u-boot source code could likely messing up your u-boot envs and prevent booting, or in the worse case bricking it. Please post questions regarding installation for other MVEBU boxes, it might be possible to do this.
1. Start kwboot on the serial console host
For ARM32 kwboot:
For x86-64 kwboot:
2. Power up the NAS326, and wait at serial console, observe kwboot spinning / while waiting for handshake.
3. After a period of time, the NAS326 will time out and start booting its stock u-boot. Interrupt u-boot at countdown. Get a listing of your current u-boot envs, and save it to a notepad in case you want to restore it later.
4. Enter the following commands (copy/paste each line to the u-boot prompt).
5. Reset the NAS326, exit kwboot.
6. Start kwboot again on the serial console host (use the same command as in step 1)
7. After a period of time, the NAS326 will time out and start booting its stock u-boot. Observe kernel loading and booting until seeing the Debian prompt. At this point we can either login directly with serial console, or by SHH. If login is through SSH, find the NAS:
When the ping returns successful response, then login (root password is root);
If for whatever reason (e.g. firewall), the NAS326 cannot be found as debian.local, then find its IP in the router webpage. Or use a scanning app such as Linux nmap or IOS Fing to find the IP.
8. DONE.
A3. Normal Operation
The USB rootfs should be plugged in permanently, and the serial console module should be removed.
1. Whenever the NAS326 is rebooted or cold started, to boot without manual intervention, the serial console module must be unplugged from the NAS326. If the serial console module is plugged in, then step 1 in the installation instruction A2 must be executed (so that the NAS326 will continue booting when it detected the serial console present). Note that reboot in some instance will work with serial console plugged in.
2. If you want to boot back to stock OS in NAND, just shutdown the box, unplug the USB and power up the box. It will boot the kernel 1 in NAND and then if not successful, it will try kernel 2.
This also serves as a rescue system. Whenever the rootfs on USB has problem and cannot boot (the effect is just like the USB drive is not plugged in), the NAS326 will fall back to booting the kernel 1 or 2 in NAND. When this occurs, the u-boot envs in step 4 must be reentered at serial console again to allow booting back to USB rootfs.
3. Setup WOL.
Add this line to your /etc/rc.local
For more info about WOL, see this post
A4. Reverse to stock OS permanently
To reverse the setup, and boot back to stock NAND kernel permanently, execute the following instructions at serial console:
B. Instruction for booting the NAS326 with a USB rootfs (setup without serial console)
B1. Requirements
1. Prepare the rootfs Debian-4.9.0-mvebu-tld-12-rootfs-bodhi.tar.bz2 as described in Debian rootfs release section:
B2. Installation
Warning: Step 4 in the instruction in this section uses a "env/code injection" to replace the Zyxel NAS326 stock u-boot bootcmd with a different command during boot. It's a simple trick that change u-boot env bootcmd (it does not touch u-boot binary in NAND). However, this hack should not be used on a different MVEBU box (any box other than the NAS326). Doing this without examining your box's stock u-boot source code could likely messing up your u-boot envs and prevent booting, or in the worse case bricking it. Please post questions regarding installation for other MVEBU boxes, it might be possible to do this.
1. Gain SSH to the NAS326 box.
Use the Zyxel NAS326 instruction (came with the box) for logging as admin user through the web page of the box, set password, and Enable SSH.
2. Open a termimal and connect to the NAS326 with SSH, and login to the box as root user.
3. After logging in, get a listing of your current u-boot envs, and save it to a notepad in case you want to restore it later.
4. Enter the following commands (copy/paste each line to the stock OS command line).
And then list the u-boot envs again, and save it to a notepad in case there is problem with booting and it needs to be referenced.
5. Plug in the USB rootfs Debian-4.9.0-mvebu-tld-12-rootfs-bodhi.tar.bz2, and reboot
7. After a period of time, the NAS326 will start rebooting. Wait for about 30 seconds and login through SSH.
To find the NAS:
When the ping returns successful response, then login (root password is root);
If for whatever reason (e.g. firewall), the NAS326 cannot be found as debian.local, then find its IP in the router webpage. Or use a scanning app such as Linux nmap or IOS Fing to find the IP.
8. DONE.
B3. Normal Operation
The USB rootfs should be plugged in permanently, and if there is serial console module attached before then it should be removed during booting.
1. Whenever the NAS326 is rebooted or cold started, to boot without manual intervention, the serial console module must be unplugged from the NAS326. If the serial console module is plugged in, then step 1 in the Section A2 installation instruction must be executed (so that the NAS326 will continue booting when it detected the serial console present). Note that reboot in some instance will work with serial console plugged in.
2. If you want to boot back to stock OS in NAND, just shutdown the box, unplug the USB and power up the box. It will boot the kernel 1 in NAND and then if not successful, it will try kernel 2.
This also serves as a rescue system. Whenever the rootfs on USB has problem and cannot boot (the effect is just like the USB drive is not plugged in), the NAS326 will fall back to booting the kernel 1 or 2 in NAND. When this occurs, the u-boot envs in step 4 must be reentered at Debian command line again to allow booting back to USB rootfs.
3. Setup WOL.
Add this line to your /etc/rc.local
For more info about WOL, see this post
B4. Reverse to stock OS permanently
To reverse the setup, and boot back to stock NAND kernel permanently, execute the following instructions at the Debian command line:
C. Instruction for booting the NAS326 with rootfs on internal HDD (setup without serial console)
C1. Requirements
1. Prepare the rootfs Debian-4.9.0-mvebu-tld-12-rootfs-bodhi.tar.bz2, using one of the internal HDD, as described in Debian rootfs release section:
C2. Installation
Warning: Step 4 in the instruction in this section uses a "env/code injection" to replace the Zyxel NAS326 stock u-boot bootcmd with a different command during boot. It's a simple trick that change u-boot env bootcmd (it does not touch u-boot binary in NAND). However, this hack should not be used on a different MVEBU box (any box other than the NAS326). Doing this without examining your box's stock u-boot source code could likely messing up your u-boot envs and prevent booting, or in the worse case bricking it. Please post questions regarding installation for other MVEBU boxes, it might be possible to do this.
1. Gain SSH to the NAS326 box.
Use the Zyxel NAS326 instruction (came with the box) for logging as admin user through the web page of the box, set password, and Enable SSH.
2. Open a termimal and connect to the NAS326 with SSH, and login to the box as root user.
3. After logging in, get a listing of your current u-boot envs, and save it to a notepad in case you want to restore it later.
4. Enter the following commands (copy/paste each line to the stock OS command line).
And then list the u-boot envs again, and save it to a notepad in case there is problem with booting and it needs to be referenced.
5. Insert the HDD with rootfs Debian-4.9.0-mvebu-tld-12-rootfs-bodhi.tar.bz2, if not already inside the box, and reboot
7. After a period of time, the NAS326 will start rebooting. Wait for about 30 seconds and login through SSH.
To find the NAS:
When the ping returns successful response, then login (root password is root);
If for whatever reason (e.g. firewall), the NAS326 cannot be found as debian.local, then find its IP in the router webpage. Or use a scanning app such as Linux nmap or IOS Fing to find the IP.
8. DONE.
C3. Normal Operation
The HDD rootfs should be plugged in permanently, and if there is serial console module attached before then it should be removed during booting.
1. Whenever the NAS326 is rebooted or cold started, to boot without manual intervention, the serial console module must be unplugged from the NAS326. If the serial console module is plugged in, then step 1 in the Section A2 installation instruction must be executed (so that the NAS326 will continue booting when it detected the serial console present). Note that reboot in some instance will work with serial console plugged in.
2. If you want to boot back to stock OS in NAND, just shutdown the box, remove the HDD rootfs and power up the box. It will boot the kernel 1 in NAND and then if not successful, it will try kernel 2.
This also serves as a rescue system. Whenever the rootfs on HDD has problem and cannot boot (the effect is just like the HDD drive is not plugged in), the NAS326 will fall back to booting the kernel 1 or 2 in NAND. When this occurs, the u-boot envs in step 4 must be reentered at Debian command line again to allow booting back to HDD rootfs.
3. Setup WOL.
Add this line to your /etc/rc.local
For more info about WOL, see this post
C4. Reverse to stock OS permanently
To reverse the setup, and boot back to stock NAND kernel permanently, execute the following instructions at the Debian command line:
D. Notes
D.1. HDD rootfs quirks
For HHD booting issues after your installation, see this thread.
D.2. NAS326 Serial console pinouts
D.3. NAS326 Serial console header Pic
The Zyxel NAS326 and the NSA325 serial header pinouts and locations are identical on these boards. I've attached the NSA2325 board pic to this post here to show the header location.
Also see NAS326 board pic here.
E. Instruction for kernel upgrade after installation
Starting kernel version 5.2.9-mvebu-tld-1, we need to boot with uImage. So please follow a special upgrade instruction here to upgrade the kernel from 4.9.0-mvebu-tld-12 to the latest:
https://forum.doozan.com/read.php?2,88619,94989#msg-94989
-bodhi
===========================
Forum Wiki
bodhi's corner (buy bodhi a beer)
Edited 15 time(s). Last edit at 01/07/2025 09:41PM by bodhi.
Updated 08 Jul 2020
Credit
Thanks cyraxxx for testing this new installation instruction.
Installation Instruction
Installation for NAS326 box can be done with serial console connected (section A), or inside stock OS and without serial console (section B for USB rootfs, section C for SATA rootfs). Note: for section A and B, the USB rootfs must be inserted to the front USB port (USB 2.0).
Prerequisite
Prepare the rootfs Debian-5.2.9-mvebu-tld-1-rootfs-bodhi.tar.bz2 on USB or HDD as described in the rootfs release thread (scroll down to section Updated 10 Sep 2019).
A. Instruction for the booting the NAS326 with a USB rootfs (serial console setup)
A1. Requirements
1. Serial console connected during set up (which should be removed later during normal operation).
2. Download either the latest ARM32 version or the x86-64 version of kwboot. Use it depending on the architecture of serial console converter host. Please see this post for ARM32 kwboot. (I'll need to recompile the x86-64 version and reupload).
3. Prepare the rootfs Debian-5.2.9-mvebu-tld-1-rootfs-bodhi.tar.bz2 as described in the Debian rootfs release section:
Quote
Updated 04 Feb 2017:
This Debian-5.2.9-mvebu-tld-1-rootfs-bodhi.tar.bz2 has been uploaded.
A2. Installation
Warning: Step 4 in the instruction in this section uses a "env/code injection" to replace the Zyxel NAS326 stock u-boot bootcmd with a different command during boot. It's a simple trick that change u-boot env bootcmd (it does not touch u-boot binary in NAND). However, this hack should not be used on a different MVEBU box (any box other than the NAS326). Doing this without examining your box's stock u-boot source code could likely messing up your u-boot envs and prevent booting, or in the worse case bricking it. Please post questions regarding installation for other MVEBU boxes, it might be possible to do this.
1. Start kwboot on the serial console host
For ARM32 kwboot:
./kwboot -t -B 115200 /dev/ttyUSB0 -d
For x86-64 kwboot:
./kwboot -t -B 115200 /dev/ttyUSB0
2. Power up the NAS326, and wait at serial console, observe kwboot spinning / while waiting for handshake.
3. After a period of time, the NAS326 will time out and start booting its stock u-boot. Interrupt u-boot at countdown. Get a listing of your current u-boot envs, and save it to a notepad in case you want to restore it later.
printenv
4. Enter the following commands (copy/paste each line to the u-boot prompt).
setenv curr_bootfrom 1
setenv next_bootfrom 1
setenv load_initrd_addr 0x2900000
setenv load_image_addr 0x02000000
setenv usb_init 'mw.l f1018100 20420000; mw.l f1018140 003E8800; sleep 3; usb start'
setenv set_bootargs_stock 'setenv bootargs "console=ttyS0,115200 ubi.mtd=4,2048 rootfstype=ubifs root=ubi0:rootfs1 rw rootdelay=2"'
setenv bootcmd_stock_1 'run set_bootargs_stock; echo Booting from NAND kernel 1 ...; nand read 0x2000000 0x00E00000 0xF00000 && bootz 0x2000000'
setenv bootcmd_stock_2 'run set_bootargs_stock; echo Booting from NAND kernel 2 ...; nand read 0x2000000 0x08700000 0xF00000 && bootz 0x2000000'
setenv usb_set_bootargs 'setenv bootargs "console=ttyS0,115200 root=LABEL=rootfs rootdelay=10 $mtdparts earlyprintk=serial"'
setenv usb_bootcmd 'echo Booting from USB ...; setenv fdt_skip_update yes; run usb_init; ext2load usb 0:1 $load_image_addr /boot/uImage; ext2load usb 0:1 $load_initrd_addr /boot/uInitrd; run usb_set_bootargs; bootm $load_image_addr $load_initrd_addr'
setenv bootcmd_custom 'if run usb_bootcmd; then; else if run bootcmd_stock_1; then; else run bootcmd_stock_2; reset; fi; fi'
setenv kernel_addr_1 '0x00000000; run bootcmd_custom; '
saveenv
5. Reset the NAS326, exit kwboot.
resetAnd then press "Control \ c" to exit kwboot
6. Start kwboot again on the serial console host (use the same command as in step 1)
7. After a period of time, the NAS326 will time out and start booting its stock u-boot. Observe kernel loading and booting until seeing the Debian prompt. At this point we can either login directly with serial console, or by SHH. If login is through SSH, find the NAS:
ping debian.local
When the ping returns successful response, then login (root password is root);
ssh root@debian.local
If for whatever reason (e.g. firewall), the NAS326 cannot be found as debian.local, then find its IP in the router webpage. Or use a scanning app such as Linux nmap or IOS Fing to find the IP.
8. DONE.
A3. Normal Operation
The USB rootfs should be plugged in permanently, and the serial console module should be removed.
1. Whenever the NAS326 is rebooted or cold started, to boot without manual intervention, the serial console module must be unplugged from the NAS326. If the serial console module is plugged in, then step 1 in the installation instruction A2 must be executed (so that the NAS326 will continue booting when it detected the serial console present). Note that reboot in some instance will work with serial console plugged in.
2. If you want to boot back to stock OS in NAND, just shutdown the box, unplug the USB and power up the box. It will boot the kernel 1 in NAND and then if not successful, it will try kernel 2.
This also serves as a rescue system. Whenever the rootfs on USB has problem and cannot boot (the effect is just like the USB drive is not plugged in), the NAS326 will fall back to booting the kernel 1 or 2 in NAND. When this occurs, the u-boot envs in step 4 must be reentered at serial console again to allow booting back to USB rootfs.
3. Setup WOL and Auto Resume
For WOL, see this post.
For Auto Resume and other i2c commands, see this post.
A4. Reverse to stock OS permanently
To reverse the setup, and boot back to stock NAND kernel permanently, execute the following instructions at serial console:
setenv kernel_addr_1 0x00E00000
setenv bootargs 'console=ttyS0,115200 ubi.mtd=4,2048 rootfstype=ubifs root=ubi0:rootfs1 rw rootdelay=2'
saveenv
boot
B. Instruction for booting the NAS326 with a USB rootfs (setup without serial console)
B1. Deprecated
B2. Installation
Warning: Step 4 in the instruction in this section uses a "env/code injection" to replace the Zyxel NAS326 stock u-boot bootcmd with a different command during boot. It's a simple trick that change u-boot env bootcmd (it does not touch u-boot binary in NAND). However, this hack should not be used on a different MVEBU box (any box other than the NAS326). Doing this without examining your box's stock u-boot source code could likely messing up your u-boot envs and prevent booting, or in the worse case bricking it. Please post questions regarding installation for other MVEBU boxes, it might be possible to do this.
1. Gain SSH to the NAS326 box.
Use the Zyxel NAS326 instruction (came with the box) for logging as admin user through the web page of the box, set password, and Enable SSH.
2. Open a termimal and connect to the NAS326 with SSH, and login to the box as root user.
3. After logging in, get a listing of your current u-boot envs, and save it to a notepad in case you want to restore it later.
fw_printenv
4. Enter the following commands (copy/paste each line to the stock OS command line).
fw_setenv curr_bootfrom 1
fw_setenv next_bootfrom 1
fw_setenv load_initrd_addr 0x2900000
fw_setenv load_image_addr 0x02000000
fw_setenv usb_init 'mw.l f1018100 20420000; mw.l f1018140 003E8800; sleep 3; usb start'
fw_setenv set_bootargs_stock 'setenv bootargs "console=ttyS0,115200 ubi.mtd=4,2048 rootfstype=ubifs root=ubi0:rootfs1 rw rootdelay=2"'
fw_setenv bootcmd_stock_1 'run set_bootargs_stock; echo Booting from NAND kernel 1 ...; nand read 0x2000000 0x00E00000 0xF00000 && bootz 0x2000000'
fw_setenv bootcmd_stock_2 'run set_bootargs_stock; echo Booting from NAND kernel 2 ...; nand read 0x2000000 0x08700000 0xF00000 && bootz 0x2000000'
fw_setenv usb_set_bootargs 'setenv bootargs "console=ttyS0,115200 root=LABEL=rootfs rootdelay=10 $mtdparts earlyprintk=serial"'
fw_setenv usb_bootcmd 'echo Booting from USB ...; setenv fdt_skip_update yes; run usb_init; ext2load usb 0:1 $load_image_addr /boot/uImage; ext2load usb 0:1 $load_initrd_addr /boot/uInitrd; run usb_set_bootargs; bootm $load_image_addr $load_initrd_addr'
fw_setenv bootcmd_custom 'if run usb_bootcmd; then; else if run bootcmd_stock_1; then; else run bootcmd_stock_2; reset; fi; fi'
fw_setenv kernel_addr_1 '0x00000000; run bootcmd_custom; '
fw_setenv change_boot_part 1
And then list the u-boot envs again, and save it to a notepad in case there is problem with booting and it needs to be referenced.
fw_printenv
5. Plug in the USB rootfs Debian-5.2.9-mvebu-tld-1-rootfs-bodhi.tar.bz2, and reboot
sync
sync
/sbin/reboot
6. Deprecated.
7. After a period of time, the NAS326 will start rebooting. Wait for about 30 seconds and login through SSH.
To find the NAS:
ping debian.local
When the ping returns successful response, then login (root password is root);
ssh root@debian.local
If for whatever reason (e.g. firewall), the NAS326 cannot be found as debian.local, then find its IP in the router webpage. Or use a scanning app such as Linux nmap or IOS Fing to find the IP.
8. DONE.
B3. Normal Operation
The USB rootfs should be plugged in permanently, and if there is serial console module attached before then it should be removed during booting.
1. Whenever the NAS326 is rebooted or cold started, to boot without manual intervention, the serial console module must be unplugged from the NAS326. If the serial console module is plugged in, then step 1 in the Section A2 installation instruction must be executed (so that the NAS326 will continue booting when it detected the serial console present). Note that reboot in some instance will work with serial console plugged in.
2. If you want to boot back to stock OS in NAND, just shutdown the box, unplug the USB and power up the box. It will boot the kernel 1 in NAND and then if not successful, it will try kernel 2.
This also serves as a rescue system. Whenever the rootfs on USB has problem and cannot boot (the effect is just like the USB drive is not plugged in), the NAS326 will fall back to booting the kernel 1 or 2 in NAND. When this occurs, the u-boot envs in step 4 must be reentered at Debian command line again to allow booting back to USB rootfs.
3. Setup WOL and Auto Resume
For WOL, see this post.
For Auto Resume and other i2c commands, see this post.
B4. Reverse to stock OS permanently
To reverse the setup, and boot back to stock NAND kernel permanently, execute the following instructions at the Debian command line:
fw_setenv kernel_addr_1 0x00E00000
fw_setenv bootargs 'console=ttyS0,115200 ubi.mtd=4,2048 rootfstype=ubifs root=ubi0:rootfs1 rw rootdelay=2'
and then reboot
sync
shutdown -r now
C. Instruction for booting the NAS326 with rootfs on internal HDD (setup without serial console)
C1. Deprecated
C2. Installation
Warning: Step 4 in the instruction in this section uses a "env/code injection" to replace the Zyxel NAS326 stock u-boot bootcmd with a different command during boot. It's a simple trick that change u-boot env bootcmd (it does not touch u-boot binary in NAND). However, this hack should not be used on a different MVEBU box (any box other than the NAS326). Doing this without examining your box's stock u-boot source code could likely messing up your u-boot envs and prevent booting, or in the worse case bricking it. Please post questions regarding installation for other MVEBU boxes, it might be possible to do this.
1. Gain SSH to the NAS326 box.
Use the Zyxel NAS326 instruction (came with the box) for logging as admin user through the web page of the box, set password, and Enable SSH.
2. Open a termimal and connect to the NAS326 with SSH, and login to the box as root user.
3. After logging in, get a listing of your current u-boot envs, and save it to a notepad in case you want to restore it later.
fw_printenv
4. Enter the following commands (copy/paste each line to the stock OS command line).
fw_setenv curr_bootfrom 1
fw_setenv next_bootfrom 1
fw_setenv load_initrd_addr 0x2900000
fw_setenv load_image_addr 0x02000000
fw_setenv set_bootargs_stock 'setenv bootargs "console=ttyS0,115200 ubi.mtd=4,2048 rootfstype=ubifs root=ubi0:rootfs1 rw rootdelay=2"'
fw_setenv bootcmd_stock_1 'run set_bootargs_stock; echo Booting from NAND kernel 1 ...; nand read 0x2000000 0x00E00000 0xF00000 && bootz 0x2000000'
fw_setenv bootcmd_stock_2 'run set_bootargs_stock; echo Booting from NAND kernel 2 ...; nand read 0x2000000 0x08700000 0xF00000 && bootz 0x2000000'
fw_setenv sata_init 'mw.l f1018100 20420000; mw.l f1018140 003ca800; sleep 3; scsi init'
fw_setenv sata_bootcmd 'echo Booting from SATA ...; setenv fdt_skip_update yes; run sata_init; ext2load scsi 0:1 $load_image_addr /boot/uImage; ext2load scsi 0:1 $load_initrd_addr /boot/uInitrd; run sata_set_bootargs; bootm $load_image_addr $load_initrd_addr'
fw_setenv sata_set_bootargs 'setenv bootargs "console=ttyS0,115200 root=LABEL=rootfs rootdelay=10 $mtdparts earlyprintk=serial"'
fw_setenv bootcmd_custom_sata 'if run sata_bootcmd; then; else if run bootcmd_stock_1; then; else run bootcmd_stock_2; reset; fi; fi'
fw_setenv bootcmd_custom 'run bootcmd_custom_sata'
fw_setenv kernel_addr_1 '0x00000000; run bootcmd_custom; '
And then list the u-boot envs again, and save it to a notepad in case there is problem with booting and it needs to be referenced.
fw_printenv
5. Insert the HDD with rootfs Debian-5.2.9-mvebu-tld-1-rootfs-bodhi.tar.bz2. If the HDD is not already inside the box during installation then shutdown this NAS326, insert the HDD and power up, else go ahead and reboot:
sync
sync
/sbin/reboot
6. Deprecated.
7. After a period of time, the NAS326 will start rebooting. Wait for about 30 seconds and login through SSH.
To find the NAS:
ping debian.local
When the ping returns successful response, then login (root password is root);
ssh root@debian.local
If for whatever reason (e.g. firewall), the NAS326 cannot be found as debian.local, then find its IP in the router webpage. Or use a scanning app such as Linux nmap or IOS Fing to find the IP.
8. DONE.
C3. Normal Operation
The HDD rootfs should be plugged in permanently, and if there is serial console module attached before then it should be removed during booting.
1. Whenever the NAS326 is rebooted or cold started, to boot without manual intervention, the serial console module must be unplugged from the NAS326. If the serial console module is plugged in, then step 1 in the Section A2 installation instruction must be executed (so that the NAS326 will continue booting when it detected the serial console present). Note that reboot in some instance will work with serial console plugged in.
2. If you want to boot back to stock OS in NAND, just shutdown the box, remove the HDD rootfs and power up the box. It will boot the kernel 1 in NAND and then if not successful, it will try kernel 2.
This also serves as a rescue system. Whenever the rootfs on HDD has problem and cannot boot (the effect is just like the HDD drive is not plugged in), the NAS326 will fall back to booting the kernel 1 or 2 in NAND. When this occurs, the u-boot envs in step 4 must be reentered at Debian command line again to allow booting back to HDD rootfs.
3. Setup WOL and Auto Resume
For WOL, see this post.
For Auto Resume and other i2c commands, see this post.
C4. Reverse to stock OS permanently
To reverse the setup, and boot back to stock NAND kernel permanently, execute the following instructions at the Debian command line:
fw_setenv kernel_addr_1 0x00E00000
fw_setenv bootargs 'console=ttyS0,115200 ubi.mtd=4,2048 rootfstype=ubifs root=ubi0:rootfs1 rw rootdelay=2'
and then reboot
sync
shutdown -r now
D. Notes
D.1. HDD rootfs quirks
For HHD booting issues after your installation, see this thread.
D.2. NAS326 Serial console pinouts
          +----+----+
          |    |    |
+----+----+----+----+----+
|3.3V| TX | RX |    | GND|
+----+----+----+    +----+
D.3. NAS326 Serial console header Pic
The Zyxel NAS326 and the NSA325 serial header pinouts and locations are identical on these boards. I've attached the NSA2325 board pic to this post here to show the header location.
Also see the NAS326 board pic here.
=========== Old Installation Instruction, kept for posterity ============
Zyxel NAS326 Installation
Updated 23 Jan 2020
Updated 20 Aug 2019
For 1st time installation, please use the instruction below to install using Debian-4.9.0-mvebu-tld-12-rootfs-bodhi.tar.bz2 rootfs. And then upgrade the kernel to the latest version (see Section E at the end of the instruction).
Installation Instruction
Installation for NAS326 box can be done with serial console connected (section A), or inside stock OS and without serial console (section B for USB rootfs, section C for SATA rootfs). Note: for section A and B, the USB rootfs must be inserted to the front USB port (USB 2.0).
A. Instruction for the booting the NAS326 with a USB rootfs (serial console setup)
A1. Requirements
1. Serial console connected during set up (which should be removed later during normal operation).
2. Download either the latest ARM32 version or the x86-64 version of kwboot. Use it depending on the architecture of serial console converter host. Please see this post for ARM32 kwboot. (I'll need to recompile the x86-64 version and reupload).
3. Prepare the rootfs Debian-4.9.0-mvebu-tld-12-rootfs-bodhi.tar.bz2 as described in the Debian rootfs release section:
Quote
Updated 04 Feb 2017:
This Debian-4.9.0-mvebu-tld-12-rootfs-bodhi.tar.bz2 has been uploaded.
A2. Installation
Warning: Step 4 in the instruction in this section uses a "env/code injection" to replace the Zyxel NAS326 stock u-boot bootcmd with a different command during boot. It's a simple trick that change u-boot env bootcmd (it does not touch u-boot binary in NAND). However, this hack should not be used on a different MVEBU box (any box other than the NAS326). Doing this without examining your box's stock u-boot source code could likely messing up your u-boot envs and prevent booting, or in the worse case bricking it. Please post questions regarding installation for other MVEBU boxes, it might be possible to do this.
1. Start kwboot on the serial console host
For ARM32 kwboot:
./kwboot -t -B 115200 /dev/ttyUSB0 -d
For x86-64 kwboot:
./kwboot -t -B 115200 /dev/ttyUSB0
2. Power up the NAS326, and wait at serial console, observe kwboot spinning / while waiting for handshake.
3. After a period of time, the NAS326 will time out and start booting its stock u-boot. Interrupt u-boot at countdown. Get a listing of your current u-boot envs, and save it to a notepad in case you want to restore it later.
printenv
4. Enter the following commands (copy/paste each line to the u-boot prompt).
setenv curr_bootfrom 1
setenv next_bootfrom 1
setenv load_dtb_addr 0x1000000
setenv load_initrd_addr 0x2900000
setenv load_image_addr 0x02000000
setenv usb_init 'mw.l f1018100 20420000; mw.l f1018140 003E8800; sleep 3; usb start'
setenv set_bootargs_stock 'setenv bootargs "console=ttyS0,115200 ubi.mtd=4,2048 rootfstype=ubifs root=ubi0:rootfs1 rw rootdelay=2"'
setenv bootcmd_stock_1 'run set_bootargs_stock; echo Booting from NAND kernel 1 ...; nand read 0x2000000 0x00E00000 0xF00000 && bootz 0x2000000'
setenv bootcmd_stock_2 'run set_bootargs_stock; echo Booting from NAND kernel 2 ...; nand read 0x2000000 0x08700000 0xF00000 && bootz 0x2000000'
setenv usb_set_bootargs 'setenv bootargs "console=ttyS0,115200 root=LABEL=rootfs rootdelay=10 $mtdparts earlyprintk=serial"'
setenv usb_bootcmd 'echo Booting from USB ...; setenv fdt_skip_update yes; run usb_init; ext2load usb 0:1 $load_image_addr /boot/zImage; ext2load usb 0:1 $load_dtb_addr /boot/dts/armada-380-zyxel-nas326.dtb; ext2load usb 0:1 $load_initrd_addr /boot/uInitrd; run usb_set_bootargs; bootz $load_image_addr $load_initrd_addr $load_dtb_addr'
setenv bootcmd_custom 'if run usb_bootcmd; then; else if run bootcmd_stock_1; then; else run bootcmd_stock_2; reset; fi; fi'
setenv kernel_addr_1 '0x00000000; run bootcmd_custom; '
saveenv
5. Reset the NAS326, exit kwboot.
resetAnd then press "Control \ c" to exit kwboot
6. Start kwboot again on the serial console host (use the same command as in step 1)
7. After a period of time, the NAS326 will time out and start booting its stock u-boot. Observe kernel loading and booting until seeing the Debian prompt. At this point we can either login directly with serial console, or by SHH. If login is through SSH, find the NAS:
ping debian.local
When the ping returns successful response, then login (root password is root);
ssh root@debian.local
If for whatever reason (e.g. firewall), the NAS326 cannot be found as debian.local, then find its IP in the router webpage. Or use a scanning app such as Linux nmap or IOS Fing to find the IP.
8. DONE.
A3. Normal Operation
The USB rootfs should be plugged in permanently, and the serial console module should be removed.
1. Whenever the NAS326 is rebooted or cold started, to boot without manual intervention, the serial console module must be unplugged from the NAS326. If the serial console module is plugged in, then step 1 in the installation instruction A2 must be executed (so that the NAS326 will continue booting when it detected the serial console present). Note that reboot in some instance will work with serial console plugged in.
2. If you want to boot back to stock OS in NAND, just shutdown the box, unplug the USB and power up the box. It will boot the kernel 1 in NAND and then if not successful, it will try kernel 2.
This also serves as a rescue system. Whenever the rootfs on USB has problem and cannot boot (the effect is just like the USB drive is not plugged in), the NAS326 will fall back to booting the kernel 1 or 2 in NAND. When this occurs, the u-boot envs in step 4 must be reentered at serial console again to allow booting back to USB rootfs.
3. Setup WOL.
Add this line to your /etc/rc.local
/usr/sbin/i2cset -y 0x0 0xa 0xa 0x0006 w
For more info about WOL, see this post
A4. Reverse to stock OS permanently
To reverse the setup, and boot back to stock NAND kernel permanently, execute the following instructions at serial console:
setenv kernel_addr_1 0x00E00000
setenv bootargs 'console=ttyS0,115200 ubi.mtd=4,2048 rootfstype=ubifs root=ubi0:rootfs1 rw rootdelay=2'
saveenv
boot
B. Instruction for booting the NAS326 with a USB rootfs (setup without serial console)
B1. Requirements
1. Prepare the rootfs Debian-4.9.0-mvebu-tld-12-rootfs-bodhi.tar.bz2 as described in Debian rootfs release section:
Quote
Updated 04 Feb 2017:
This Debian-4.9.0-mvebu-tld-12-rootfs-bodhi.tar.bz2 has been uploaded.
B2. Installation
Warning: Step 4 in the instruction in this section uses a "env/code injection" to replace the Zyxel NAS326 stock u-boot bootcmd with a different command during boot. It's a simple trick that change u-boot env bootcmd (it does not touch u-boot binary in NAND). However, this hack should not be used on a different MVEBU box (any box other than the NAS326). Doing this without examining your box's stock u-boot source code could likely messing up your u-boot envs and prevent booting, or in the worse case bricking it. Please post questions regarding installation for other MVEBU boxes, it might be possible to do this.
1. Gain SSH to the NAS326 box.
Use the Zyxel NAS326 instruction (came with the box) for logging as admin user through the web page of the box, set password, and Enable SSH.
2. Open a termimal and connect to the NAS326 with SSH, and login to the box as root user.
3. After logging in, get a listing of your current u-boot envs, and save it to a notepad in case you want to restore it later.
fw_printenv
4. Enter the following commands (copy/paste each line to the stock OS command line).
fw_setenv curr_bootfrom 1
fw_setenv next_bootfrom 1
fw_setenv load_dtb_addr 0x1000000
fw_setenv load_initrd_addr 0x2900000
fw_setenv load_image_addr 0x02000000
fw_setenv usb_init 'mw.l f1018100 20420000; mw.l f1018140 003E8800; sleep 3; usb start'
fw_setenv set_bootargs_stock 'setenv bootargs "console=ttyS0,115200 ubi.mtd=4,2048 rootfstype=ubifs root=ubi0:rootfs1 rw rootdelay=2"'
fw_setenv bootcmd_stock_1 'run set_bootargs_stock; echo Booting from NAND kernel 1 ...; nand read 0x2000000 0x00E00000 0xF00000 && bootz 0x2000000'
fw_setenv bootcmd_stock_2 'run set_bootargs_stock; echo Booting from NAND kernel 2 ...; nand read 0x2000000 0x08700000 0xF00000 && bootz 0x2000000'
fw_setenv usb_set_bootargs 'setenv bootargs "console=ttyS0,115200 root=LABEL=rootfs rootdelay=10 $mtdparts earlyprintk=serial"'
fw_setenv usb_bootcmd 'echo Booting from USB ...; setenv fdt_skip_update yes; run usb_init; ext2load usb 0:1 $load_image_addr /boot/zImage; ext2load usb 0:1 $load_dtb_addr /boot/dts/armada-380-zyxel-nas326.dtb; ext2load usb 0:1 $load_initrd_addr /boot/uInitrd; run usb_set_bootargs; bootz $load_image_addr $load_initrd_addr $load_dtb_addr'
fw_setenv bootcmd_custom 'if run usb_bootcmd; then; else if run bootcmd_stock_1; then; else run bootcmd_stock_2; reset; fi; fi'
fw_setenv kernel_addr_1 '0x00000000; run bootcmd_custom; '
fw_setenv change_boot_part 1
And then list the u-boot envs again, and save it to a notepad in case there is problem with booting and it needs to be referenced.
fw_printenv
5. Plug in the USB rootfs Debian-4.9.0-mvebu-tld-12-rootfs-bodhi.tar.bz2, and reboot
sync
sync
/sbin/reboot
7. After a period of time, the NAS326 will start rebooting. Wait for about 30 seconds and login through SSH.
To find the NAS:
ping debian.local
When the ping returns successful response, then login (root password is root);
ssh root@debian.local
If for whatever reason (e.g. firewall), the NAS326 cannot be found as debian.local, then find its IP in the router webpage. Or use a scanning app such as Linux nmap or IOS Fing to find the IP.
8. DONE.
B3. Normal Operation
The USB rootfs should be plugged in permanently, and if there is serial console module attached before then it should be removed during booting.
1. Whenever the NAS326 is rebooted or cold started, to boot without manual intervention, the serial console module must be unplugged from the NAS326. If the serial console module is plugged in, then step 1 in the Section A2 installation instruction must be executed (so that the NAS326 will continue booting when it detected the serial console present). Note that reboot in some instance will work with serial console plugged in.
2. If you want to boot back to stock OS in NAND, just shutdown the box, unplug the USB and power up the box. It will boot the kernel 1 in NAND and then if not successful, it will try kernel 2.
This also serves as a rescue system. Whenever the rootfs on USB has problem and cannot boot (the effect is just like the USB drive is not plugged in), the NAS326 will fall back to booting the kernel 1 or 2 in NAND. When this occurs, the u-boot envs in step 4 must be reentered at Debian command line again to allow booting back to USB rootfs.
3. Setup WOL.
Add this line to your /etc/rc.local
/usr/sbin/i2cset -y 0x0 0xa 0xa 0x0006 w
For more info about WOL, see this post
B4. Reverse to stock OS permanently
To reverse the setup, and boot back to stock NAND kernel permanently, execute the following instructions at the Debian command line:
fw_setenv kernel_addr_1 0x00E00000
fw_setenv bootargs 'console=ttyS0,115200 ubi.mtd=4,2048 rootfstype=ubifs root=ubi0:rootfs1 rw rootdelay=2'
and then reboot
sync
shutdown -r now
C. Instruction for booting the NAS326 with rootfs on internal HDD (setup without serial console)
C1. Requirements
1. Prepare the rootfs Debian-4.9.0-mvebu-tld-12-rootfs-bodhi.tar.bz2, using one of the internal HDD, as described in Debian rootfs release section:
Quote
Updated 04 Feb 2017:
This Debian-4.9.0-mvebu-tld-12-rootfs-bodhi.tar.bz2 has been uploaded.
C2. Installation
Warning: Step 4 in the instruction in this section uses a "env/code injection" to replace the Zyxel NAS326 stock u-boot bootcmd with a different command during boot. It's a simple trick that change u-boot env bootcmd (it does not touch u-boot binary in NAND). However, this hack should not be used on a different MVEBU box (any box other than the NAS326). Doing this without examining your box's stock u-boot source code could likely messing up your u-boot envs and prevent booting, or in the worse case bricking it. Please post questions regarding installation for other MVEBU boxes, it might be possible to do this.
1. Gain SSH to the NAS326 box.
Use the Zyxel NAS326 instruction (came with the box) for logging as admin user through the web page of the box, set password, and Enable SSH.
2. Open a termimal and connect to the NAS326 with SSH, and login to the box as root user.
3. After logging in, get a listing of your current u-boot envs, and save it to a notepad in case you want to restore it later.
fw_printenv
4. Enter the following commands (copy/paste each line to the stock OS command line).
fw_setenv curr_bootfrom 1
fw_setenv next_bootfrom 1
fw_setenv load_dtb_addr 0x1000000
fw_setenv load_initrd_addr 0x2900000
fw_setenv load_image_addr 0x02000000
fw_setenv set_bootargs_stock 'setenv bootargs "console=ttyS0,115200 ubi.mtd=4,2048 rootfstype=ubifs root=ubi0:rootfs1 rw rootdelay=2"'
fw_setenv bootcmd_stock_1 'run set_bootargs_stock; echo Booting from NAND kernel 1 ...; nand read 0x2000000 0x00E00000 0xF00000 && bootz 0x2000000'
fw_setenv bootcmd_stock_2 'run set_bootargs_stock; echo Booting from NAND kernel 2 ...; nand read 0x2000000 0x08700000 0xF00000 && bootz 0x2000000'

fw_setenv sata_init 'mw.l f1018100 20420000; mw.l f1018140 003ca800; sleep 3; scsi init'
fw_setenv sata_bootcmd 'echo Booting from SATA ...; setenv fdt_skip_update yes; run sata_init; ext2load scsi 0:1 $load_image_addr /boot/zImage; ext2load scsi 0:1 $load_dtb_addr /boot/dts/armada-380-zyxel-nas326.dtb; ext2load scsi 0:1 $load_initrd_addr /boot/uInitrd; run sata_set_bootargs; bootz $load_image_addr $load_initrd_addr $load_dtb_addr'
fw_setenv sata_set_bootargs 'setenv bootargs "console=ttyS0,115200 root=LABEL=rootfs rootdelay=10 $mtdparts earlyprintk=serial"'
fw_setenv bootcmd_custom_sata 'if run sata_bootcmd; then; else if run bootcmd_stock_1; then; else run bootcmd_stock_2; reset; fi; fi'
fw_setenv bootcmd_custom 'run bootcmd_custom_sata'
fw_setenv kernel_addr_1 '0x00000000; run bootcmd_custom; '
And then list the u-boot envs again, and save it to a notepad in case there is problem with booting and it needs to be referenced.
fw_printenv
5. Insert the HDD with rootfs Debian-4.9.0-mvebu-tld-12-rootfs-bodhi.tar.bz2, if not already inside the box, and reboot
sync
sync
/sbin/reboot
7. After a period of time, the NAS326 will start rebooting. Wait for about 30 seconds and login through SSH.
To find the NAS:
ping debian.local
When the ping returns successful response, then login (root password is root);
ssh root@debian.local
If for whatever reason (e.g. firewall), the NAS326 cannot be found as debian.local, then find its IP in the router webpage. Or use a scanning app such as Linux nmap or IOS Fing to find the IP.
8. DONE.
C3. Normal Operation
The HDD rootfs should be plugged in permanently, and if there is serial console module attached before then it should be removed during booting.
1. Whenever the NAS326 is rebooted or cold started, to boot without manual intervention, the serial console module must be unplugged from the NAS326. If the serial console module is plugged in, then step 1 in the Section A2 installation instruction must be executed (so that the NAS326 will continue booting when it detected the serial console present). Note that reboot in some instance will work with serial console plugged in.
2. If you want to boot back to stock OS in NAND, just shutdown the box, remove the HDD rootfs and power up the box. It will boot the kernel 1 in NAND and then if not successful, it will try kernel 2.
This also serves as a rescue system. Whenever the rootfs on HDD has problem and cannot boot (the effect is just like the HDD drive is not plugged in), the NAS326 will fall back to booting the kernel 1 or 2 in NAND. When this occurs, the u-boot envs in step 4 must be reentered at Debian command line again to allow booting back to HDD rootfs.
3. Setup WOL.
Add this line to your /etc/rc.local
/usr/sbin/i2cset -y 0x0 0xa 0xa 0x0006 w
For more info about WOL, see this post
C4. Reverse to stock OS permanently
To reverse the setup, and boot back to stock NAND kernel permanently, execute the following instructions at the Debian command line:
fw_setenv kernel_addr_1 0x00E00000
fw_setenv bootargs 'console=ttyS0,115200 ubi.mtd=4,2048 rootfstype=ubifs root=ubi0:rootfs1 rw rootdelay=2'
and then reboot
sync
shutdown -r now
D. Notes
D.1. HDD rootfs quirks
For HHD booting issues after your installation, see this thread.
D.2. NAS326 Serial console pinouts
          +----+----+
          |    |    |
+----+----+----+----+----+
|3.3V| TX | RX |    | GND|
+----+----+----+    +----+
D.3. NAS326 Serial console header Pic
The Zyxel NAS326 and the NSA325 serial header pinouts and locations are identical on these boards. I've attached the NSA2325 board pic to this post here to show the header location.
Also see NAS326 board pic here.
E. Instruction for kernel upgrade after installation
Starting kernel version 5.2.9-mvebu-tld-1, we need to boot with uImage. So please follow a special upgrade instruction here to upgrade the kernel from 4.9.0-mvebu-tld-12 to the latest:
https://forum.doozan.com/read.php?2,88619,94989#msg-94989
-bodhi
===========================
Forum Wiki
bodhi's corner (buy bodhi a beer)
Edited 15 time(s). Last edit at 01/07/2025 09:41PM by bodhi.
|
Re: Zyxel NAS326 Installation September 09, 2019 07:14AM |
Registered: 6 years ago Posts: 29 |
Hi bodhi,
in the Linux Kernel 5.2.9 MVEBU package and Debian armhf rootfs installation instructions, you state:
I use flash-kernel to simplify/automate the uboot image creation.
I installed flash-kernel from the Debian buster archives and added /etc/flash-kernel/db like this:
regards
kralan
in the Linux Kernel 5.2.9 MVEBU package and Debian armhf rootfs installation instructions, you state:
Is this still valid?Quote
Remove flash-kernel first to avoid potential problem.
I use flash-kernel to simplify/automate the uboot image creation.
I installed flash-kernel from the Debian buster archives and added /etc/flash-kernel/db like this:
Machine: Zyxel NAS326
U-Boot-Kernel-Address: 0x8000
U-Boot-Kernel-Entry-Point: 0x8000
U-Boot-Initrd-Address: 0x0
Boot-Kernel-Path: /boot/uImage
Boot-Initrd-Path: /boot/uInitrd
Required-Packages: u-boot-tools
DTB-Id: armada-380-zyxel-nas326.dtb
DTB-Append: yes
It worked well for kernels 4.20.6-mvebu-tld-1 and 5.2.9-mvebu-tld-1, the images were created automatically as part of installing the kernel deb package.
regards
kralan
|
Re: Zyxel NAS326 Installation September 09, 2019 05:18PM |
Admin Registered: 14 years ago Posts: 19,720 |
Hi kralan,
> Is this still valid?
> I use flash-kernel to simplify/automate the uboot
> image creation.
> I installed flash-kernel from the Debian buster
> archives and added /etc/flash-kernel/db like
> this:
>
> 5.2.9-mvebu-tld-1, the images were created
> automatically as part of installing the kernel deb
> package.
The instruction is still valid for a good reason.
To be clear, there is no problem with flash-kernel. That's the Debian way to do installation automatically while we run the mainline Debian kernel. For experienced users like you, usually you would do a cursory check for the /boot directory after upgrading kernel or apt-get upgrade to see everything is normal. So it is OK to use flash-kernel if you know the /boot files well and see problems right away. So you would want to automate the installation process like what you did above.
The potential problem with using flash-kernel is for less eperienced users. If the rootfs was not created by using my release rootfs, then it is possible that the user is installing my customed build kernel from a mainline Debian debootstrap rootfs, therefore there is a mainline Debian kernel on it. This is where the problem potentially will occur if there is a mix of mainline and customed kernels in the rootfs. flash-kernel does not recognize the customed kernel, thus the uImage and uInitrd might be generated from a wrong version. uInitrd problem usually occurs during apt-get upgrade. In the past, I've seen even uImage was not correct sometime (iirc).
So I wanted to prevent all possible pitfalls by instructing users to generate these 2 files manually, not with flash-kernel. And by removing flash-kernel from the rootfs while running a customed kernel, it will prevent future problems, too.
-bodhi
===========================
Forum Wiki
bodhi's corner (buy bodhi a beer)
Edited 1 time(s). Last edit at 09/09/2019 05:19PM by bodhi.
Quote
Remove flash-kernel first to avoid
> potential problem.
> Is this still valid?
> I use flash-kernel to simplify/automate the uboot
> image creation.
> I installed flash-kernel from the Debian buster
> archives and added /etc/flash-kernel/db like
> this:
>
> Machine: Zyxel NAS326
> U-Boot-Kernel-Address: 0x8000
> U-Boot-Kernel-Entry-Point: 0x8000
> U-Boot-Initrd-Address: 0x0
> Boot-Kernel-Path: /boot/uImage
> Boot-Initrd-Path: /boot/uInitrd
> Required-Packages: u-boot-tools
> DTB-Id: armada-380-zyxel-nas326.dtb
> DTB-Append: yes
>
> It worked well for kernels 4.20.6-mvebu-tld-1 and
> 5.2.9-mvebu-tld-1, the images were created
> automatically as part of installing the kernel deb
> package.
The instruction is still valid for a good reason.
To be clear, there is no problem with flash-kernel. That's the Debian way to do installation automatically while we run the mainline Debian kernel. For experienced users like you, usually you would do a cursory check for the /boot directory after upgrading kernel or apt-get upgrade to see everything is normal. So it is OK to use flash-kernel if you know the /boot files well and see problems right away. So you would want to automate the installation process like what you did above.
The potential problem with using flash-kernel is for less eperienced users. If the rootfs was not created by using my release rootfs, then it is possible that the user is installing my customed build kernel from a mainline Debian debootstrap rootfs, therefore there is a mainline Debian kernel on it. This is where the problem potentially will occur if there is a mix of mainline and customed kernels in the rootfs. flash-kernel does not recognize the customed kernel, thus the uImage and uInitrd might be generated from a wrong version. uInitrd problem usually occurs during apt-get upgrade. In the past, I've seen even uImage was not correct sometime (iirc).
So I wanted to prevent all possible pitfalls by instructing users to generate these 2 files manually, not with flash-kernel. And by removing flash-kernel from the rootfs while running a customed kernel, it will prevent future problems, too.
-bodhi
===========================
Forum Wiki
bodhi's corner (buy bodhi a beer)
Edited 1 time(s). Last edit at 09/09/2019 05:19PM by bodhi.
|
Re: Zyxel NAS326 Installation September 10, 2019 04:36AM |
Registered: 6 years ago Posts: 29 |
bodhi Wrote:
-------------------------------------------------------
> The potential problem with using flash-kernel is
> for less eperienced users. If the rootfs
> was not created by using my release rootfs, then
> it is possible that the user is installing my
> customed build kernel from a mainline Debian
> debootstrap rootfs, therefore there is a mainline
> Debian kernel on it. This is where the problem
> potentially will occur if there is a mix of
> mainline and customed kernels in the rootfs.
> flash-kernel does not recognize the customed
> kernel, thus the uImage and uInitrd might be
> generated from a wrong version. uInitrd problem
> usually occurs during apt-get upgrade. In the
> past, I've seen even uImage was not correct
> sometime (iirc).
>
> So I wanted to prevent all possible pitfalls by
> instructing users to generate these 2 files
> manually, not with flash-kernel. And by removing
> flash-kernel from the rootfs while running a
> customed kernel, it will prevent future problems,
> too.
If you want to differentiate your custom kernels from Debian's, add
Flash-kernel will refuse to act on kernels without the right suffix, then.
Admittedly, this will match only the first 99 revisions, because of the limited pattern matching abilities of the shell used.
Flash-kernel is for the lazy guys. I found it tedious and error-prone having to look up the image generation commands on every kernel upgrade.
Nevertheless, I regard sharing the manual process as essential.
kralan
Edited 1 time(s). Last edit at 09/10/2019 04:41AM by kralan.
-------------------------------------------------------
> The potential problem with using flash-kernel is
> for less eperienced users. If the rootfs
> was not created by using my release rootfs, then
> it is possible that the user is installing my
> customed build kernel from a mainline Debian
> debootstrap rootfs, therefore there is a mainline
> Debian kernel on it. This is where the problem
> potentially will occur if there is a mix of
> mainline and customed kernels in the rootfs.
> flash-kernel does not recognize the customed
> kernel, thus the uImage and uInitrd might be
> generated from a wrong version. uInitrd problem
> usually occurs during apt-get upgrade. In the
> past, I've seen even uImage was not correct
> sometime (iirc).
>
> So I wanted to prevent all possible pitfalls by
> instructing users to generate these 2 files
> manually, not with flash-kernel. And by removing
> flash-kernel from the rootfs while running a
> customed kernel, it will prevent future problems,
> too.
If you want to differentiate your custom kernels from Debian's, add
Kernel-Flavors: tld-[1-9] tld-[1-9][0-9]to /etc/flash-kernel/db.
Flash-kernel will refuse to act on kernels without the right suffix, then.
Admittedly, this will match only the first 99 revisions, because of the limited pattern matching abilities of the shell used.
Flash-kernel is for the lazy guys. I found it tedious and error-prone having to look up the image generation commands on every kernel upgrade.
Nevertheless, I regard sharing the manual process as essential.
kralan
Edited 1 time(s). Last edit at 09/10/2019 04:41AM by kralan.
|
Re: Zyxel NAS326 Installation September 10, 2019 07:44AM |
Admin Registered: 14 years ago Posts: 19,720 |
kralan Wrote:
-------------------------------------------------------
> bodhi Wrote:
> -------------------------------------------------------
>
> > The potential problem with using flash-kernel
> is
> > for less eperienced users. If the rootfs
> > was not created by using my release rootfs,
> then
> > it is possible that the user is installing my
> > customed build kernel from a mainline Debian
> > debootstrap rootfs, therefore there is a
> mainline
> > Debian kernel on it. This is where the problem
> > potentially will occur if there is a mix of
> > mainline and customed kernels in the rootfs.
> > flash-kernel does not recognize the customed
> > kernel, thus the uImage and uInitrd might be
> > generated from a wrong version. uInitrd problem
> > usually occurs during apt-get upgrade. In the
> > past, I've seen even uImage was not correct
> > sometime (iirc).
> >
> > So I wanted to prevent all possible pitfalls by
> > instructing users to generate these 2 files
> > manually, not with flash-kernel. And by
> removing
> > flash-kernel from the rootfs while running a
> > customed kernel, it will prevent future
> problems,
> > too.
>
> If you want to differentiate your custom kernels
> from Debian's, add
>
> Flash-kernel will refuse to act on kernels without
> the right suffix, then.
> Admittedly, this will match only the first 99
> revisions, because of the limited pattern matching
> abilities of the shell used.
Yes. We knew this is possible :) But I chose the simpler and foolproof installation steps. It shows what’s going on behind the scene.
> Flash-kernel is for the lazy guys. I found it
> tedious and error-prone having to look up the
> image generation commands on every kernel
> upgrade.
history command would be useful for this.
-bodhi
===========================
Forum Wiki
bodhi's corner (buy bodhi a beer)
-------------------------------------------------------
> bodhi Wrote:
> -------------------------------------------------------
>
> > The potential problem with using flash-kernel
> is
> > for less eperienced users. If the rootfs
> > was not created by using my release rootfs,
> then
> > it is possible that the user is installing my
> > customed build kernel from a mainline Debian
> > debootstrap rootfs, therefore there is a
> mainline
> > Debian kernel on it. This is where the problem
> > potentially will occur if there is a mix of
> > mainline and customed kernels in the rootfs.
> > flash-kernel does not recognize the customed
> > kernel, thus the uImage and uInitrd might be
> > generated from a wrong version. uInitrd problem
> > usually occurs during apt-get upgrade. In the
> > past, I've seen even uImage was not correct
> > sometime (iirc).
> >
> > So I wanted to prevent all possible pitfalls by
> > instructing users to generate these 2 files
> > manually, not with flash-kernel. And by
> removing
> > flash-kernel from the rootfs while running a
> > customed kernel, it will prevent future
> problems,
> > too.
>
> If you want to differentiate your custom kernels
> from Debian's, add
>
> Kernel-Flavors: tld-[1-9] tld-[1-9][0-9]
>
> to /etc/flash-kernel/db.
> Flash-kernel will refuse to act on kernels without
> the right suffix, then.
> Admittedly, this will match only the first 99
> revisions, because of the limited pattern matching
> abilities of the shell used.
Yes. We knew this is possible :) But I chose the simpler and foolproof installation steps. It shows what’s going on behind the scene.
> Flash-kernel is for the lazy guys. I found it
> tedious and error-prone having to look up the
> image generation commands on every kernel
> upgrade.
history command would be useful for this.
-bodhi
===========================
Forum Wiki
bodhi's corner (buy bodhi a beer)
|
Re: Zyxel NAS326 Installation October 05, 2019 04:38AM |
Registered: 5 years ago Posts: 10 |
I have a zyxel 326 nas (second hand), pre-owned by somebody and looks already bricked: before I install debian I would like to restore fully to original condition. I do not have the original nand backup files because I just got the NAS without any disk.
At the moment the box always starting up a new/fresh factory environment regardless what you are doing or saving anything in the GUI or in filesystem.
If you check the serial log you can find the following behavior: bad CRC, using default environment.
I printed the 'printenv' variables if you have any idea what is messed what to fix. I read all forum threads and posts and do not have an idea what else can I do.
###########################################################################################
# U-Boot
###########################################################################################
###########################################################################################
# Printenv output
###########################################################################################
###########################################################################################
# A full boot cycle - unattended
###########################################################################################
Attached - zyxel_nas_326_factory_rom_bootloop.log
###########################################################################################
# fw_printenv
###########################################################################################
/ # fw_printenv
###########################################################################################
# /proc/mtd
###########################################################################################
/ # cat /proc/mtd
###########################################################################################
# fw_env.config
###########################################################################################
# cat /etc/fw_env.config
===============================
moderator edit: use code tags to post log
Edited 1 time(s). Last edit at 10/05/2019 05:25AM by bodhi.
At the moment the box always starting up a new/fresh factory environment regardless what you are doing or saving anything in the GUI or in filesystem.
If you check the serial log you can find the following behavior: bad CRC, using default environment.
I printed the 'printenv' variables if you have any idea what is messed what to fix. I read all forum threads and posts and do not have an idea what else can I do.
###########################################################################################
# U-Boot
###########################################################################################
BootROM - 1.73
Booting from NAND flash

General initialization - Version: 1.0.0
Detected Device ID 6810
High speed PHY - Version: 2.0

Init RD NAS topology board SerDes lanes topology details:
 | Lane #  | Speed |  Type       |
 --------------------------------
 |   0    |  06   |  SATA0      |
 |   1    |  05   |  USB3 HOST0 |
 |   2    |  06   |  SATA1      |
 |   5    |  05   |  USB3 HOST1 |
 --------------------------------
High speed PHY - Ended Successfully
DDR3 Training Sequence - Ver TIP-1.26.0
mvSysEnvGetTopologyUpdateInfo: TWSI Read failed
DDR3 Training Sequence - Switching XBAR Window to FastPath Window
DDR3 Training Sequence - Ended Successfully
Not detected suspend to RAM indication
BootROM: Image checksum verification PASSED
l
 __   __                      _ _
|  \/  | __ _ _ ____   _____| | |
| |\/| |/ _` | '__\ \ / / _ \ | |
| |  | | (_| | |   \ V /  __/ | |
|_|  |_|\__,_|_|    \_/ \___|_|_|
         _   _     ____              _
        | | | |   | __ )  ___   ___ | |_
        | | | |___|  _ \ / _ \ / _ \| __|
        | |_| |___| |_) | (_) | (_) | |_
         \___/    |____/ \___/ \___/ \__|
 ** LOADER **


U-Boot 2013.01-svn48206 (Dec 03 2015 - 02:50:37) Marvell version: 2014_T3.0p6

Board: RD-NAS-88F6820-DDR3
SoC:   MV88F6810 Rev A0
       running 1 CPUs
CPU:   ARM Cortex A9 MPCore (Rev 1) LE
       CPU 0
       CPU    @ 1332 [MHz]
       L2     @ 666 [MHz]
       TClock @ 200 [MHz]
       DDR    @ 666 [MHz]
       DDR 32 Bit Width, FastPath Memory Access, DLB Enabled, ECC Disabled
DRAM:  512 MiB

Map:   Code:                    0x1fed0000:0x1ff95e28
       BSS:                     0x1ffef2b4
       Stack:                   0x1f9cff20
       Heap:                    0x1f9d0000:0x1fed0000
       U-Boot Environment:      0x00200000:0x00280000 (NAND)

NAND:  256 MiB
MMC:   mv_sdh: 0
*** Warning - bad CRC, using default environment

Erasing Nand...
Writing to Nand... done
*** Booting kernel from kernel 1 @0x00E00000 ***
USB2.0 0: Host Mode
USB3.0 0: Host Mode
USB3.0 1: Host Mode
Board configuration detected:
Net:
|  port  | Interface | PHY address  |
|--------|-----------|--------------|
| egiga0 |   RGMII   |     0x01     |
egiga0 [PRIME]
Hit any key to stop autoboot:  0
###########################################################################################
# Printenv output
###########################################################################################
Marvell>> printenv
CASset=max
CONTRY_TYPE=FF
FEATURE_BIT=00
MALLOC_len=5
MODEL_ID=B303
MPmode=SMP
PRODUCT_NAME=STG-328
VENDOR_NAME=MitraStar Technology Corp.
autoload=no
baudrate=115200
boot_order=hd_scr usb_scr mmc_scr hd_img usb_img mmc_img pxe net_img net_scr
bootargs=console=ttyS0,115200 ubi.mtd=4,2048 rootfstype=ubifs root=ubi0:rootfs1 rw rootdelay=2
bootargs_dflt=$console $nandEcc $mtdparts $bootargs_root nfsroot=$serverip:$rootpath ip=$ipaddr:$serverip$bootargs_end $mvNetConfig video=dovefb:lcd0:$lcd0_params clcd.lcd0_enable=$lcd0_enable clcd.lcd_panel=$lcd_panel
bootargs_end=:10.4.50.254:255.255.255.0:Armada38x:eth0:none
bootargs_root=root=/dev/nfs rw
bootcmd=nand read 0x2000000 0x00E00000 0xF00000 && bootz 0x2000000
bootcmd_auto=stage_boot $boot_order
bootcmd_fdt=tftpboot 0x2000000 $image_name;tftpboot $fdtaddr $fdtfile;setenv bootargs $console $nandEcc $mtdparts $bootargs_root nfsroot=$serverip:$rootpath ip=$ipaddr:$serverip$bootargs_end $mvNetConfig video=dovefb:lcd0:$lcd0_params clcd.lcd0_enable=$lcd0_enable clcd.lcd_panel=$lcd_panel; bootz 0x2000000 - $fdtaddr;
bootcmd_fdt_boot=tftpboot 0x2000000 $image_name; setenv bootargs $console $nandEcc $mtdparts $bootargs_root nfsroot=$serverip:$rootpath ip=$ipaddr:$serverip$bootargs_end $mvNetConfig video=dovefb:lcd0:$lcd0_params clcd.lcd0_enable=$lcd0_enable clcd.lcd_panel=$lcd_panel; bootz 0x2000000 - $fdtaddr;
bootcmd_fdt_edit=tftpboot $fdtaddr $fdtfile; fdt addr $fdtaddr; setenv bootcmd $bootcmd_fdt_boot
bootcmd_lgcy=tftpboot 0x2000000 $image_name; setenv bootargs $bootargs_dflt; bootm 0x2000000;
bootdelay=3
cacheShare=no
console=console=ttyS0,115200
curr_bootfrom=1
device_partition=0:1
disaMvPnp=no
eeeEnable=no
enaClockGating=no
enaCpuStream=no
enaFPU=yes
enaMonExt=no
enaWrAllo=no
eth1addr=00:50:43:94:29:0e
eth1mtu=1500
eth2addr=00:50:43:94:74:0e
eth2mtu=1500
eth3addr=00:50:43:29:74:94
eth3mtu=1500
ethact=egiga0
ethaddr=00:50:43:74:29:0e
ethmtu=1500
ethprime=egiga0
fdt_addr=2040000
fdt_skip_update=no
fdtaddr=0x1000000
fdtfile=armada-38x-modular.dtb
ide_path=/
image_name=uImage
initrd_name=uInitrd
ipaddr=10.4.50.170
kernel_addr=${kernel_addr_1}
kernel_addr_1=0x00E00000
kernel_addr_2=0x08700000
kernel_addr_r=2080000
kernel_mtd_1=3
kernel_mtd_2=5
lcd0_enable=0
lcd0_params=640x480-16@60
lcd_panel=0
loadaddr=0x02000000
loads_echo=0
mtdids=nand0=armada-nand
mtdparts=mtdparts=armada-nand:2m(u-boot),2m(env),2m(config),15m(kernel1),110m(rootfs1),15m(kernel2),-(rootfs2)
mvNetConfig=mv_net_config=4,(00:50:43:11:11:11,0:1:2:3),mtu=1500
mv_pon_addr=00:50:43:0e:74:94
nandEcc=nfcConfig=4bitecc
netbsd_en=no
netmask=255.255.255.0
netretry=no
next_bootfrom=1
pcieTune=no
pexMode=RC
pxe_files_load=:default.arm-armadaxp-db:default.arm-armadaxp:default.arm
pxefile_addr_r=3100000
ramdisk_addr_r=2880000
rootpath=/srv/nfs/
sata_delay_reset=0
sata_dma_mode=yes
script_addr_r=3000000
script_name=boot.scr
serverip=10.4.50.38
standalone=fsload 0x2000000 $image_name;setenv bootargs $console $nandEcc $mtdparts root=/dev/mtdblock0 rw ip=$ipaddr:$serverip$bootargs_end; bootm 0x2000000;
stderr=serial
stdin=serial
stdout=serial
sysimg_mtd_1=4
sysimg_mtd_2=6
usb0Mode=host
usbActive=0
usbType=2
vxworks_en=no
yuk_ethaddr=00:00:00:EE:51:81

Environment size: 3387/524284 bytes
Marvell>>
###########################################################################################
# A full boot cycle - unattended
###########################################################################################
Attached - zyxel_nas_326_factory_rom_bootloop.log
###########################################################################################
# fw_printenv
###########################################################################################
/ # fw_printenv
CASset=max
CONTRY_TYPE=FF
FEATURE_BIT=00
MALLOC_len=5
MODEL_ID=B303
MPmode=SMP
PRODUCT_NAME=STG-328
VENDOR_NAME=MitraStar Technology Corp.
autoload=no
baudrate=115200
boot_order=hd_scr usb_scr mmc_scr hd_img usb_img mmc_img pxe net_img net_scr
bootargs=console=ttyS0,115200 ubi.mtd=4,2048 rootfstype=ubifs root=ubi0:rootfs1 rw rootdelay=2
bootargs_dflt=$console $nandEcc $mtdparts $bootargs_root nfsroot=$serverip:$rootpath ip=$ipaddr:$serverip$bootargs_end $mvNetConfig video=dovefb:lcd0:$lcd0_params clcd.lcd0_enable=$lcd0_enable clcd.lcd_panel=$lcd_panel
bootargs_end=:10.4.50.254:255.255.255.0:Armada38x:eth0:none
bootargs_root=root=/dev/nfs rw
bootcmd=nand read 0x2000000 0x00E00000 0xF00000 && bootz 0x2000000
bootcmd_auto=stage_boot $boot_order
bootcmd_fdt=tftpboot 0x2000000 $image_name;tftpboot $fdtaddr $fdtfile;setenv bootargs $console $nandEcc $mtdparts $bootargs_root nfsroot=$serverip:$rootpath ip=$ipaddr:$serverip$bootargs_end $mvNetConfig video=dovefb:lcd0:$lcd0_params clcd.lcd0_enable=$lcd0_enable clcd.lcd_panel=$lcd_panel; bootz 0x2000000 - $fdtaddr;
bootcmd_fdt_boot=tftpboot 0x2000000 $image_name; setenv bootargs $console $nandEcc $mtdparts $bootargs_root nfsroot=$serverip:$rootpath ip=$ipaddr:$serverip$bootargs_end $mvNetConfig video=dovefb:lcd0:$lcd0_params clcd.lcd0_enable=$lcd0_enable clcd.lcd_panel=$lcd_panel; bootz 0x2000000 - $fdtaddr;
bootcmd_fdt_edit=tftpboot $fdtaddr $fdtfile; fdt addr $fdtaddr; setenv bootcmd $bootcmd_fdt_boot
bootcmd_lgcy=tftpboot 0x2000000 $image_name; setenv bootargs $bootargs_dflt; bootm 0x2000000;
bootdelay=3
cacheShare=no
console=console=ttyS0,115200
curr_bootfrom=1
device_partition=0:1
disaMvPnp=no
eeeEnable=no
enaClockGating=no
enaCpuStream=no
enaFPU=yes
enaMonExt=no
enaWrAllo=no
eth1addr=00:50:43:38:32:25
eth1mtu=1500
eth2addr=00:50:43:38:a6:25
eth2mtu=1500
eth3addr=00:50:43:32:a6:38
eth3mtu=1500
ethact=egiga0
ethmtu=1500
ethprime=egiga0
fdt_addr=2040000
fdt_skip_update=no
fdtaddr=0x1000000
fdtfile=armada-38x-modular.dtb
ide_path=/
image_name=uImage
initrd_name=uInitrd
ipaddr=10.4.50.170
kernel_addr=${kernel_addr_1}
kernel_addr_1=0x00E00000
kernel_addr_2=0x08700000
kernel_addr_r=2080000
kernel_mtd_1=3
kernel_mtd_2=5
lcd0_enable=0
lcd0_params=640x480-16@60
lcd_panel=0
loadaddr=0x02000000
loads_echo=0
mtdids=nand0=armada-nand
mtdparts=mtdparts=armada-nand:2m(u-boot),2m(env),2m(config),15m(kernel1),110m(rootfs1),15m(kernel2),-(rootfs2)
mvNetConfig=mv_net_config=4,(00:50:43:11:11:11,0:1:2:3),mtu=1500
mv_pon_addr=00:50:43:25:a6:38
nandEcc=nfcConfig=4bitecc
netbsd_en=no
netmask=255.255.255.0
netretry=no
pcieTune=no
pexMode=RC
pxe_files_load=:default.arm-armadaxp-db:default.arm-armadaxp:default.arm
pxefile_addr_r=3100000
ramdisk_addr_r=2880000
rootpath=/srv/nfs/
sata_delay_reset=0
sata_dma_mode=yes
script_addr_r=3000000
script_name=boot.scr
serverip=10.4.50.38
standalone=fsload 0x2000000 $image_name;setenv bootargs $console $nandEcc $mtdparts root=/dev/mtdblock0 rw ip=$ipaddr:$serverip$bootargs_end; bootm 0x2000000;
stderr=serial
stdin=serial
stdout=serial
sysimg_mtd_1=4
sysimg_mtd_2=6
usb0Mode=host
usbActive=0
usbType=2
vxworks_en=no
yuk_ethaddr=00:00:00:EE:51:81
fwversion_1=V5.20(AAZF.1)
revision_1=50729
modelid_1=B303
core_checksum_1=868590f39fdf3fe14e07e5824a550dd7
zld_checksum_1=845ace22f5de7ac51fbd2ed1338bd28d
romfile_checksum_1=9D0A
img_checksum_1=596153a55a196698e2f816f42d2dae47
curr_bootfrom=1
ethaddr=5C:6A:80:7E:35:D7
serial_number=S170Y27062046
fwversion_2=V5.21(AAZF.4)
revision_2=51163
modelid_2=B303
core_checksum_2=ef8a9629888e1ceec7460982d09cb77b
zld_checksum_2=fb6f99502a16990e237befde4540abd0
romfile_checksum_2=55FA
img_checksum_2=4f8482d456f3aa06b3d7a4769916fa45
next_bootfrom=2
###########################################################################################
# /proc/mtd
###########################################################################################
/ # cat /proc/mtd
dev:    size   erasesize  name
mtd0: 00200000 00020000 "U-Boot"
mtd1: 00200000 00020000 "U-Boot env"
mtd2: 00a00000 00020000 "Config"
mtd3: 00f00000 00020000 "Kernel-1"
mtd4: 06a00000 00020000 "RootFS-1"
mtd5: 00f00000 00020000 "Kernel-2"
mtd6: 06a00000 00020000 "RootFS-2"
###########################################################################################
# fw_env.config
###########################################################################################
# cat /etc/fw_env.config
# Configuration file for fw_(printenv/saveenv) utility.
# Up to two entries are valid, in this case the redundant
# environment sector is assumed present.
# Notice, that the "Number of sectors" is ignored on NOR and SPI-dataflash.
# Futhermore, if the Flash sector size is ommitted, this value is assumed to
# be the same as the Environment size, which is valid for NOR and SPI-dataflash

# NOR example
# MTD device name       Device offset   Env. size       Flash sector size       Number of sectors
#/dev/mtd1              0x0000          0x4000          0x4000
#/dev/mtd2              0x0000          0x4000          0x4000

# MTD SPI-dataflash example
# MTD device name       Device offset   Env. size       Flash sector size       Number of sectors
#/dev/mtd5              0x4200          0x4200
#/dev/mtd6              0x4200          0x4200

# NAND example
/dev/mtd1               0x0000          0x80000         0x20000                 16
===============================
moderator edit: use code tags to post log
Edited 1 time(s). Last edit at 10/05/2019 05:25AM by bodhi.
|
Re: Zyxel NAS326 Installation October 05, 2019 05:31AM |
Admin Registered: 14 years ago Posts: 19,720 |
mazsola2k,
Your box is far from bricked.
The fact that you have booted into stokck OS and can run fw_printenv, cat /proc/mtd, and cat /etc/fw_env.config, telling me that it is running OK.
And your u-boot envs look OK to me to.
Am I reading your post correctly? did you run the fw_printenv command above after the serial console stopped and you can see the shell prompt / # ?
-bodhi
===========================
Forum Wiki
bodhi's corner (buy bodhi a beer)
Your box is far from bricked.
The fact that you have booted into stokck OS and can run fw_printenv, cat /proc/mtd, and cat /etc/fw_env.config, telling me that it is running OK.
Quote
###########################################################################################
# A full boot cycle - unattended
###########################################################################################
Attached - zyxel_nas_326_factory_rom_bootloop.log
###########################################################################################
# fw_printenv
###########################################################################################
/ # fw_printenv
And your u-boot envs look OK to me to.
Am I reading your post correctly? did you run the fw_printenv command above after the serial console stopped and you can see the shell prompt / # ?
-bodhi
===========================
Forum Wiki
bodhi's corner (buy bodhi a beer)
|
Re: Zyxel NAS326 Installation October 05, 2019 05:58AM |
Admin Registered: 14 years ago Posts: 19,720 |
And in your log zyxel_nas_326_factory_rom_bootloop.log.
It shows the shell prompt / #
That means you are in stock OS.
-bodhi
===========================
Forum Wiki
bodhi's corner (buy bodhi a beer)
Edited 1 time(s). Last edit at 10/05/2019 05:59AM by bodhi.
It shows the shell prompt / #
Please press Enter to activate this console. Jan  4 12:21:01 NAS326 afpd[2651]: Netatalk AFP/TCP listening on 192.168.2.3:548


BusyBox v1.19.4 (2016-11-10 14:10:25 CST) built-in shell (ash)
Enter 'help' for a list of built-in commands.

Jan  4 04:21:03 NAS326 linuxrc: starting pid 3291, tty '': '-/bin/sh'
/ # Jan  4 12:21:04 NAS326 httpd[3331]: [warn] Init: Session Cache is not configured [hint: SSLSessionCache]
Jan  4 12:21:04 NAS326 httpd[3331]: [warn] RSA server certificate is a CA certificate (BasicConstraints: CA == TRUE !?)
Jan  4 12:21:04 NAS326 httpd[3331]: [warn] RSA server certificate CommonName (CN) `NAS326' does NOT match server name!?
Jan  4 12:21:04 NAS326 httpd[3331]: [error] mod_auth_zyxel: initialized.

/ # Jan  4 12:21:05 NAS326 httpd[3341]: [warn] RSA server certificate is a CA certificate (BasicConstraints: CA == TRUE !?)
That means you are in stock OS.
-bodhi
===========================
Forum Wiki
bodhi's corner (buy bodhi a beer)
Edited 1 time(s). Last edit at 10/05/2019 05:59AM by bodhi.
|
Re: Zyxel NAS326 Installation October 05, 2019 07:20AM |
Registered: 5 years ago Posts: 10 |
Let me clarify: the problem is that if the system booted up and I get the shell and UI is up, everything is factory new. Everytime I reboot/restart/power cycle the system all settings wiped. Not saving my admin password / interface settings / iscsi settings. Always expanding like a fresh install after a recovery, even I do not push recovery or factory reset.
|
Re: Zyxel NAS326 Installation October 05, 2019 03:33PM |
Registered: 5 years ago Posts: 10 |
What do you think guys what can cause this situation? Failing NAND or simple a config issue?
note: saveenv does working without errors, but Warning - bad CRC, using default environment - always come back in the beginning of u-boot process and always factory reset the environment.
If it is a real nand issue may a "nand scrub" would help on this? If I issue the command. do I have further things that I need to take care before/after? (other than saving the printenv output and fw_printenv). Do I need a rescue linux to restoring mtd device scheme anything?
If it is a config problem please share your thoughts.
Edited 4 time(s). Last edit at 10/05/2019 03:49PM by mazsola2k.
*** Warning - bad CRC, using default environment

Erasing Nand...
Writing to Nand... done
Marvell>> nand bad

Device 0 bad blocks:
        3e0000
        580000
       1240000
       1ac0000
       1de0000
       1e00000
       2b80000
       3e00000
       44c0000
       5f60000
       6280000
       7fa0000
       8760000
       8ca0000
       9960000
       9c80000
       a340000
       d900000
       ef40000
       fe80000
       ff00000
       ff20000
       ff40000
       ff60000
       ff80000
       ffa0000
       ffc0000
       ffe0000
note: saveenv does working without errors, but Warning - bad CRC, using default environment - always come back in the beginning of u-boot process and always factory reset the environment.
If it is a real nand issue may a "nand scrub" would help on this? If I issue the command. do I have further things that I need to take care before/after? (other than saving the printenv output and fw_printenv). Do I need a rescue linux to restoring mtd device scheme anything?
If it is a config problem please share your thoughts.
Edited 4 time(s). Last edit at 10/05/2019 03:49PM by mazsola2k.
|
Re: Zyxel NAS326 Installation October 05, 2019 06:20PM |
Admin Registered: 14 years ago Posts: 19,720 |
mazsola2k,
OK I see. This could be fixed with a few reboots.
This error most of the time has nothing to do with bad blocks. But in this case, a bad block might be what cause the envs area kept coming back with a bad checksum.
There is a bad block inside each of U-Boot env and Config partitions.
- The first bad bock is 0x0000003e0000 (3968K) which is inside U-Boot env and before Config
- The 2nd bad block is 0x000000580000 (5632K) which is inside Config
====
There will be many reboots until you can get a good boot at this point.
Power up, interrupt serial console and
Log in stock OS, and then
After you can tell there was no error in dmesg and no error reported to the terminal, do:
And then reboot. Interrupt serial console,
Does the CRC error go away? and does the test_mazsola2k show up in the printenv?
Please post the entire log of what you did here.
-bodhi
===========================
Forum Wiki
bodhi's corner (buy bodhi a beer)
Quote
Let me clarify: the problem is that if the system booted up and I get the shell and UI is up, everything is factory new. Everytime I reboot/restart/power cycle the system all settings wiped. Not saving my admin password / interface settings / iscsi settings. Always expanding like a fresh install after a recovery, even I do not push recovery or factory reset.
OK I see. This could be fixed with a few reboots.
Quote
*** Warning - bad CRC, using default environment
This error most of the time has nothing to do with bad blocks. But in this case, a bad block might be what cause the envs area kept coming back with a bad checksum.
There is a bad block inside each of U-Boot env and Config partitions.
Bad block table found at page 131008, version 0x01
Bad block table found at page 130944, version 0x01
nand_read_bbt: bad block at 0x0000003e0000
nand_read_bbt: bad block at 0x000000580000
nand_read_bbt: bad block at 0x000001240000
nand_read_bbt: bad block at 0x000001ac0000
nand_read_bbt: bad block at 0x000001de0000
nand_read_bbt: bad block at 0x000001e00000
nand_read_bbt: bad block at 0x000002b80000
nand_read_bbt: bad block at 0x000003e00000
nand_read_bbt: bad block at 0x0000044c0000
nand_read_bbt: bad block at 0x000005f60000
nand_read_bbt: bad block at 0x000006280000
nand_read_bbt: bad block at 0x000007fa0000
nand_read_bbt: bad block at 0x000008760000
nand_read_bbt: bad block at 0x000008ca0000
nand_read_bbt: bad block at 0x000009960000
nand_read_bbt: bad block at 0x000009c80000
nand_read_bbt: bad block at 0x00000a340000
nand_read_bbt: bad block at 0x00000d900000
nand_read_bbt: bad block at 0x00000ef40000
nand_read_bbt: bad block at 0x00000fe80000
7 ofpart partitions found on MTD device armada-nand
Creating 7 MTD partitions on "armada-nand":

0x000000000000-0x000000200000 : "U-Boot"
0x000000200000-0x000000400000 : "U-Boot env"
0x000000400000-0x000000e00000 : "Config"
0x000000e00000-0x000001d00000 : "Kernel-1"
0x000001d00000-0x000008700000 : "RootFS-1"
0x000008700000-0x000009600000 : "Kernel-2"
0x000009600000-0x000010000000 : "RootFS-2"
- The first bad bock is 0x0000003e0000 (3968K) which is inside U-Boot env and before Config
- The 2nd bad block is 0x000000580000 (5632K) which is inside Config
====
There will be many reboots until you can get a good boot at this point.
Power up, interrupt serial console and
setenv next_bootfrom 1
boot
Let's see if it boot into stock OS.
Log in stock OS, and then
fw_printenvMake sure you see the envs are listed without error. This is important, if there is error stop here. Do this to further check
dmesg |tail
After you can tell there was no error in dmesg and no error reported to the terminal, do:
fw_setenv test_mazsola2k yesAnd print it out.
fw_printenv test_mazsola2k
And then reboot. Interrupt serial console,
printenv
Does the CRC error go away? and does the test_mazsola2k show up in the printenv?
Please post the entire log of what you did here.
-bodhi
===========================
Forum Wiki
bodhi's corner (buy bodhi a beer)
|
Re: Zyxel NAS326 Installation October 06, 2019 02:16AM |
Registered: 5 years ago Posts: 10 |
Executed
u-boot setenv
fw_printenv
dmesg
setenv under os:
In u-boot, the bad crc presented again:
printenv in u-boot, mazsola2k test entry not presented:
u-boot setenv
Marvell>> setenv next_bootfrom 1
Marvell>> boot
fw_printenv
/ # fw_printenv
CASset=max
CONTRY_TYPE=FF
FEATURE_BIT=00
MALLOC_len=5
MODEL_ID=B303
MPmode=SMP
PRODUCT_NAME=STG-328
VENDOR_NAME=MitraStar Technology Corp.
autoload=no
baudrate=115200
boot_order=hd_scr usb_scr mmc_scr hd_img usb_img mmc_img pxe net_img net_scr
bootargs=console=ttyS0,115200 ubi.mtd=4,2048 rootfstype=ubifs root=ubi0:rootfs1 rw rootdelay=2
bootargs_dflt=$console $nandEcc $mtdparts $bootargs_root nfsroot=$serverip:$rootpath ip=$ipaddr:$serverip$bootargs_end $mvNetConfig video=dovefb:lcd0:$lcd0_params clcd.lcd0_enable=$lcd0_enable clcd.lcd_panel=$lcd_panel
bootargs_end=:10.4.50.254:255.255.255.0:Armada38x:eth0:none
bootargs_root=root=/dev/nfs rw
bootcmd=nand read 0x2000000 0x00E00000 0xF00000 && bootz 0x2000000
bootcmd_auto=stage_boot $boot_order
bootcmd_fdt=tftpboot 0x2000000 $image_name;tftpboot $fdtaddr $fdtfile;setenv bootargs $console $nandEcc $mtdparts $bootargs_root nfsroot=$serverip:$rootpath ip=$ipaddr:$serverip$bootargs_end $mvNetConfig video=dovefb:lcd0:$lcd0_params clcd.lcd0_enable=$lcd0_enable clcd.lcd_panel=$lcd_panel; bootz 0x2000000 - $fdtaddr;
bootcmd_fdt_boot=tftpboot 0x2000000 $image_name; setenv bootargs $console $nandEcc $mtdparts $bootargs_root nfsroot=$serverip:$rootpath ip=$ipaddr:$serverip$bootargs_end $mvNetConfig video=dovefb:lcd0:$lcd0_params clcd.lcd0_enable=$lcd0_enable clcd.lcd_panel=$lcd_panel; bootz 0x2000000 - $fdtaddr;
bootcmd_fdt_edit=tftpboot $fdtaddr $fdtfile; fdt addr $fdtaddr; setenv bootcmd $bootcmd_fdt_boot
bootcmd_lgcy=tftpboot 0x2000000 $image_name; setenv bootargs $bootargs_dflt; bootm 0x2000000;
bootdelay=3
cacheShare=no
console=console=ttyS0,115200
curr_bootfrom=1
device_partition=0:1
disaMvPnp=no
eeeEnable=no
enaClockGating=no
enaCpuStream=no
enaFPU=yes
enaMonExt=no
enaWrAllo=no
eth1addr=00:50:43:38:32:25
eth1mtu=1500
eth2addr=00:50:43:38:a6:25
eth2mtu=1500
eth3addr=00:50:43:32:a6:38
eth3mtu=1500
ethact=egiga0
ethmtu=1500
ethprime=egiga0
fdt_addr=2040000
fdt_skip_update=no
fdtaddr=0x1000000
fdtfile=armada-38x-modular.dtb
ide_path=/
image_name=uImage
initrd_name=uInitrd
ipaddr=10.4.50.170
kernel_addr=${kernel_addr_1}
kernel_addr_1=0x00E00000
kernel_addr_2=0x08700000
kernel_addr_r=2080000
kernel_mtd_1=3
kernel_mtd_2=5
lcd0_enable=0
lcd0_params=640x480-16@60
lcd_panel=0
loadaddr=0x02000000
loads_echo=0
mtdids=nand0=armada-nand
mtdparts=mtdparts=armada-nand:2m(u-boot),2m(env),2m(config),15m(kernel1),110m(rootfs1),15m(kernel2),-(rootfs2)
mvNetConfig=mv_net_config=4,(00:50:43:11:11:11,0:1:2:3),mtu=1500
mv_pon_addr=00:50:43:25:a6:38
nandEcc=nfcConfig=4bitecc
netbsd_en=no
netmask=255.255.255.0
netretry=no
pcieTune=no
pexMode=RC
pxe_files_load=:default.arm-armadaxp-db:default.arm-armadaxp:default.arm
pxefile_addr_r=3100000
ramdisk_addr_r=2880000
rootpath=/srv/nfs/
sata_delay_reset=0
sata_dma_mode=yes
script_addr_r=3000000
script_name=boot.scr
serverip=10.4.50.38
standalone=fsload 0x2000000 $image_name;setenv bootargs $console $nandEcc $mtdparts root=/dev/mtdblock0 rw ip=$ipaddr:$serverip$bootargs_end; bootm 0x2000000;
stderr=serial
stdin=serial
stdout=serial
sysimg_mtd_1=4
sysimg_mtd_2=6
usb0Mode=host
usbActive=0
usbType=2
vxworks_en=no
yuk_ethaddr=00:00:00:EE:51:81
fwversion_1=V5.20(AAZF.1)
revision_1=50729
modelid_1=B303
core_checksum_1=868590f39fdf3fe14e07e5824a550dd7
zld_checksum_1=845ace22f5de7ac51fbd2ed1338bd28d
romfile_checksum_1=9D0A
img_checksum_1=596153a55a196698e2f816f42d2dae47
curr_bootfrom=1
ethaddr=5C:6A:80:7E:35:D7
serial_number=S170Y27062046
fwversion_2=V5.21(AAZF.4)
revision_2=51163
modelid_2=B303
core_checksum_2=ef8a9629888e1ceec7460982d09cb77b
zld_checksum_2=fb6f99502a16990e237befde4540abd0
romfile_checksum_2=55FA
img_checksum_2=4f8482d456f3aa06b3d7a4769916fa45
next_bootfrom=1
change_boot_part=0
dmesg
/ # dmesg |tail
tntfs: module license 'Commercial. For support email ntfs-support@tuxera.com.' taints kernel.
Disabling lock debugging due to kernel taint
Tuxera NTFS driver 3015.1.29 [Flags: R/W MODULE].
PPP generic driver version 2.4.2
PPP MPPE Compression module registered
PPP Deflate Compression module registered
NET: Registered protocol family 24
PPP BSD Compression module registered
IPv6: ADDRCONF(NETDEV_CHANGE): egiga0: link becomes ready
Rounding down aligned max_sectors from 4294967295 to 4294967288
setenv under os:
/ # fw_setenv test_mazsola2k yes
/ # fw_printenv test_mazsola2k
test_mazsola2k=yes
reboot
In u-boot, the bad crc presented again:
Restarting system.

BootROM - 1.73
Booting from NAND flash

General initialization - Version: 1.0.0
Detected Device ID 6810
High speed PHY - Version: 2.0

Init RD NAS topology board SerDes lanes topology details:
 | Lane #  | Speed |  Type       |
 --------------------------------
 |   0    |  06   |  SATA0      |
 |   1    |  05   |  USB3 HOST0 |
 |   2    |  06   |  SATA1      |
 |   5    |  05   |  USB3 HOST1 |
 --------------------------------
High speed PHY - Ended Successfully
DDR3 Training Sequence - Ver TIP-1.26.0
mvSysEnvGetTopologyUpdateInfo: TWSI Read failed
DDR3 Training Sequence - Switching XBAR Window to FastPath Window
DDR3 Training Sequence - Ended Successfully
Not detected suspend to RAM indication
BootROM: Image checksum verification PASSED

 __   __                      _ _
|  \/  | __ _ _ ____   _____| | |
| |\/| |/ _` | '__\ \ / / _ \ | |
| |  | | (_| | |   \ V /  __/ | |
|_|  |_|\__,_|_|    \_/ \___|_|_|
         _   _     ____              _
        | | | |   | __ )  ___   ___ | |_
        | | | |___|  _ \ / _ \ / _ \| __|
        | |_| |___| |_) | (_) | (_) | |_
         \___/    |____/ \___/ \___/ \__|
 ** LOADER **


U-Boot 2013.01-svn48206 (Dec 03 2015 - 02:50:37) Marvell version: 2014_T3.0p6

Board: RD-NAS-88F6820-DDR3
SoC:   MV88F6810 Rev A0
       running 1 CPUs
CPU:   ARM Cortex A9 MPCore (Rev 1) LE
       CPU 0
       CPU    @ 1332 [MHz]
       L2     @ 666 [MHz]
       TClock @ 200 [MHz]
       DDR    @ 666 [MHz]
       DDR 32 Bit Width, FastPath Memory Access, DLB Enabled, ECC Disabled
DRAM:  512 MiB

Map:   Code:                    0x1fed0000:0x1ff95e28
       BSS:                     0x1ffef2b4
       Stack:                   0x1f9cff20
       Heap:                    0x1f9d0000:0x1fed0000
       U-Boot Environment:      0x00200000:0x00280000 (NAND)

NAND:  256 MiB
MMC:   mv_sdh: 0
*** Warning - bad CRC, using default environment

Erasing Nand...
Writing to Nand... done
*** Booting kernel from kernel 1 @0x00E00000 ***
USB2.0 0: Host Mode
USB3.0 0: Host Mode
USB3.0 1: Host Mode
Board configuration detected:
Net:
|  port  | Interface | PHY address  |
|--------|-----------|--------------|
| egiga0 |   RGMII   |     0x01     |
egiga0 [PRIME]
Hit any key to stop autoboot:  0
printenv in u-boot, mazsola2k test entry not presented:
Marvell>> printenv
CASset=max
CONTRY_TYPE=FF
FEATURE_BIT=00
MALLOC_len=5
MODEL_ID=B303
MPmode=SMP
PRODUCT_NAME=STG-328
VENDOR_NAME=MitraStar Technology Corp.
autoload=no
baudrate=115200
boot_order=hd_scr usb_scr mmc_scr hd_img usb_img mmc_img pxe net_img net_scr
bootargs=console=ttyS0,115200 ubi.mtd=4,2048 rootfstype=ubifs root=ubi0:rootfs1 rw rootdelay=2
bootargs_dflt=$console $nandEcc $mtdparts $bootargs_root nfsroot=$serverip:$rootpath ip=$ipaddr:$serverip$bootargs_end $mvNetConfig video=dovefb:lcd0:$lcd0_params clcd.lcd0_enabl e=$lcd0_enable clcd.lcd_panel=$lcd_panel
bootargs_end=:10.4.50.254:255.255.255.0:Armada38x:eth0:none
bootargs_root=root=/dev/nfs rw
bootcmd=nand read 0x2000000 0x00E00000 0xF00000 && bootz 0x2000000
bootcmd_auto=stage_boot $boot_order
bootcmd_fdt=tftpboot 0x2000000 $image_name;tftpboot $fdtaddr $fdtfile;setenv bootargs $console $nandEcc $mtdparts $bootargs_root nfsroot=$serverip:$rootpath ip=$ipaddr:$serverip$ bootargs_end $mvNetConfig video=dovefb:lcd0:$lcd0_params clcd.lcd0_enable=$lcd0_enable clcd.lcd_panel=$lcd_panel; bootz 0x2000000 - $fdtaddr;
bootcmd_fdt_boot=tftpboot 0x2000000 $image_name; setenv bootargs $console $nandEcc $mtdparts $bootargs_root nfsroot=$serverip:$rootpath ip=$ipaddr:$serverip$bootargs_end $mvNetCo nfig video=dovefb:lcd0:$lcd0_params clcd.lcd0_enable=$lcd0_enable clcd.lcd_panel=$lcd_panel; bootz 0x2000000 - $fdtaddr;
bootcmd_fdt_edit=tftpboot $fdtaddr $fdtfile; fdt addr $fdtaddr; setenv bootcmd $bootcmd_fdt_boot
bootcmd_lgcy=tftpboot 0x2000000 $image_name; setenv bootargs $bootargs_dflt; bootm 0x2000000;
bootdelay=3
cacheShare=no
console=console=ttyS0,115200
curr_bootfrom=1
device_partition=0:1
disaMvPnp=no
eeeEnable=no
enaClockGating=no
enaCpuStream=no
enaFPU=yes
enaMonExt=no
enaWrAllo=no
eth1addr=00:50:43:40:25:0a
eth1mtu=1500
eth2addr=00:50:43:40:a0:0a
eth2mtu=1500
eth3addr=00:50:43:25:a0:40
eth3mtu=1500
ethact=egiga0
ethaddr=00:50:43:a0:25:0a
ethmtu=1500
ethprime=egiga0
fdt_addr=2040000
fdt_skip_update=no
fdtaddr=0x1000000
fdtfile=armada-38x-modular.dtb
ide_path=/
image_name=uImage
initrd_name=uInitrd
ipaddr=10.4.50.170
kernel_addr=${kernel_addr_1}
kernel_addr_1=0x00E00000
kernel_addr_2=0x08700000
kernel_addr_r=2080000
kernel_mtd_1=3
kernel_mtd_2=5
lcd0_enable=0
lcd0_params=640x480-16@60
lcd_panel=0
loadaddr=0x02000000
loads_echo=0
mtdids=nand0=armada-nand
mtdparts=mtdparts=armada-nand:2m(u-boot),2m(env),2m(config),15m(kernel1),110m(rootfs1),15m(kernel2),-(rootfs2)
mvNetConfig=mv_net_config=4,(00:50:43:11:11:11,0:1:2:3),mtu=1500
mv_pon_addr=00:50:43:0a:a0:40
nandEcc=nfcConfig=4bitecc
netbsd_en=no
netmask=255.255.255.0
netretry=no
next_bootfrom=1
pcieTune=no
pexMode=RC
pxe_files_load=:default.arm-armadaxp-db:default.arm-armadaxp:default.arm
pxefile_addr_r=3100000
ramdisk_addr_r=2880000
rootpath=/srv/nfs/
sata_delay_reset=0
sata_dma_mode=yes
script_addr_r=3000000
script_name=boot.scr
serverip=10.4.50.38
standalone=fsload 0x2000000 $image_name;setenv bootargs $console $nandEcc $mtdparts root=/dev/mtdblock0 rw ip=$ipaddr:$serverip$bootargs_end; bootm 0x2000000;
stderr=serial
stdin=serial
stdout=serial
sysimg_mtd_1=4
sysimg_mtd_2=6
usb0Mode=host
usbActive=0
usbType=2
vxworks_en=no
yuk_ethaddr=00:00:00:EE:51:81

Environment size: 3387/524284 bytes
|
Re: Zyxel NAS326 Installation October 06, 2019 03:21AM |
Admin Registered: 14 years ago Posts: 19,720 |
Power up, interrupt serial console and
Let's see if it boot into stock OS using FW kernel 2. If it does, then login into stock OS and
And reboot. Interrupt serial console and
-bodhi
===========================
Forum Wiki
bodhi's corner (buy bodhi a beer)
setenv next_bootfrom 2
setenv change_boot_part 1
boot
Let's see if it boot into stock OS using FW kernel 2. If it does, then login into stock OS and
fw_printenv
And reboot. Interrupt serial console and
printenv
-bodhi
===========================
Forum Wiki
bodhi's corner (buy bodhi a beer)
|
Re: Zyxel NAS326 Installation October 06, 2019 05:23AM |
Registered: 5 years ago Posts: 10 |
uboot - change next_bootfrom 2
change_boot_part 1
OS booted up:
rebooted, stopped boot process (bad crc again)
Edited 1 time(s). Last edit at 10/06/2019 05:25AM by mazsola2k.
change_boot_part 1
Hit any key to stop autoboot:  0
Marvell>> setenv next_bootfrom 2
Marvell>> setenv change_boot_part 1
Marvell>> boot

NAND read: device 0 offset 0xe00000, size 0xf00000
Skipping bad block 0x01240000
Skipping bad block 0x01ac0000
 15728640 bytes read: OK
*  kernel: cmdline image address = 0x02000000

Starting kernel ...

Power on HDD1 ...
Power on HDD2 ...
Power on USB ...

Uncompressing Linux... done, booting the kernel.
Booting Linux on physical CPU 0x0
Linux version 3.10.39 (root@SDD2SVR2) (gcc version 4.8.5 20150209 (prerelease) (                                           crosstool-NG 1.21.0) ) #1 Thu Nov 10 14:18:33 CST 2016
CPU: ARMv7 Processor [414fc091] revision 1 (ARMv7), cr=10c53c7d
OS booted up:
Jan  5 05:04:45 NAS326 linuxrc: starting pid 3301, tty '': '-/bin/sh'
/ # ip address
1: lo: <LOOPBACK,UP,LOWER_UP> mtu 65536 qdisc noqueue state UNKNOWN group default
    link/loopback 00:00:00:00:00:00 brd 00:00:00:00:00:00
    inet 127.0.0.1/8 scope host lo
       valid_lft forever preferred_lft forever
    inet6 ::1/128 scope host
       valid_lft forever preferred_lft forever
2: egiga0: <BROADCAST,MULTICAST,NOTRAILERS,UP,LOWER_UP> mtu 1500 qdisc mq state UP group default qlen 532
    link/ether 5c:6a:80:7e:35:d7 brd ff:ff:ff:ff:ff:ff
    inet 192.168.2.2/24 brd 192.168.2.255 scope global egiga0
       valid_lft forever preferred_lft forever
3: sit0: <NOARP> mtu 1480 qdisc noop state DOWN group default
    link/sit 0.0.0.0 brd 0.0.0.0
/ #
/ # Jan  5 13:05:45 NAS326 httpd[3777]: [error] [client 192.168.2.4] cat: can't open '/tmp/domuser': No such file or directory, referer: http://192.168.2.2/r50729,/desktop,/login.html
Jan  5 13:05:45 NAS326 weblogin.cgi: get_semaphore(41):sem_key=1392537051,semid=32769
Jan  5 13:05:45 NAS326 weblogin.cgi: [../source3/pam_smbpass/zyxel_user.c]zyxel_add_user(admin)
fw_printenv
/ # fw_printenv
CASset=max
CONTRY_TYPE=FF
FEATURE_BIT=00
MALLOC_len=5
MODEL_ID=B303
MPmode=SMP
PRODUCT_NAME=STG-328
VENDOR_NAME=MitraStar Technology Corp.
autoload=no
baudrate=115200
boot_order=hd_scr usb_scr mmc_scr hd_img usb_img mmc_img pxe net_img net_scr
bootargs=console=ttyS0,115200 ubi.mtd=4,2048 rootfstype=ubifs root=ubi0:rootfs1 rw rootdelay=2
bootargs_dflt=$console $nandEcc $mtdparts $bootargs_root nfsroot=$serverip:$rootpath ip=$ipaddr:$serverip$bootargs_end $mvNetConfig video=dovefb:lcd0:$lcd0_params clcd.lcd0_enable=$lcd0_enable clcd.lcd_panel=$lcd_panel
bootargs_end=:10.4.50.254:255.255.255.0:Armada38x:eth0:none
bootargs_root=root=/dev/nfs rw
bootcmd=nand read 0x2000000 0x00E00000 0xF00000 && bootz 0x2000000
bootcmd_auto=stage_boot $boot_order
bootcmd_fdt=tftpboot 0x2000000 $image_name;tftpboot $fdtaddr $fdtfile;setenv bootargs $console $nandEcc $mtdparts $bootargs_root nfsroot=$serverip:$rootpath ip=$ipaddr:$serverip$bootargs_end $mvNetConfig video=dovefb:lcd0:$lcd0_params clcd.lcd0_enable=$lcd0_enable clcd.lcd_panel=$lcd_panel; bootz 0x2000000 - $fdtaddr;
bootcmd_fdt_boot=tftpboot 0x2000000 $image_name; setenv bootargs $console $nandEcc $mtdparts $bootargs_root nfsroot=$serverip:$rootpath ip=$ipaddr:$serverip$bootargs_end $mvNetConfig video=dovefb:lcd0:$lcd0_params clcd.lcd0_enable=$lcd0_enable clcd.lcd_panel=$lcd_panel; bootz 0x2000000 - $fdtaddr;
bootcmd_fdt_edit=tftpboot $fdtaddr $fdtfile; fdt addr $fdtaddr; setenv bootcmd $bootcmd_fdt_boot
bootcmd_lgcy=tftpboot 0x2000000 $image_name; setenv bootargs $bootargs_dflt; bootm 0x2000000;
bootdelay=3
cacheShare=no
console=console=ttyS0,115200
curr_bootfrom=1
device_partition=0:1
disaMvPnp=no
eeeEnable=no
enaClockGating=no
enaCpuStream=no
enaFPU=yes
enaMonExt=no
enaWrAllo=no
eth1addr=00:50:43:38:32:25
eth1mtu=1500
eth2addr=00:50:43:38:a6:25
eth2mtu=1500
eth3addr=00:50:43:32:a6:38
eth3mtu=1500
ethact=egiga0
ethmtu=1500
ethprime=egiga0
fdt_addr=2040000
fdt_skip_update=no
fdtaddr=0x1000000
fdtfile=armada-38x-modular.dtb
ide_path=/
image_name=uImage
initrd_name=uInitrd
ipaddr=10.4.50.170
kernel_addr=${kernel_addr_1}
kernel_addr_1=0x00E00000
kernel_addr_2=0x08700000
kernel_addr_r=2080000
kernel_mtd_1=3
kernel_mtd_2=5
lcd0_enable=0
lcd0_params=640x480-16@60
lcd_panel=0
loadaddr=0x02000000
loads_echo=0
mtdids=nand0=armada-nand
mtdparts=mtdparts=armada-nand:2m(u-boot),2m(env),2m(config),15m(kernel1),110m(rootfs1),15m(kernel2),-(rootfs2)
mvNetConfig=mv_net_config=4,(00:50:43:11:11:11,0:1:2:3),mtu=1500
mv_pon_addr=00:50:43:25:a6:38
nandEcc=nfcConfig=4bitecc
netbsd_en=no
netmask=255.255.255.0
netretry=no
pcieTune=no
pexMode=RC
pxe_files_load=:default.arm-armadaxp-db:default.arm-armadaxp:default.arm
pxefile_addr_r=3100000
ramdisk_addr_r=2880000
rootpath=/srv/nfs/
sata_delay_reset=0
sata_dma_mode=yes
script_addr_r=3000000
script_name=boot.scr
serverip=10.4.50.38
standalone=fsload 0x2000000 $image_name;setenv bootargs $console $nandEcc $mtdparts root=/dev/mtdblock0 rw ip=$ipaddr:$serverip$bootargs_end; bootm 0x2000000;
stderr=serial
stdin=serial
stdout=serial
sysimg_mtd_1=4
sysimg_mtd_2=6
usb0Mode=host
usbActive=0
usbType=2
vxworks_en=no
yuk_ethaddr=00:00:00:EE:51:81
fwversion_1=V5.20(AAZF.1)
revision_1=50729
modelid_1=B303
core_checksum_1=868590f39fdf3fe14e07e5824a550dd7
zld_checksum_1=845ace22f5de7ac51fbd2ed1338bd28d
romfile_checksum_1=9D0A
img_checksum_1=596153a55a196698e2f816f42d2dae47
curr_bootfrom=1
ethaddr=5C:6A:80:7E:35:D7
serial_number=S170Y27062046
fwversion_2=V5.21(AAZF.4)
revision_2=51163
modelid_2=B303
core_checksum_2=ef8a9629888e1ceec7460982d09cb77b
zld_checksum_2=fb6f99502a16990e237befde4540abd0
romfile_checksum_2=55FA
img_checksum_2=4f8482d456f3aa06b3d7a4769916fa45
next_bootfrom=1
change_boot_part=0
test_mazsola2k=yes
/ # [3990] server write-only FIFO is opened (fd=7)
[3990] server read-only FIFO is opened (fd=8)
[3990] server error read-only FIFO is opened (fd=9)
argc = 1,  func = 70
[3990] is disconnected

/ # uname -a
Linux NAS326 3.10.39 #1 Thu Nov 10 14:18:33 CST 2016 armv7l GNU/Linux
rebooted, stopped boot process (bad crc again)
Restarting system.

BootROM - 1.73
Booting from NAND flash

General initialization - Version: 1.0.0
Detected Device ID 6810
High speed PHY - Version: 2.0

Init RD NAS topology board SerDes lanes topology details:
 | Lane #  | Speed |  Type       |
 --------------------------------
 |   0    |  06   |  SATA0      |
 |   1    |  05   |  USB3 HOST0 |
 |   2    |  06   |  SATA1      |
 |   5    |  05   |  USB3 HOST1 |
 --------------------------------
High speed PHY - Ended Successfully
DDR3 Training Sequence - Ver TIP-1.26.0
mvSysEnvGetTopologyUpdateInfo: TWSI Read failed
DDR3 Training Sequence - Switching XBAR Window to FastPath Window
DDR3 Training Sequence - Ended Successfully
Not detected suspend to RAM indication
BootROM: Image checksum verification PASSED
l
 __   __                      _ _
|  \/  | __ _ _ ____   _____| | |
| |\/| |/ _` | '__\ \ / / _ \ | |
| |  | | (_| | |   \ V /  __/ | |
|_|  |_|\__,_|_|    \_/ \___|_|_|
         _   _     ____              _
        | | | |   | __ )  ___   ___ | |_
        | | | |___|  _ \ / _ \ / _ \| __|
        | |_| |___| |_) | (_) | (_) | |_
         \___/    |____/ \___/ \___/ \__|
 ** LOADER **


U-Boot 2013.01-svn48206 (Dec 03 2015 - 02:50:37) Marvell version: 2014_T3.0p6

Board: RD-NAS-88F6820-DDR3
SoC:   MV88F6810 Rev A0
       running 1 CPUs
CPU:   ARM Cortex A9 MPCore (Rev 1) LE
       CPU 0
       CPU    @ 1332 [MHz]
       L2     @ 666 [MHz]
       TClock @ 200 [MHz]
       DDR    @ 666 [MHz]
       DDR 32 Bit Width, FastPath Memory Access, DLB Enabled, ECC Disabled
DRAM:  512 MiB

Map:   Code:                    0x1fed0000:0x1ff95e28
       BSS:                     0x1ffef2b4
       Stack:                   0x1f9cff20
       Heap:                    0x1f9d0000:0x1fed0000
       U-Boot Environment:      0x00200000:0x00280000 (NAND)

NAND:  256 MiB
MMC:   mv_sdh: 0
*** Warning - bad CRC, using default environment

Erasing Nand...
Writing to Nand... done
*** Booting kernel from kernel 1 @0x00E00000 ***
USB2.0 0: Host Mode
USB3.0 0: Host Mode
USB3.0 1: Host Mode
Board configuration detected:
Net:
|  port  | Interface | PHY address  |
|--------|-----------|--------------|
| egiga0 |   RGMII   |     0x01     |
egiga0 [PRIME]
Hit any key to stop autoboot:  0
u-boot printenv
Marvell>> printenv
CASset=max
CONTRY_TYPE=FF
FEATURE_BIT=00
MALLOC_len=5
MODEL_ID=B303
MPmode=SMP
PRODUCT_NAME=STG-328
VENDOR_NAME=MitraStar Technology Corp.
autoload=no
baudrate=115200
boot_order=hd_scr usb_scr mmc_scr hd_img usb_img mmc_img pxe net_img net_scr
bootargs=console=ttyS0,115200 ubi.mtd=4,2048 rootfstype=ubifs root=ubi0:rootfs1 rw rootdelay=2
bootargs_dflt=$console $nandEcc $mtdparts $bootargs_root nfsroot=$serverip:$rootpath ip=$ipaddr:$serverip$bootargs_end $mvNetConfig video=dovefb:lcd0:$lcd0_params clcd.lcd0_enable=$lcd0_enable clcd.lcd_panel=$lcd_panel
bootargs_end=:10.4.50.254:255.255.255.0:Armada38x:eth0:none
bootargs_root=root=/dev/nfs rw
bootcmd=nand read 0x2000000 0x00E00000 0xF00000 && bootz 0x2000000
bootcmd_auto=stage_boot $boot_order
bootcmd_fdt=tftpboot 0x2000000 $image_name;tftpboot $fdtaddr $fdtfile;setenv bootargs $console $nandEcc $mtdparts $bootargs_root nfsroot=$serverip:$rootpath ip=$ipaddr:$serverip$bootargs_end $mvNetConfig video=dovefb:lcd0:$lcd0_params clcd.lcd0_enable=$lcd0_enable clcd.lcd_panel=$lcd_panel; bootz 0x2000000 - $fdtaddr;
bootcmd_fdt_boot=tftpboot 0x2000000 $image_name; setenv bootargs $console $nandEcc $mtdparts $bootargs_root nfsroot=$serverip:$rootpath ip=$ipaddr:$serverip$bootargs_end $mvNetConfig video=dovefb:lcd0:$lcd0_params clcd.lcd0_enable=$lcd0_enable clcd.lcd_panel=$lcd_panel; bootz 0x2000000 - $fdtaddr;
bootcmd_fdt_edit=tftpboot $fdtaddr $fdtfile; fdt addr $fdtaddr; setenv bootcmd $bootcmd_fdt_boot
bootcmd_lgcy=tftpboot 0x2000000 $image_name; setenv bootargs $bootargs_dflt; bootm 0x2000000;
bootdelay=3
cacheShare=no
console=console=ttyS0,115200
curr_bootfrom=1
device_partition=0:1
disaMvPnp=no
eeeEnable=no
enaClockGating=no
enaCpuStream=no
enaFPU=yes
enaMonExt=no
enaWrAllo=no
eth1addr=00:50:43:2d:0e:0f
eth1mtu=1500
eth2addr=00:50:43:2d:5a:0f
eth2mtu=1500
eth3addr=00:50:43:0e:5a:2d
eth3mtu=1500
ethact=egiga0
ethaddr=00:50:43:5a:0e:0f
ethmtu=1500
ethprime=egiga0
fdt_addr=2040000
fdt_skip_update=no
fdtaddr=0x1000000
fdtfile=armada-38x-modular.dtb
ide_path=/
image_name=uImage
initrd_name=uInitrd
ipaddr=10.4.50.170
kernel_addr=${kernel_addr_1}
kernel_addr_1=0x00E00000
kernel_addr_2=0x08700000
kernel_addr_r=2080000
kernel_mtd_1=3
kernel_mtd_2=5
lcd0_enable=0
lcd0_params=640x480-16@60
lcd_panel=0
loadaddr=0x02000000
loads_echo=0
mtdids=nand0=armada-nand
mtdparts=mtdparts=armada-nand:2m(u-boot),2m(env),2m(config),15m(kernel1),110m(rootfs1),15m(kernel2),-(rootfs2)
mvNetConfig=mv_net_config=4,(00:50:43:11:11:11,0:1:2:3),mtu=1500
mv_pon_addr=00:50:43:0f:5a:2d
nandEcc=nfcConfig=4bitecc
netbsd_en=no
netmask=255.255.255.0
netretry=no
next_bootfrom=1
pcieTune=no
pexMode=RC
pxe_files_load=:default.arm-armadaxp-db:default.arm-armadaxp:default.arm
pxefile_addr_r=3100000
ramdisk_addr_r=2880000
rootpath=/srv/nfs/
sata_delay_reset=0
sata_dma_mode=yes
script_addr_r=3000000
script_name=boot.scr
serverip=10.4.50.38
standalone=fsload 0x2000000 $image_name;setenv bootargs $console $nandEcc $mtdparts root=/dev/mtdblock0 rw ip=$ipaddr:$serverip$bootargs_end; bootm 0x2000000;
stderr=serial
stdin=serial
stdout=serial
sysimg_mtd_1=4
sysimg_mtd_2=6
usb0Mode=host
usbActive=0
usbType=2
vxworks_en=no
yuk_ethaddr=00:00:00:EE:51:81

Environment size: 3387/524284 bytes
Marvell>>
Edited 1 time(s). Last edit at 10/06/2019 05:25AM by mazsola2k.
|
Re: Zyxel NAS326 Installation October 06, 2019 05:34AM |
Admin Registered: 14 years ago Posts: 19,720 |
mazsola2k,
> Marvell>> setenv next_bootfrom 2
> Marvell>> setenv change_boot_part 1
> Marvell>> boot
>
> NAND read: device 0 offset 0xe00000, size
> 0xf00000
> Skipping bad block 0x01240000
> Skipping bad block 0x01ac0000
> 15728640 bytes read: OK
> * kernel: cmdline image address = 0x02000000
>
So it did not switch to kernel 2.
Now we are going to force u-boot to mark the bad block in NAND envs area.
Power up, interrupt serial console and
What I expected to see is the same message:
Let's double check the envs
And then boot.
-bodhi
===========================
Forum Wiki
bodhi's corner (buy bodhi a beer)
> Marvell>> setenv next_bootfrom 2
> Marvell>> setenv change_boot_part 1
> Marvell>> boot
>
> NAND read: device 0 offset 0xe00000, size
> 0xf00000
> Skipping bad block 0x01240000
> Skipping bad block 0x01ac0000
> 15728640 bytes read: OK
> * kernel: cmdline image address = 0x02000000
>
So it did not switch to kernel 2.
Now we are going to force u-boot to mark the bad block in NAND envs area.
Power up, interrupt serial console and
setenv next_bootfrom 2
setenv change_boot_part 1
setenv test_mazsola2k yes
saveenv
What I expected to see is the same message:
Quote
Erasing Nand...
Writing to Nand... done
Let's double check the envs
printenv
And then boot.
boot
-bodhi
===========================
Forum Wiki
bodhi's corner (buy bodhi a beer)
|
Re: Zyxel NAS326 Installation October 06, 2019 05:44AM |
Registered: 5 years ago Posts: 10 |
followed your suggestion:
u-boot:
booted up the os:
fw_printenv in the os (test_mazsola2k value presented)
If I reboot to u-boot CRC agan and it forgets the test_mazsola2k value
Edited 3 time(s). Last edit at 10/06/2019 05:48AM by mazsola2k.
u-boot:
Hit any key to stop autoboot:  0
Marvell>> setenv next_bootfrom 2
Marvell>> setenv change_boot_part 1
Marvell>> setenv test_mazsola2k yes
Marvell>> saveenv
Saving Environment to NAND...
Erasing Nand...
Writing to Nand... done
Marvell>> printenv
CASset=max
CONTRY_TYPE=FF
FEATURE_BIT=00
MALLOC_len=5
MODEL_ID=B303
MPmode=SMP
PRODUCT_NAME=STG-328
VENDOR_NAME=MitraStar Technology Corp.
autoload=no
baudrate=115200
boot_order=hd_scr usb_scr mmc_scr hd_img usb_img mmc_img pxe net_img net_scr
bootargs=console=ttyS0,115200 ubi.mtd=4,2048 rootfstype=ubifs root=ubi0:rootfs1 rw rootdelay=2
bootargs_dflt=$console $nandEcc $mtdparts $bootargs_root nfsroot=$serverip:$rootpath ip=$ipaddr:$serverip$bootargs_end $mvNetConfig video=dovefb:lcd0:$lcd0_params clcd.lcd0_enable=$lcd0_enable clcd.lcd_panel=$lcd_panel
bootargs_end=:10.4.50.254:255.255.255.0:Armada38x:eth0:none
bootargs_root=root=/dev/nfs rw
bootcmd=nand read 0x2000000 0x00E00000 0xF00000 && bootz 0x2000000
bootcmd_auto=stage_boot $boot_order
bootcmd_fdt=tftpboot 0x2000000 $image_name;tftpboot $fdtaddr $fdtfile;setenv bootargs $console $nandEcc $mtdparts $bootargs_root nfsroot=$serverip:$rootpath ip=$ipaddr:$serverip$bootargs_end $mvNetConfig video=dovefb:lcd0:$lcd0_params clcd.lcd0_enable=$lcd0_enable clcd.lcd_panel=$lcd_panel; bootz 0x2000000 - $fdtaddr;
bootcmd_fdt_boot=tftpboot 0x2000000 $image_name; setenv bootargs $console $nandEcc $mtdparts $bootargs_root nfsroot=$serverip:$rootpath ip=$ipaddr:$serverip$bootargs_end $mvNetConfig video=dovefb:lcd0:$lcd0_params clcd.lcd0_enable=$lcd0_enable clcd.lcd_panel=$lcd_panel; bootz 0x2000000 - $fdtaddr;
bootcmd_fdt_edit=tftpboot $fdtaddr $fdtfile; fdt addr $fdtaddr; setenv bootcmd $bootcmd_fdt_boot
bootcmd_lgcy=tftpboot 0x2000000 $image_name; setenv bootargs $bootargs_dflt; bootm 0x2000000;
bootdelay=3
cacheShare=no
change_boot_part=1
console=console=ttyS0,115200
curr_bootfrom=1
device_partition=0:1
disaMvPnp=no
eeeEnable=no
enaClockGating=no
enaCpuStream=no
enaFPU=yes
enaMonExt=no
enaWrAllo=no
eth1addr=00:50:43:15:3c:23
eth1mtu=1500
eth2addr=00:50:43:15:7e:23
eth2mtu=1500
eth3addr=00:50:43:3c:7e:15
eth3mtu=1500
ethact=egiga0
ethaddr=00:50:43:7e:3c:23
ethmtu=1500
ethprime=egiga0
fdt_addr=2040000
fdt_skip_update=no
fdtaddr=0x1000000
fdtfile=armada-38x-modular.dtb
ide_path=/
image_name=uImage
initrd_name=uInitrd
ipaddr=10.4.50.170
kernel_addr=${kernel_addr_1}
kernel_addr_1=0x00E00000
kernel_addr_2=0x08700000
kernel_addr_r=2080000
kernel_mtd_1=3
kernel_mtd_2=5
lcd0_enable=0
lcd0_params=640x480-16@60
lcd_panel=0
loadaddr=0x02000000
loads_echo=0
mtdids=nand0=armada-nand
mtdparts=mtdparts=armada-nand:2m(u-boot),2m(env),2m(config),15m(kernel1),110m(rootfs1),15m(kernel2),-(rootfs2)
mvNetConfig=mv_net_config=4,(00:50:43:11:11:11,0:1:2:3),mtu=1500
mv_pon_addr=00:50:43:23:7e:15
nandEcc=nfcConfig=4bitecc
netbsd_en=no
netmask=255.255.255.0
netretry=no
next_bootfrom=2
pcieTune=no
pexMode=RC
pxe_files_load=:default.arm-armadaxp-db:default.arm-armadaxp:default.arm
pxefile_addr_r=3100000
ramdisk_addr_r=2880000
rootpath=/srv/nfs/
sata_delay_reset=0
sata_dma_mode=yes
script_addr_r=3000000
script_name=boot.scr
serverip=10.4.50.38
standalone=fsload 0x2000000 $image_name;setenv bootargs $console $nandEcc $mtdparts root=/dev/mtdblock0 rw ip=$ipaddr:$serverip$bootargs_end; bootm 0x2000000;
stderr=serial
stdin=serial
stdout=serial
sysimg_mtd_1=4
sysimg_mtd_2=6
test_mazsola2k=yes
usb0Mode=host
usbActive=0
usbType=2
vxworks_en=no
yuk_ethaddr=00:00:00:EE:51:81

Environment size: 3429/524284 bytes
booted up the os:
boot
fw_printenv in the os (test_mazsola2k value presented)
/ # fw_printenv
CASset=max
CONTRY_TYPE=FF
FEATURE_BIT=00
MALLOC_len=5
MODEL_ID=B303
MPmode=SMP
PRODUCT_NAME=STG-328
VENDOR_NAME=MitraStar Technology Corp.
autoload=no
baudrate=115200
boot_order=hd_scr usb_scr mmc_scr hd_img usb_img mmc_img pxe net_img net_scr
bootargs=console=ttyS0,115200 ubi.mtd=4,2048 rootfstype=ubifs root=ubi0:rootfs1 rw rootdelay=2
bootargs_dflt=$console $nandEcc $mtdparts $bootargs_root nfsroot=$serverip:$rootpath ip=$ipaddr:$serverip$bootargs_end $mvNetConfig video=dovefb:lcd0:$lcd0_params clcd.lcd0_enable=$lcd0_enable clcd.lcd_panel=$lcd_panel
bootargs_end=:10.4.50.254:255.255.255.0:Armada38x:eth0:none
bootargs_root=root=/dev/nfs rw
bootcmd=nand read 0x2000000 0x00E00000 0xF00000 && bootz 0x2000000
bootcmd_auto=stage_boot $boot_order
bootcmd_fdt=tftpboot 0x2000000 $image_name;tftpboot $fdtaddr $fdtfile;setenv bootargs $console $nandEcc $mtdparts $bootargs_root nfsroot=$serverip:$rootpath ip=$ipaddr:$serverip$bootargs_end $mvNetConfig video=dovefb:lcd0:$lcd0_params clcd.lcd0_enable=$lcd0_enable clcd.lcd_panel=$lcd_panel; bootz 0x2000000 - $fdtaddr;
bootcmd_fdt_boot=tftpboot 0x2000000 $image_name; setenv bootargs $console $nandEcc $mtdparts $bootargs_root nfsroot=$serverip:$rootpath ip=$ipaddr:$serverip$bootargs_end $mvNetConfig video=dovefb:lcd0:$lcd0_params clcd.lcd0_enable=$lcd0_enable clcd.lcd_panel=$lcd_panel; bootz 0x2000000 - $fdtaddr;
bootcmd_fdt_edit=tftpboot $fdtaddr $fdtfile; fdt addr $fdtaddr; setenv bootcmd $bootcmd_fdt_boot
bootcmd_lgcy=tftpboot 0x2000000 $image_name; setenv bootargs $bootargs_dflt; bootm 0x2000000;
bootdelay=3
cacheShare=no
console=console=ttyS0,115200
curr_bootfrom=1
device_partition=0:1
disaMvPnp=no
eeeEnable=no
enaClockGating=no
enaCpuStream=no
enaFPU=yes
enaMonExt=no
enaWrAllo=no
eth1addr=00:50:43:38:32:25
eth1mtu=1500
eth2addr=00:50:43:38:a6:25
eth2mtu=1500
eth3addr=00:50:43:32:a6:38
eth3mtu=1500
ethact=egiga0
ethmtu=1500
ethprime=egiga0
fdt_addr=2040000
fdt_skip_update=no
fdtaddr=0x1000000
fdtfile=armada-38x-modular.dtb
ide_path=/
image_name=uImage
initrd_name=uInitrd
ipaddr=10.4.50.170
kernel_addr=${kernel_addr_1}
kernel_addr_1=0x00E00000
kernel_addr_2=0x08700000
kernel_addr_r=2080000
kernel_mtd_1=3
kernel_mtd_2=5
lcd0_enable=0
lcd0_params=640x480-16@60
lcd_panel=0
loadaddr=0x02000000
loads_echo=0
mtdids=nand0=armada-nand
mtdparts=mtdparts=armada-nand:2m(u-boot),2m(env),2m(config),15m(kernel1),110m(rootfs1),15m(kernel2),-(rootfs2)
mvNetConfig=mv_net_config=4,(00:50:43:11:11:11,0:1:2:3),mtu=1500
mv_pon_addr=00:50:43:25:a6:38
nandEcc=nfcConfig=4bitecc
netbsd_en=no
netmask=255.255.255.0
netretry=no
pcieTune=no
pexMode=RC
pxe_files_load=:default.arm-armadaxp-db:default.arm-armadaxp:default.arm
pxefile_addr_r=3100000
ramdisk_addr_r=2880000
rootpath=/srv/nfs/
sata_delay_reset=0
sata_dma_mode=yes
script_addr_r=3000000
script_name=boot.scr
serverip=10.4.50.38
standalone=fsload 0x2000000 $image_name;setenv bootargs $console $nandEcc $mtdparts root=/dev/mtdblock0 rw ip=$ipaddr:$serverip$bootargs_end; bootm 0x2000000;
stderr=serial
stdin=serial
stdout=serial
sysimg_mtd_1=4
sysimg_mtd_2=6
usb0Mode=host
usbActive=0
usbType=2
vxworks_en=no
yuk_ethaddr=00:00:00:EE:51:81
fwversion_1=V5.20(AAZF.1)
revision_1=50729
modelid_1=B303
core_checksum_1=868590f39fdf3fe14e07e5824a550dd7
zld_checksum_1=845ace22f5de7ac51fbd2ed1338bd28d
romfile_checksum_1=9D0A
img_checksum_1=596153a55a196698e2f816f42d2dae47
curr_bootfrom=1
ethaddr=5C:6A:80:7E:35:D7
serial_number=S170Y27062046
fwversion_2=V5.21(AAZF.4)
revision_2=51163
modelid_2=B303
core_checksum_2=ef8a9629888e1ceec7460982d09cb77b
zld_checksum_2=fb6f99502a16990e237befde4540abd0
romfile_checksum_2=55FA
img_checksum_2=4f8482d456f3aa06b3d7a4769916fa45
next_bootfrom=1
change_boot_part=0
test_mazsola2k=yes
/ #
If I reboot to u-boot CRC agan and it forgets the test_mazsola2k value
MMC:   mv_sdh: 0
*** Warning - bad CRC, using default environment


Marvell>> printenv
CASset=max
CONTRY_TYPE=FF
FEATURE_BIT=00
MALLOC_len=5
MODEL_ID=B303
MPmode=SMP
PRODUCT_NAME=STG-328
VENDOR_NAME=MitraStar Technology Corp.
autoload=no
baudrate=115200
boot_order=hd_scr usb_scr mmc_scr hd_img usb_img mmc_img pxe net_img net_scr
bootargs=console=ttyS0,115200 ubi.mtd=4,2048 rootfstype=ubifs root=ubi0:rootfs1 rw rootdelay=2
bootargs_dflt=$console $nandEcc $mtdparts $bootargs_root nfsroot=$serverip:$rootpath ip=$ipaddr:$serverip$bootargs_end $mvNetConfig video=dovefb:lcd0:$lcd0_params clcd.lcd0_enable=$lcd0_enable clcd.lcd_panel=$lcd_panel
bootargs_end=:10.4.50.254:255.255.255.0:Armada38x:eth0:none
bootargs_root=root=/dev/nfs rw
bootcmd=nand read 0x2000000 0x00E00000 0xF00000 && bootz 0x2000000
bootcmd_auto=stage_boot $boot_order
bootcmd_fdt=tftpboot 0x2000000 $image_name;tftpboot $fdtaddr $fdtfile;setenv bootargs $console $nandEcc $mtdparts $bootargs_root nfsroot=$serverip:$rootpath ip=$ipaddr:$serverip$bootargs_end $mvNetConfig video=dovefb:lcd0:$lcd0_params clcd.lcd0_enable=$lcd0_enable clcd.lcd_panel=$lcd_panel; bootz 0x2000000 - $fdtaddr;
bootcmd_fdt_boot=tftpboot 0x2000000 $image_name; setenv bootargs $console $nandEcc $mtdparts $bootargs_root nfsroot=$serverip:$rootpath ip=$ipaddr:$serverip$bootargs_end $mvNetConfig video=dovefb:lcd0:$lcd0_params clcd.lcd0_enable=$lcd0_enable clcd.lcd_panel=$lcd_panel; bootz 0x2000000 - $fdtaddr;
bootcmd_fdt_edit=tftpboot $fdtaddr $fdtfile; fdt addr $fdtaddr; setenv bootcmd $bootcmd_fdt_boot
bootcmd_lgcy=tftpboot 0x2000000 $image_name; setenv bootargs $bootargs_dflt; bootm 0x2000000;
bootdelay=3
cacheShare=no
console=console=ttyS0,115200
curr_bootfrom=1
device_partition=0:1
disaMvPnp=no
eeeEnable=no
enaClockGating=no
enaCpuStream=no
enaFPU=yes
enaMonExt=no
enaWrAllo=no
eth1addr=00:50:43:a0:25:2a
eth1mtu=1500
eth2addr=00:50:43:a0:a8:2a
eth2mtu=1500
eth3addr=00:50:43:25:a8:a0
eth3mtu=1500
ethact=egiga0
ethaddr=00:50:43:a8:25:2a
ethmtu=1500
ethprime=egiga0
fdt_addr=2040000
fdt_skip_update=no
fdtaddr=0x1000000
fdtfile=armada-38x-modular.dtb
ide_path=/
image_name=uImage
initrd_name=uInitrd
ipaddr=10.4.50.170
kernel_addr=${kernel_addr_1}
kernel_addr_1=0x00E00000
kernel_addr_2=0x08700000
kernel_addr_r=2080000
kernel_mtd_1=3
kernel_mtd_2=5
lcd0_enable=0
lcd0_params=640x480-16@60
lcd_panel=0
loadaddr=0x02000000
loads_echo=0
mtdids=nand0=armada-nand
mtdparts=mtdparts=armada-nand:2m(u-boot),2m(env),2m(config),15m(kernel1),110m(rootfs1),15m(kernel2),-(rootfs2)
mvNetConfig=mv_net_config=4,(00:50:43:11:11:11,0:1:2:3),mtu=1500
mv_pon_addr=00:50:43:2a:a8:a0
nandEcc=nfcConfig=4bitecc
netbsd_en=no
netmask=255.255.255.0
netretry=no
next_bootfrom=1
pcieTune=no
pexMode=RC
pxe_files_load=:default.arm-armadaxp-db:default.arm-armadaxp:default.arm
pxefile_addr_r=3100000
ramdisk_addr_r=2880000
rootpath=/srv/nfs/
sata_delay_reset=0
sata_dma_mode=yes
script_addr_r=3000000
script_name=boot.scr
serverip=10.4.50.38
standalone=fsload 0x2000000 $image_name;setenv bootargs $console $nandEcc $mtdparts root=/dev/mtdblock0 rw ip=$ipaddr:$serverip$bootargs_end; bootm 0x2000000;
stderr=serial
stdin=serial
stdout=serial
sysimg_mtd_1=4
sysimg_mtd_2=6
usb0Mode=host
usbActive=0
usbType=2
vxworks_en=no
yuk_ethaddr=00:00:00:EE:51:81

Environment size: 3387/524284 bytes
Marvell>>
Edited 3 time(s). Last edit at 10/06/2019 05:48AM by mazsola2k.
|
Re: Zyxel NAS326 Installation October 06, 2019 11:51AM |
Registered: 5 years ago Posts: 10 |
If I try to make a correlation among bad blocks and zyxel uboot nand env settings:
In a factory zyxel uboot the NAND Env address is here:
U-Boot Environment: 0x00200000:0x00280000 (NAND)
I can see that sector 280000 is a bad block
nand_read_bbt: bad block at 0x000006280000
Is not simply this causing the problem?
Even the save env is working, but because the first address of the U-Boot Env area is a bad block, it is not reading further when I boot-up my machine and fails with Bad CRC?
Edited 2 time(s). Last edit at 10/06/2019 01:04PM by mazsola2k.
|
Re: Zyxel NAS326 Installation October 06, 2019 05:37PM |
Admin Registered: 14 years ago Posts: 19,720 |
> I can see that sector 280000 is a bad block
> nand_read_bbt: bad block at 0x000006280000
>
> Is not simply this causing the problem?
No. Not that bad block. 0x000006280000 is far away from u-boot envs area.
> Even the save env is working, but because the
> first address of the U-Boot Env area is a bad
> block, it is not reading further when I boot-up my
> machine and fails with Bad CRC?
Not the firs address. It is 0x0000003e0000.
nand_read_bbt: bad block at 0x0000003e0000
What we already tried was saveenv. This command should have made the envs area to be erased, new envs are written after that, and a new CRC got created.
So I'm not sure why that did not happen.
-bodhi
===========================
Forum Wiki
bodhi's corner (buy bodhi a beer)
|
Re: Zyxel NAS326 Installation October 06, 2019 07:02PM |
Admin Registered: 14 years ago Posts: 19,720 |
mazsola2k ,
I've just noticed this. It is most likely a wrong definition in stock.
/etc/fw_env.config
Replace that with
The envs is 512K (0x80000), and NAND sector is 128K. 16 is definitely a bad number.
Please try the test in stock OS:
After correct the /etc/fw_envconfig, list the envs, and then set a test variable and then reboot
If the fw_printenv above gives error then don't do this fw_setenv, wait until in serial console to set it.
Reboot.
-bodhi
===========================
Forum Wiki
bodhi's corner (buy bodhi a beer)
Edited 1 time(s). Last edit at 10/06/2019 07:05PM by bodhi.
I've just noticed this. It is most likely a wrong definition in stock.
/etc/fw_env.config
/dev/mtd1 0x0000 0x80000 0x20000 16
Replace that with
/dev/mtd1 0x0000 0x80000 0x20000 4
The envs is 512K (0x80000), and NAND sector is 128K. 16 is definitely a bad number.
Please try the test in stock OS:
After correct the /etc/fw_envconfig, list the envs, and then set a test variable and then reboot
fw_printenv
If the fw_printenv above gives error then don't do this fw_setenv, wait until in serial console to set it.
fw_setenv test_ mazsola2k yes
Reboot.
-bodhi
===========================
Forum Wiki
bodhi's corner (buy bodhi a beer)
Edited 1 time(s). Last edit at 10/06/2019 07:05PM by bodhi.
|
Re: Zyxel NAS326 Installation October 06, 2019 11:59PM |
Admin Registered: 14 years ago Posts: 19,720 |
The more I think about this, the more I believe that this number of sectors = 16 could cause problem in the CRC.
-bodhi
===========================
Forum Wiki
bodhi's corner (buy bodhi a beer)
/dev/mtd1 0x0000 0x80000 0x20000 16
-bodhi
===========================
Forum Wiki
bodhi's corner (buy bodhi a beer)
|
Re: Zyxel NAS326 Installation October 07, 2019 12:23AM |
Registered: 5 years ago Posts: 10 |
I executed the steps and even I modify 16 to 4, it re-sets after reboot.s
Rebooted and bad CRC again:
boot
After re-boot re-writing the (/etc/fw_env.config) with default 16!
Edited 1 time(s). Last edit at 10/07/2019 12:25AM by mazsola2k.
/ # vi /etc/fw_env.config
# Configuration file for fw_(printenv/saveenv) utility.
# Up to two entries are valid, in this case the redundant
# environment sector is assumed present.
# Notice, that the "Number of sectors" is ignored on NOR and SPI-dataflash.
# Futhermore, if the Flash sector size is ommitted, this value is assumed to
# be the same as the Environment size, which is valid for NOR and SPI-dataflash

# NOR example
# MTD device name       Device offset   Env. size       Flash sector size       Number of sectors
#/dev/mtd1              0x0000          0x4000          0x4000
#/dev/mtd2              0x0000          0x4000          0x4000

# MTD SPI-dataflash example
# MTD device name       Device offset   Env. size       Flash sector size       Number of sectors
#/dev/mtd5              0x4200          0x4200
#/dev/mtd6              0x4200          0x4200

# NAND example
/dev/mtd1               0x0000          0x80000         0x20000                 4


fw_setenv test_ mazsola2k yes
 fw_printenv
CASset=max
CONTRY_TYPE=FF
FEATURE_BIT=00
MALLOC_len=5
MODEL_ID=B303
MPmode=SMP
PRODUCT_NAME=STG-328
VENDOR_NAME=MitraStar Technology Corp.
autoload=no
baudrate=115200
boot_order=hd_scr usb_scr mmc_scr hd_img usb_img mmc_img pxe net_img net_scr
bootargs=console=ttyS0,115200 ubi.mtd=4,2048 rootfstype=ubifs root=ubi0:rootfs1 rw rootdelay=2
bootargs_dflt=$console $nandEcc $mtdparts $bootargs_root nfsroot=$serverip:$rootpath ip=$ipaddr:$serverip$bootargs_end $mvNetConfig video=dovefb:lcd0:$lcd0_params clcd.lcd0_enable=$lcd0_enable clcd.lcd_panel=$lcd_panel
bootargs_end=:10.4.50.254:255.255.255.0:Armada38x:eth0:none
bootargs_root=root=/dev/nfs rw
bootcmd=nand read 0x2000000 0x00E00000 0xF00000 && bootz 0x2000000
bootcmd_auto=stage_boot $boot_order
bootcmd_fdt=tftpboot 0x2000000 $image_name;tftpboot $fdtaddr $fdtfile;setenv bootargs $console $nandEcc $mtdparts $bootargs_root nfsroot=$serverip:$rootpath ip=$ipaddr:$serverip$bootargs_end $mvNetConfig video=dovefb:lcd0:$lcd0_params clcd.lcd0_enable=$lcd0_enable clcd.lcd_panel=$lcd_panel; bootz 0x2000000 - $fdtaddr;
bootcmd_fdt_boot=tftpboot 0x2000000 $image_name; setenv bootargs $console $nandEcc $mtdparts $bootargs_root nfsroot=$serverip:$rootpath ip=$ipaddr:$serverip$bootargs_end $mvNetConfig video=dovefb:lcd0:$lcd0_params clcd.lcd0_enable=$lcd0_enable clcd.lcd_panel=$lcd_panel; bootz 0x2000000 - $fdtaddr;
bootcmd_fdt_edit=tftpboot $fdtaddr $fdtfile; fdt addr $fdtaddr; setenv bootcmd $bootcmd_fdt_boot
bootcmd_lgcy=tftpboot 0x2000000 $image_name; setenv bootargs $bootargs_dflt; bootm 0x2000000;
bootdelay=3
cacheShare=no
console=console=ttyS0,115200
curr_bootfrom=1
device_partition=0:1
disaMvPnp=no
eeeEnable=no
enaClockGating=no
enaCpuStream=no
enaFPU=yes
enaMonExt=no
enaWrAllo=no
eth1addr=00:50:43:38:32:25
eth1mtu=1500
eth2addr=00:50:43:38:a6:25
eth2mtu=1500
eth3addr=00:50:43:32:a6:38
eth3mtu=1500
ethact=egiga0
ethmtu=1500
ethprime=egiga0
fdt_addr=2040000
fdt_skip_update=no
fdtaddr=0x1000000
fdtfile=armada-38x-modular.dtb
ide_path=/
image_name=uImage
initrd_name=uInitrd
ipaddr=10.4.50.170
kernel_addr=${kernel_addr_1}
kernel_addr_1=0x00E00000
kernel_addr_2=0x08700000
kernel_addr_r=2080000
kernel_mtd_1=3
kernel_mtd_2=5
lcd0_enable=0
lcd0_params=640x480-16@60
lcd_panel=0
loadaddr=0x02000000
loads_echo=0
mtdids=nand0=armada-nand
mtdparts=mtdparts=armada-nand:2m(u-boot),2m(env),2m(config),15m(kernel1),110m(rootfs1),15m(kernel2),-(rootfs2)
mvNetConfig=mv_net_config=4,(00:50:43:11:11:11,0:1:2:3),mtu=1500
mv_pon_addr=00:50:43:25:a6:38
nandEcc=nfcConfig=4bitecc
netbsd_en=no
netmask=255.255.255.0
netretry=no
pcieTune=no
pexMode=RC
pxe_files_load=:default.arm-armadaxp-db:default.arm-armadaxp:default.arm
pxefile_addr_r=3100000
ramdisk_addr_r=2880000
rootpath=/srv/nfs/
sata_delay_reset=0
sata_dma_mode=yes
script_addr_r=3000000
script_name=boot.scr
serverip=10.4.50.38
standalone=fsload 0x2000000 $image_name;setenv bootargs $console $nandEcc $mtdparts root=/dev/mtdblock0 rw ip=$ipaddr:$serverip$bootargs_end; bootm 0x2000000;
stderr=serial
stdin=serial
stdout=serial
sysimg_mtd_1=4
sysimg_mtd_2=6
usb0Mode=host
usbActive=0
usbType=2
vxworks_en=no
yuk_ethaddr=00:00:00:EE:51:81
fwversion_1=V5.20(AAZF.1)
revision_1=50729
modelid_1=B303
core_checksum_1=868590f39fdf3fe14e07e5824a550dd7
zld_checksum_1=845ace22f5de7ac51fbd2ed1338bd28d
romfile_checksum_1=9D0A
img_checksum_1=596153a55a196698e2f816f42d2dae47
curr_bootfrom=1
ethaddr=5C:6A:80:7E:35:D7
serial_number=S170Y27062046
fwversion_2=V5.21(AAZF.4)
revision_2=51163
modelid_2=B303
core_checksum_2=ef8a9629888e1ceec7460982d09cb77b
zld_checksum_2=fb6f99502a16990e237befde4540abd0
romfile_checksum_2=55FA
img_checksum_2=4f8482d456f3aa06b3d7a4769916fa45
next_bootfrom=1
test_mazsola2k=yes
change_boot_part=0
Rebooted and bad CRC again:
MMC:   mv_sdh: 0
*** Warning - bad CRC, using default environment

Erasing Nand...
Writing to Nand... done
Marvell>> printenv
CASset=max
CONTRY_TYPE=FF
FEATURE_BIT=00
MALLOC_len=5
MODEL_ID=B303
MPmode=SMP
PRODUCT_NAME=STG-328
VENDOR_NAME=MitraStar Technology Corp.
autoload=no
baudrate=115200
boot_order=hd_scr usb_scr mmc_scr hd_img usb_img mmc_img pxe net_img net_scr
bootargs=console=ttyS0,115200 ubi.mtd=4,2048 rootfstype=ubifs root=ubi0:rootfs1 rw rootdelay=2
bootargs_dflt=$console $nandEcc $mtdparts $bootargs_root nfsroot=$serverip:$rootpath ip=$ipaddr:$serverip$bootargs_end $mvNetConfig video=dovefb:lcd0:$lcd0_params clcd.lcd0_enable=$lcd0_enable clcd.lcd_panel=$lcd_panel
bootargs_end=:10.4.50.254:255.255.255.0:Armada38x:eth0:none
bootargs_root=root=/dev/nfs rw
bootcmd=nand read 0x2000000 0x00E00000 0xF00000 && bootz 0x2000000
bootcmd_auto=stage_boot $boot_order
bootcmd_fdt=tftpboot 0x2000000 $image_name;tftpboot $fdtaddr $fdtfile;setenv bootargs $console $nandEcc $mtdparts $bootargs_root nfsroot=$serverip:$rootpath ip=$ipaddr:$serverip$bootargs_end $mvNetConfig video=dovefb:lcd0:$lcd0_params clcd.lcd0_enable=$lcd0_enable clcd.lcd_panel=$lcd_panel; bootz 0x2000000 - $fdtaddr;
bootcmd_fdt_boot=tftpboot 0x2000000 $image_name; setenv bootargs $console $nandEcc $mtdparts $bootargs_root nfsroot=$serverip:$rootpath ip=$ipaddr:$serverip$bootargs_end $mvNetConfig video=dovefb:lcd0:$lcd0_params clcd.lcd0_enable=$lcd0_enable clcd.lcd_panel=$lcd_panel; bootz 0x2000000 - $fdtaddr;
bootcmd_fdt_edit=tftpboot $fdtaddr $fdtfile; fdt addr $fdtaddr; setenv bootcmd $bootcmd_fdt_boot
bootcmd_lgcy=tftpboot 0x2000000 $image_name; setenv bootargs $bootargs_dflt; bootm 0x2000000;
bootdelay=3
cacheShare=no
console=console=ttyS0,115200
curr_bootfrom=1
device_partition=0:1
disaMvPnp=no
eeeEnable=no
enaClockGating=no
enaCpuStream=no
enaFPU=yes
enaMonExt=no
enaWrAllo=no
eth1addr=00:50:43:00:23:0c
eth1mtu=1500
eth2addr=00:50:43:00:ae:0c
eth2mtu=1500
eth3addr=00:50:43:23:ae:00
eth3mtu=1500
ethact=egiga0
ethaddr=00:50:43:ae:23:0c
ethmtu=1500
ethprime=egiga0
fdt_addr=2040000
fdt_skip_update=no
fdtaddr=0x1000000
fdtfile=armada-38x-modular.dtb
ide_path=/
image_name=uImage
initrd_name=uInitrd
ipaddr=10.4.50.170
kernel_addr=${kernel_addr_1}
kernel_addr_1=0x00E00000
kernel_addr_2=0x08700000
kernel_addr_r=2080000
kernel_mtd_1=3
kernel_mtd_2=5
lcd0_enable=0
lcd0_params=640x480-16@60
lcd_panel=0
loadaddr=0x02000000
loads_echo=0
mtdids=nand0=armada-nand
mtdparts=mtdparts=armada-nand:2m(u-boot),2m(env),2m(config),15m(kernel1),110m(rootfs1),15m(kernel2),-(rootfs2)
mvNetConfig=mv_net_config=4,(00:50:43:11:11:11,0:1:2:3),mtu=1500
mv_pon_addr=00:50:43:0c:ae:00
nandEcc=nfcConfig=4bitecc
netbsd_en=no
netmask=255.255.255.0
netretry=no
next_bootfrom=1
pcieTune=no
pexMode=RC
pxe_files_load=:default.arm-armadaxp-db:default.arm-armadaxp:default.arm
pxefile_addr_r=3100000
ramdisk_addr_r=2880000
rootpath=/srv/nfs/
sata_delay_reset=0
sata_dma_mode=yes
script_addr_r=3000000
script_name=boot.scr
serverip=10.4.50.38
standalone=fsload 0x2000000 $image_name;setenv bootargs $console $nandEcc $mtdparts root=/dev/mtdblock0 rw ip=$ipaddr:$serverip$bootargs_end; bootm 0x2000000;
stderr=serial
stdin=serial
stdout=serial
sysimg_mtd_1=4
sysimg_mtd_2=6
usb0Mode=host
usbActive=0
usbType=2
vxworks_en=no
yuk_ethaddr=00:00:00:EE:51:81

Environment size: 3387/524284 bytes
boot
After re-boot re-writing the (/etc/fw_env.config) with default 16!
/ # cat /etc/fw_env.config
# Configuration file for fw_(printenv/saveenv) utility.
# Up to two entries are valid, in this case the redundant
# environment sector is assumed present.
# Notice, that the "Number of sectors" is ignored on NOR and SPI-dataflash.
# Futhermore, if the Flash sector size is ommitted, this value is assumed to
# be the same as the Environment size, which is valid for NOR and SPI-dataflash

# NOR example
# MTD device name       Device offset   Env. size       Flash sector size       Number of sectors
#/dev/mtd1              0x0000          0x4000          0x4000
#/dev/mtd2              0x0000          0x4000          0x4000

# MTD SPI-dataflash example
# MTD device name       Device offset   Env. size       Flash sector size       Number of sectors
#/dev/mtd5              0x4200          0x4200
#/dev/mtd6              0x4200          0x4200

# NAND example
/dev/mtd1               0x0000          0x80000         0x20000                 16
Edited 1 time(s). Last edit at 10/07/2019 12:25AM by mazsola2k.
|
Re: Zyxel NAS326 Installation October 07, 2019 12:44AM |
Admin Registered: 14 years ago Posts: 19,720 |
Quote
After re-boot re-writing the (/etc/fw_env.config) with default 16!
That means the FW was restored to initial condition during boot or shutdown.
I was hoping that by limit it to 4 it would not look at the bad block that came after 512K.
But I guess (a wild one) it did rebuild FW during reboot/shutdown when the kernel and rootfs area have bad blocks.
====
Ok so at this point, we've exhausted all possible work-arounds for those bad blocks, my recommendation is:
Go ahead and install Debian on USB rootfs, using the instruction in the 1st post. And you must use the Debian-4.12.4-mvebu-tld-1-rootfs-bodhi.tar.bz2 (stretch) rootfs or earlier rootfs
Quote
Updated 23 Aug 2017:
This Debian-4.12.4-mvebu-tld-1-rootfs-bodhi.tar.bz2 has been uploaded.
Basic Debian stretch armhf rootfs for most MVEBU Armada NAS:
-bodhi
===========================
Forum Wiki
bodhi's corner (buy bodhi a beer)
|
Re: Zyxel NAS326 Installation October 07, 2019 12:46AM |
Admin Registered: 14 years ago Posts: 19,720 |
I would not recommend the NAND scrub approach.
This box has no recovery mechanism (yet). So the chance of bricking is too high when you do that.
-bodhi
===========================
Forum Wiki
bodhi's corner (buy bodhi a beer)
This box has no recovery mechanism (yet). So the chance of bricking is too high when you do that.
-bodhi
===========================
Forum Wiki
bodhi's corner (buy bodhi a beer)
|
Re: Zyxel NAS326 Installation October 07, 2019 01:26AM |
Registered: 5 years ago Posts: 10 |
I can execute the debian guide,
just I can see saveenv also part
of the procedure, that actually not working on my board to keep env config in uboot.
Last resort: nand scrub ?
ok you anwered.
In this case what about to replace the nand chip to a factory one?
after that what
is the actual way after to fill in uboot and mtd volumes?
Edited 1 time(s). Last edit at 10/07/2019 01:31AM by mazsola2k.
|
Re: Zyxel NAS326 Installation October 07, 2019 01:41AM |
Admin Registered: 14 years ago Posts: 19,720 |
mazsola2k,
> I can execute the debian guide,
> just I can see saveenv also part
> of the procedure, that actually not working on my
> board to keep env config in uboot.
>
> Last resort: nand scrub ?
I would do the Debian installation first. The envs CRC checksum error hopefully will be fixed automatically by using Debian fw_setenv.
Even if it does not fix the envs CRC problem, you can still boot Debian with serial console and use this box to it's fullest potentials.
I would not recommend doing NAND scrub for this box.
-bodhi
===========================
Forum Wiki
bodhi's corner (buy bodhi a beer)
|
Re: Zyxel NAS326 Installation October 07, 2019 01:43AM |
Admin Registered: 14 years ago Posts: 19,720 |
Quote
In this case what about to replace the nand chip to a factory one?
I would not recommend that either. Too much works for not much gain.
-bodhi
===========================
Forum Wiki
bodhi's corner (buy bodhi a beer)
|
Re: Zyxel NAS326 Installation October 09, 2019 10:09AM |
Registered: 5 years ago Posts: 10 |
Dear Bodhi,
Thank you for your support and guide.
Debian is working well on this box and it looks the wrong nand content poisoned the environment.
Since I am not using the built-in kernel all NAND Bad CRC errors gone, saving the environment config and debian booting perfectly.
Maybe if I can get the mtd nand backups from somebody about mtd0/1/2/3/4/5/6 partitions that I can restore to factory stage, it would be cool as well.
As of now the box healthy with Debian:
Edited 1 time(s). Last edit at 10/09/2019 10:10AM by mazsola2k.
Thank you for your support and guide.
Debian is working well on this box and it looks the wrong nand content poisoned the environment.
Since I am not using the built-in kernel all NAND Bad CRC errors gone, saving the environment config and debian booting perfectly.
Maybe if I can get the mtd nand backups from somebody about mtd0/1/2/3/4/5/6 partitions that I can restore to factory stage, it would be cool as well.
As of now the box healthy with Debian:
Debian GNU/Linux 9 debian ttyS0

debian login: root
Password:
Last login: Wed Oct  9 07:38:00 PDT 2019 on ttyS0
Linux debian 4.12.4-mvebu-tld-1 #1 SMP PREEMPT Sat Jul 29 21:56:37 PDT 2017 armv7l

The programs included with the Debian GNU/Linux system are free software;
the exact distribution terms for each program are described in the
individual files in /usr/share/doc/*/copyright.

Debian GNU/Linux comes with ABSOLUTELY NO WARRANTY, to the extent
permitted by applicable law.
debian
192.168.2.187
Zyxel NAS326
Linux version 4.12.4-mvebu-tld-1 (root@tldDebianVM) (gcc version 5.4.0 20160609 (Ubuntu/Linaro 5.4.0-6ubuntu1~16.04.4) ) #1 SMP PREEMPT Sat Jul 29 21:56:37 PDT 2017
Debian 9.1
Wed Oct 9 08:04:55 PDT 2019 up
root@debian:~# df
Filesystem     1K-blocks   Used Available Use% Mounted on
udev              249660      0    249660   0% /dev
tmpfs              50728   1224     49504   3% /run
/dev/sda1        3782592 840100   2747012  24% /
tmpfs               5120      0      5120   0% /run/lock
tmpfs             101440      0    101440   0% /run/shm
tmpfs             253628      0    253628   0% /tmp
root@debian:~# uname -a
Linux debian 4.12.4-mvebu-tld-1 #1 SMP PREEMPT Sat Jul 29 21:56:37 PDT 2017 armv7l GNU/Linux
root@debian:~# cat /proc/mtd
dev:    size   erasesize  name
mtd0: 00200000 00020000 "U-Boot"
mtd1: 00200000 00020000 "U-Boot env"
mtd2: 00a00000 00020000 "Config"
mtd3: 00f00000 00020000 "Kernel-1"
mtd4: 06a00000 00020000 "RootFS-1"
mtd5: 00f00000 00020000 "Kernel-2"
mtd6: 06a00000 00020000 "RootFS-2"
root@debian:~# cat /etc/fw_env.config
# MTD device name       Device offset   Env. size       Flash sector size       Number of sectors

/dev/mtd1               0x0000          0x80000         0x20000                 4
root@debian:~# ip address
1: lo: <LOOPBACK,UP,LOWER_UP> mtu 65536 qdisc noqueue state UNKNOWN group default qlen 1000
    link/loopback 00:00:00:00:00:00 brd 00:00:00:00:00:00
    inet 127.0.0.1/8 scope host lo
       valid_lft forever preferred_lft forever
    inet6 ::1/128 scope host
       valid_lft forever preferred_lft forever
2: eth0: <BROADCAST,MULTICAST,UP,LOWER_UP> mtu 1500 qdisc mq state UP group default qlen 532
    link/ether a6:ea:04:65:ff:7e brd ff:ff:ff:ff:ff:ff
    inet 192.168.2.187/24 brd 192.168.2.255 scope global eth0
       valid_lft forever preferred_lft forever
    inet6 fe80::a4ea:4ff:fe65:ff7e/64 scope link
       valid_lft forever preferred_lft forever
3: sit0@NONE: <NOARP> mtu 1480 qdisc noop state DOWN group default qlen 1000
    link/sit 0.0.0.0 brd 0.0.0.0
4: ip6tnl0@NONE: <NOARP> mtu 1452 qdisc noop state DOWN group default qlen 1000
    link/tunnel6 :: brd ::
root@debian:~# ping 8.8.8.8
PING 8.8.8.8 (8.8.8.8) 56(84) bytes of data.
64 bytes from 8.8.8.8: icmp_seq=1 ttl=55 time=11.7 ms
64 bytes from 8.8.8.8: icmp_seq=3 ttl=55 time=6.81 ms
^C
--- 8.8.8.8 ping statistics ---
3 packets transmitted, 2 received, 33% packet loss, time 2070ms
rtt min/avg/max/mdev = 6.819/9.290/11.761/2.471 ms
root@debian:~# cat /proc/cpuinfo
processor       : 0
model name      : ARMv7 Processor rev 1 (v7l)
BogoMIPS        : 50.00
Features        : half thumb fastmult vfp edsp thumbee neon vfpv3 tls vfpd32
CPU implementer : 0x41
CPU architecture: 7
CPU variant     : 0x4
CPU part        : 0xc09
CPU revision    : 1

Hardware        : Marvell Armada 380/385 (Device Tree)
Revision        : 0000
Serial          : 0000000000000000
Edited 1 time(s). Last edit at 10/09/2019 10:10AM by mazsola2k.
|
Re: Zyxel NAS326 Installation October 09, 2019 02:13PM |
Admin Registered: 14 years ago Posts: 19,720 |
mazsola2k,
> Since I am not using the built-in kernel all NAND
> Bad CRC errors gone, saving the environment config
> and debian booting perfectly.
Cool!
-bodhi
===========================
Forum Wiki
bodhi's corner (buy bodhi a beer)
> Since I am not using the built-in kernel all NAND
> Bad CRC errors gone, saving the environment config
> and debian booting perfectly.
Cool!
-bodhi
===========================
Forum Wiki
bodhi's corner (buy bodhi a beer)
|
Dzanar
Re: Zyxel NAS326 Installation Instruction November 10, 2019 10:07AM |
|
Re: Zyxel NAS326 Installation Instruction November 10, 2019 05:09PM |
Admin Registered: 14 years ago Posts: 19,720 |
Dzanar,
I kept forgetting about this! Thanks for the reminder. It will be updated in the next few days.
-bodhi
===========================
Forum Wiki
bodhi's corner (buy bodhi a beer)
I kept forgetting about this! Thanks for the reminder. It will be updated in the next few days.
-bodhi
===========================
Forum Wiki
bodhi's corner (buy bodhi a beer)

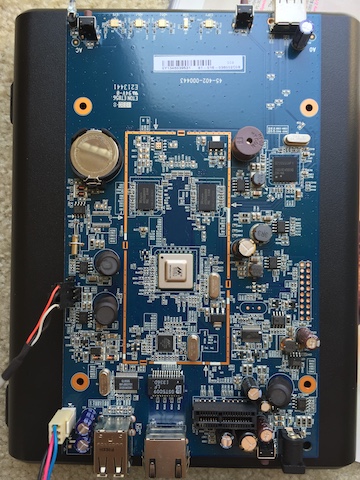