HOW2: Repair Pogo E02 with Raspberry PI (1,2 or 3) JTAG and OpenOCD
Posted by joerg_999
|
Re: HOW2: Repair Pogo E02 with Raspberry PI (1,2 or 3) JTAG and OpenOCD October 15, 2018 03:59PM |
Registered: 6 years ago Posts: 23 |
Unfortunately Dockstar does not find the "user" environment.
The very small "default" environment is used.
I have fixed the MAC and IP adress to the former values.
Perhaps I do not use the correct location to burn to
Both OpenOCD-Commands ...
... and
does not lead into a read of environment variables ...
The very small "default" environment is used.
I have fixed the MAC and IP adress to the former values.
Perhaps I do not use the correct location to burn to
Both OpenOCD-Commands ...
>  nand write 0 uboot-env.img 0xc0000 oob_softecc_kw
wrote file uboot-env.img to NAND flash 0 up to offset 0x000e0000 in 51.873577s (2.468 KiB/s)
... and
nand write 0 uboot-env.img 0xa0000 oob_softecc_kw
does not lead into a read of environment variables ...
|
Re: HOW2: Repair Pogo E02 with Raspberry PI (1,2 or 3) JTAG and OpenOCD October 15, 2018 04:17PM |
Registered: 6 years ago Posts: 23 |
That is the output of serial console after resetting
U-Boot 2016.11+dfsg1-4 (Mar 27 2017 - 18:39:51 +0000)
Seagate FreeAgent DockStar

SoC:   Kirkwood 88F6281_A0
DRAM:  128 MiB
WARNING: Caches not enabled
NAND:  256 MiB
In:    serial
Out:   serial
Err:   serial
Net:   egiga0
88E1116 Initialized on egiga0
Hit any key to stop autoboot:  3 \0x08\0x08\0x08 0
DockStar> printenv
baudrate=115200
bootargs_root=ubi.mtd=1 root=ubi0:root rootfstype=ubifs ro
bootcmd=setenv bootargs ${console} ${mtdparts} ${bootargs_root}; ubi part root; ubifsmount ubi:root; ubifsload 0x800000 ${kernel}; ubifsload 0x1100000 ${initrd}; bootm 0x800000 0x1100000
bootdelay=3
console=console=ttyS0,115200
ethact=egiga0
ethaddr=00:10:75:xx:xx:xx
initrd=/boot/uInitrd
ipaddr=192.168.x.x
kernel=/boot/uImage
mtdids=nand0=orion_nand
mtdparts=mtdparts=orion_nand:1m(uboot),-(root)
stderr=serial
stdin=serial
stdout=serial

Environment size: 548/131068 bytes
DockStar>
|
Re: HOW2: Repair Pogo E02 with Raspberry PI (1,2 or 3) JTAG and OpenOCD October 15, 2018 08:13PM |
Admin Registered: 14 years ago Posts: 19,728 |
This seems incorrect:
-bodhi
===========================
Forum Wiki
bodhi's corner (buy bodhi a beer)
nand write 0 uboot-env.img 0xa0000 oob_softecc_kwLet me take a quick look at the mainline source code (your u-boot is straight from mainline). My version of u-boot do not use 0xa0000. The mainline one probably don't use that either.
-bodhi
===========================
Forum Wiki
bodhi's corner (buy bodhi a beer)
|
Re: HOW2: Repair Pogo E02 with Raspberry PI (1,2 or 3) JTAG and OpenOCD October 15, 2018 08:27PM |
Admin Registered: 14 years ago Posts: 19,728 |
Mainline u-boot uses 0x80000.
But your u-boot is OK, now. so it might not use the same location.
Don't worry about the envs, you can always set them to anything after booting with serial console.
-bodhi
===========================
Forum Wiki
bodhi's corner (buy bodhi a beer)
But your u-boot is OK, now. so it might not use the same location.
Don't worry about the envs, you can always set them to anything after booting with serial console.
U-Boot 2016.11+dfsg1-4 (Mar 27 2017 - 18:39:51 +0000)
Seagate FreeAgent DockStar

SoC:   Kirkwood 88F6281_A0
DRAM:  128 MiB
WARNING: Caches not enabled
NAND:  256 MiB
In:    serial
Out:   serial
Err:   serial
Net:   egiga0
88E1116 Initialized on egiga0
Hit any key to stop autoboot:  3 \0x08\0x08\0x08 0
DockStar> printenv
baudrate=115200
bootargs_root=ubi.mtd=1 root=ubi0:root rootfstype=ubifs ro
bootcmd=setenv bootargs ${console} ${mtdparts} ${bootargs_root}; ubi part root; ubifsmount ubi:root; ubifsload 0x800000 ${kernel}; ubifsload 0x1100000 ${initrd}; bootm 0x800000 0x1100000
bootdelay=3
console=console=ttyS0,115200
ethact=egiga0
ethaddr=00:10:75:xx:xx:xx
initrd=/boot/uInitrd
ipaddr=192.168.x.x
kernel=/boot/uImage
mtdids=nand0=orion_nand
mtdparts=mtdparts=orion_nand:1m(uboot),-(root)
stderr=serial
stdin=serial
stdout=serial

Environment size: 548/131068 bytes
DockStar>
-bodhi
===========================
Forum Wiki
bodhi's corner (buy bodhi a beer)
|
Martin from Dortmund
Re: HOW2: Repair Pogo E02 with Raspberry PI (1,2 or 3) JTAG and OpenOCD October 16, 2018 03:32AM |
Perhaps it might be helpful, to provide a Text file in Format of uboot command line interface, that can be transferred using the "send file" option provided by the serial terminal program.
But I failed to convert the more complex environment lines to u-boot commands
especially entering the bootcmd via "setenv" seems to be more than removing the "=" and adding "setenv" to the front ...
But I failed to convert the more complex environment lines to u-boot commands
especially entering the bootcmd via "setenv" seems to be more than removing the "=" and adding "setenv" to the front ...
|
Re: HOW2: Repair Pogo E02 with Raspberry PI (1,2 or 3) JTAG and OpenOCD October 16, 2018 04:12AM |
Admin Registered: 14 years ago Posts: 19,728 |
Martin from Dortmund,
> Perhaps it might be helpful, to provide a Text
> file in Format of uboot command line interface,
> that can be transferred using the "send file"
That's what my released u-boot does, using uEnv.txt (loading envs from disk drive).
https://forum.doozan.com/read.php?3,12381
uboot.2017.07-tld-1.dockstar.bodhi.tar
Without using that uEnv.txt capability (mainline u-boot does not have this), you can also use u-boot script loading. However, that will take some little works to prepare, too.
====
Besides the 2 methods above, to make as simple as possible, you can just follow this simple rule to set envs:
To set an env at the prompt, you would put everything in the value side (everything after the first = sign) in single quotes to ensure space and special characters are taken as is.
For example,
The command would be:
-bodhi
===========================
Forum Wiki
bodhi's corner (buy bodhi a beer)
Edited 2 time(s). Last edit at 10/16/2018 04:15AM by bodhi.
> Perhaps it might be helpful, to provide a Text
> file in Format of uboot command line interface,
> that can be transferred using the "send file"
That's what my released u-boot does, using uEnv.txt (loading envs from disk drive).
https://forum.doozan.com/read.php?3,12381
uboot.2017.07-tld-1.dockstar.bodhi.tar
Quote
C. Add uEnv.txt to /boot directory (Optional)
To adjust the default envs to your specific configuration, and not having to permanently alter u-boot envs NAND. Create a text file in /boot directory with the content in the format that u-boot envs are listed.
Examples:
The example below only to demonstrate the syntax in uEnv.txt (they might or might not apply to your current settings):
- Load appropriate DTB file for the kernel to run GoFlex Net box.
- Use SD card, USB and SATA for booting. The kernel and rootfs search order is as they are appeared on the list: mmc, usb, ide.
- Define that there are 8 storage devices (i.e. disk partitions).
cat /boot/uEnv.txt
dtb_file=/boot/dts/kirkwood-goflexnet.dtb
devices=mmc usb ide
disks=0 1 2 3 4 5 6 7
Without using that uEnv.txt capability (mainline u-boot does not have this), you can also use u-boot script loading. However, that will take some little works to prepare, too.
====
Besides the 2 methods above, to make as simple as possible, you can just follow this simple rule to set envs:
To set an env at the prompt, you would put everything in the value side (everything after the first = sign) in single quotes to ensure space and special characters are taken as is.
For example,
bootcmd=setenv bootargs ${console} ${mtdparts} ${bootargs_root}; ubi part root; ubifsmount ubi:root; ubifsload 0x800000 ${kernel}; ubifsload 0x1100000 ${initrd}; bootm 0x800000 0x1100000
The command would be:
setenv bootcmd 'setenv bootargs ${console} ${mtdparts} ${bootargs_root}; ubi part root; ubifsmount ubi:root; ubifsload 0x800000 ${kernel}; ubifsload 0x1100000 ${initrd}; bootm 0x800000 0x1100000'
-bodhi
===========================
Forum Wiki
bodhi's corner (buy bodhi a beer)
Edited 2 time(s). Last edit at 10/16/2018 04:15AM by bodhi.
|
Martin from Dortmund
Re: HOW2: Repair Pogo E02 with Raspberry PI (1,2 or 3) JTAG and OpenOCD October 16, 2018 04:40AM |
Single Quote... Thanks for that hint. I will give it a try after work ...
An editable Text file has the advantage that it is quite easy to make individual changes e. g. IP and MAC settings per device, and feed them (after loading a common "base" Uboot Image per JTAG) without knowledge about the correct physical adress location of environment inside Flash ROM through serial line without any need of network connection and attached storage, TFTP server etc.
An editable Text file has the advantage that it is quite easy to make individual changes e. g. IP and MAC settings per device, and feed them (after loading a common "base" Uboot Image per JTAG) without knowledge about the correct physical adress location of environment inside Flash ROM through serial line without any need of network connection and attached storage, TFTP server etc.
|
Re: HOW2: Repair Pogo E02 with Raspberry PI (1,2 or 3) JTAG and OpenOCD October 16, 2018 04:58AM |
Admin Registered: 14 years ago Posts: 19,728 |
> An editable Text file has the advantage that it is
> quite easy to make individual changes e. g. IP and
> MAC settings per device, and feed them (after
> loading a common "base" Uboot Image per JTAG)
> without knowledge about the correct physical
> adress location of environment inside Flash ROM
> through serial line without any need of network
> connection and attached storage, TFTP server etc.
We had this capability for many years here :) usually it is much better to put it in a storage drive or the NAND rootfs partition. Why? because it can be used to tailor your environment without having a serial connection permanently attached.
-bodhi
===========================
Forum Wiki
bodhi's corner (buy bodhi a beer)
Edited 1 time(s). Last edit at 10/16/2018 05:00AM by bodhi.
|
Martin from Dortmund
Re: HOW2: Repair Pogo E02 with Raspberry PI (1,2 or 3) JTAG and OpenOCD October 16, 2018 05:37AM |
Quote
bodhi
... usually it is much better to put it in a storage drive or the NAND rootfs partition.
In my understanding that can be achieved by asserting "saveenv" after loading the environment variables line-by-line with "setenv".
The situation now is, that there is a "tail" of environment variables at the end of the u-boot image. (I assume thats the reason, that the image is slighty larger than 512 kByte...)
The environment there is much shorter than the one in the separate image.
If I make uboot start from a flash only filled with the u-boot image itself no crc error is reported. The only problem is the quite short set of environment variables.
If I use JTAG debugger to clear the flash region 0x80000 size 0x20000 and write the separate *.environment to that location. u-boot regrets to load the environment and loads integrated default values ...
So it seem, that I have no way to puzzle together the last environment-image and u-boot image itself into the flash.
|
Re: HOW2: Repair Pogo E02 with Raspberry PI (1,2 or 3) JTAG and OpenOCD October 16, 2018 07:16AM |
Admin Registered: 14 years ago Posts: 19,728 |
Martin from Dortmund Wrote:
-------------------------------------------------------
>
> In my understanding that can be achieved by
> asserting "saveenv" after loading the environment
> variables line-by-line with "setenv".
Sure. Those are the envs you are happy with (them after loading from a text file such as uEnv.txt, or type in explicitly at the prompt).
The text file uEnv.txt is meant to be a way to change envs without interact with serial console during boot (automatically load and imported). This file is to be resided on the rootfs /boot folder.
So uEnv.txt serves both purposes: During testing or inital setting (your situation), and later in normal operation to "tweak" the system behavior each time it's booting.
> If I use JTAG debugger to clear the flash region
> 0x80000 size 0x20000 and write the separate
> *.environment to that location. u-boot regrets to
> load the environment and loads integrated default
> values ...
That is because you are not supposed to write that text file *.environment directly to flash. It has to be an image (with checksum) such as
See the installation instruction in my u-boot release thread for hints how to do what you want. The envs location might be different, but the idea is the same.
-bodhi
===========================
Forum Wiki
bodhi's corner (buy bodhi a beer)
-------------------------------------------------------
>
>Quote
bodhi
> ... usually it is much better to put it in a
> storage drive or the NAND rootfs partition.
>
> In my understanding that can be achieved by
> asserting "saveenv" after loading the environment
> variables line-by-line with "setenv".
Sure. Those are the envs you are happy with (them after loading from a text file such as uEnv.txt, or type in explicitly at the prompt).
The text file uEnv.txt is meant to be a way to change envs without interact with serial console during boot (automatically load and imported). This file is to be resided on the rootfs /boot folder.
So uEnv.txt serves both purposes: During testing or inital setting (your situation), and later in normal operation to "tweak" the system behavior each time it's booting.
> If I use JTAG debugger to clear the flash region
> 0x80000 size 0x20000 and write the separate
> *.environment to that location. u-boot regrets to
> load the environment and loads integrated default
> values ...
That is because you are not supposed to write that text file *.environment directly to flash. It has to be an image (with checksum) such as
uboot-env.imgor
uboot.2016.05-tld-1.environment.img
See the installation instruction in my u-boot release thread for hints how to do what you want. The envs location might be different, but the idea is the same.
-bodhi
===========================
Forum Wiki
bodhi's corner (buy bodhi a beer)
|
Martin from Dortmund
Re: HOW2: Repair Pogo E02 with Raspberry PI (1,2 or 3) JTAG and OpenOCD October 16, 2018 09:14AM |
Uhh, I think, I must look after that. I am quite sure, that I have done so, but i have copied it to the working directory of OpenOCD renaming it to a convenient short name, so it is not clear from file name, how it was named originally. Perhaps I have worked on the wrong file all the time ....
It will be best to do a complete refresh of all the files from downloaded tar-Archives ... they are definitvely untouched ...
It will be best to do a complete refresh of all the files from downloaded tar-Archives ... they are definitvely untouched ...
|
Re: HOW2: Repair Pogo E02 with Raspberry PI (1,2 or 3) JTAG and OpenOCD October 16, 2018 01:07PM |
Registered: 6 years ago Posts: 23 |
No success
OpenOCD:
serial console after reset button press
I think I'll proceed to try to edit environment text file so that it is possible to send it as a chunk of "setenv" commands via serial console
OpenOCD:
>  nand write 0 uboot-env.img 0x80000 oob_softecc_kw
wrote file uboot-env.img to NAND flash 0 up to offset 0x000a0000 in 48.620975s (2.633 KiB/s)
>
serial console after reset button press
-Boot 2016.11+dfsg1-4 (Mar 27 2017 - 18:39:51 +0000)
Seagate FreeAgent DockStar

SoC:   Kirkwood 88F6281_A0
DRAM:  128 MiB
WARNING: Caches not enabled
NAND:  256 MiB
NAND read from offset 80000 failed -74
*** Warning - readenv() failed, using default environment

In:    serial
Out:   serial
Err:   serial
Net:   egiga0
Error: egiga0 address not set.

88E1116 Initialized on egiga0
Hit any key to stop autoboot:  3 \0x08\0x08\0x08 0
DockStar>
I think I'll proceed to try to edit environment text file so that it is possible to send it as a chunk of "setenv" commands via serial console
|
Re: HOW2: Repair Pogo E02 with Raspberry PI (1,2 or 3) JTAG and OpenOCD October 16, 2018 03:46PM |
Registered: 6 years ago Posts: 23 |
Next step, it seems, that the NAND Location for environment has changed for Dockstar in the latest u-boot version
Loading the environment image to 0xC0000 does not help, NAND read Failed is reported
Following file sent line by line via CuteCom results in a correct environment
I have invalidated MAC and IP- Adresses...
After....
and resetting Dockstar
Loading the environment image to 0xC0000 does not help, NAND read Failed is reported
U-Boot 2017.07-tld-1 (Oct 24 2017 - 22:32:36 -0700)
Seagate FreeAgent DockStar

SoC:   Kirkwood 88F6281_A0
DRAM:  128 MiB
WARNING: Caches not enabled
NAND:  256 MiB
NAND read from offset c0000 failed -74
*** Warning - readenv() failed, using default environment
Following file sent line by line via CuteCom results in a correct environment
setenv arcNumber 2998
setenv bootcmd_exec 'run load_uimage\;if run load_initrd\;then if run load_dtb\;then bootm $load_uimage_addr $load_initrd_addr $load_dtb_addr\;else bootm $load_uimage_addr $load_initrd_addr\; fi\; else if run load_dtb\; then bootm $load_uimage_addr - $load_dtb_addr\; else bootm $load_uimage_addr\; fi\; fi'
setenv bootcmd 'run bootcmd_uenv\; run scan_disk\; run set_bootargs\; run bootcmd_exec'
setenv bootcmd_uenv 'run uenv_load\; if test $uenv_loaded -eq 1\; then run uenv_import\; fi'
setenv bootdelay 10
setenv bootdev usb
setenv device 0:1
setenv devices 'usb ide mmc'
setenv disks '0 1 2 3'
setenv ethact egiga0
setenv ethaddr '00:10:75:rr:ee:tt'
setenv if_netconsole 'ping $serverip'
setenv ipaddr 192.168.yy.zz
setenv led_error 'orange blinking'
setenv led_exit 'green off'
setenv led_init 'green blinking'
setenv dtb_file '/boot/dts/kirkwood-pogo_e02.dtb'
setenv load_dtb_addr '0x1c00000'
setenv load_initrd_addr '0x1100000'
setenv load_uimage_addr '0x800000'
setenv load_dtb 'echo loading DTB $dtb_file ...\; load $bootdev $device $load_dtb_addr $dtb_file'
setenv load_initrd 'echo loading uInitrd ...\; load $bootdev $device $load_initrd_addr /boot/uInitrd'
setenv load_uimage 'echo loading uImage ...\; load $bootdev $device $load_uimage_addr /boot/uImage'
setenv machid
setenv mainlineLinux yes
setenv mtdids 'nand0=orion_nand'
setenv mtdparts 'mtdparts=orion_nand:1M(u-boot),4M(uImage),32M(rootfs),-(data)'
setenv partition 'nand0,2'
setenv preboot_nc 'run if_netconsole start_netconsole'
setenv scan_disk 'echo running scan_disk ...\; scan_done=0\; setenv scan_usb "usb start"\;  setenv scan_ide "ide reset"\;  setenv scan_mmc "mmc rescan"\; for dev in $devices\; do if test $scan_done -eq 0\; then echo Scan device $dev\; run scan_$dev\; for disknum in $disks\; do if test $scan_done -eq 0\; then echo device $dev $disknum:1\; if load $dev $disknum:1 $load_uimage_addr /boot/uImage 1\; then scan_done=1\; echo Found bootable drive on $dev $disknum\; setenv device $disknum:1\; setenv bootdev $dev\; fi\; fi\; done\; fi\;' done
setenv serverip '192.168.xx.xx'
setenv set_bootargs 'setenv bootargs console=ttyS0,115200 root=LABEL=rootfs rootdelay=10 $mtdparts $custom_params'
setenv start_netconsole 'setenv ncip $serverip\; setenv bootdelay 10\; setenv stdin nc\; setenv stdout nc\; setenv stderr nc\; version\;'
setenv stderr serial
setenv stdin serial
setenv stdout serial
setenv uenv_addr 0x810000
setenv uenv_import echo importing envs ...\; env import -t $uenv_addr $filesize
setenv uenv_init_devices 'setenv init_usb "usb start"\;  setenv init_ide "ide reset"\;  setenv init_mmc "mmc rescan"\; for devtype in $devices\; do run init_$devtype\; done\;'
setenv uenv_load 'run uenv_init_devices\; setenv uenv_loaded 0\; for devtype in $devices\;  do for disknum in 0\; do run uenv_read_disk\; done\; done\;'
setenv uenv_read_disk 'if test $devtype -eq mmc\; then if $devtype part\; then run uenv_read\;  fi\; else if $devtype part $disknum\; then run uenv_read\; fi\;  fi'
setenv uenv_read 'echo loading envs from $devtype $disknum ...\; if load $devtype $disknum:1 $uenv_addr /boot/uEnv.txt\; then setenv uenv_loaded 1\; fi'
setenv usb_ready_retry 15
I have invalidated MAC and IP- Adresses...
After....
DockStar> saveenv
Saving Environment to NAND...
Erasing NAND...

Erasing at 0xc0000 -- 100% complete.
Writing to NAND... OK
DockStar>
and resetting Dockstar
U-Boot 2017.07-tld-1 (Oct 24 2017 - 22:32:36 -0700)
Seagate FreeAgent DockStar

SoC:   Kirkwood 88F6281_A0
DRAM:  128 MiB
WARNING: Caches not enabled
NAND:  256 MiB
In:    serial
Out:   serial
Err:   serial
Net:   egiga0
88E1116 Initialized on egiga0
|
Re: HOW2: Repair Pogo E02 with Raspberry PI (1,2 or 3) JTAG and OpenOCD October 16, 2018 06:45PM |
Admin Registered: 14 years ago Posts: 19,728 |
> U-Boot 2017.07-tld-1 (Oct 24 2017 - 22:32:36
> -0700)
> Seagate FreeAgent DockStar
>
> SoC: Kirkwood 88F6281_A0
> DRAM: 128 MiB
> WARNING: Caches not enabled
> NAND: 256 MiB
> In: serial
> Out: serial
> Err: serial
> Net: egiga0
> 88E1116 Initialized on egiga0
Cool. So is it running OK or you still have problem?
-bodhi
===========================
Forum Wiki
bodhi's corner (buy bodhi a beer)
|
Martin from Dortmund
Re: HOW2: Repair Pogo E02 with Raspberry PI (1,2 or 3) JTAG and OpenOCD October 17, 2018 12:38AM |
|
Re: HOW2: Repair Pogo E02 with Raspberry PI (1,2 or 3) JTAG and OpenOCD October 17, 2018 01:59AM |
Admin Registered: 14 years ago Posts: 19,728 |
Quote
WARNING: Caches not enabled
This warning is OK. You can ignore it.
-bodhi
===========================
Forum Wiki
bodhi's corner (buy bodhi a beer)
|
Re: HOW2: Repair Pogo E02 with Raspberry PI (1,2 or 3) JTAG and OpenOCD November 24, 2018 04:07AM |
Registered: 6 years ago Posts: 13 |
hi @joerg_999
i'm trying to unbrick my stora ms2110 via jtag (rasp PI1)/openocd
so i soldered jtag, and seems ok using openocd :
i can't halt it :/ and without it i can't acces nand...
without knowing what i'm doing i use this conf (pogo):
perhaps some address are not good for the stora.
thx for your help.
AloneTrio
i'm trying to unbrick my stora ms2110 via jtag (rasp PI1)/openocd
so i soldered jtag, and seems ok using openocd :
root@raspberrypi:~# openocd -f pogo.cfg
Open On-Chip Debugger 0.10.0+dev-00581-g1b864d6e (2018-11-24-00:25)
Licensed under GNU GPL v2
For bug reports, read
        http://openocd.org/doc/doxygen/bugs.html
BCM2835 GPIO config: tck = 11, tms = 25, tdi = 10, tdo = 9
BCM2835 GPIO nums: swclk = 25, swdio = 24
BCM2835 GPIO config: trst = 7
trst_only separate trst_push_pull
adapter speed: 200 kHz
adapter_nsrst_delay: 500
Info : auto-selecting first available session transport "jtag". To override use 'transport select <transport>'.
trst_and_srst separate srst_gates_jtag trst_push_pull srst_open_drain connect_deassert_srst
adapter_nsrst_delay: 200
jtag_ntrst_delay: 200
dcc downloads are enabled
Warn : use 'feroceon.cpu' as target identifier, not '0'
pogo_load_uboot
Info : Listening on port 6666 for tcl connections
Info : Listening on port 4444 for telnet connections
Info : BCM2835 GPIO JTAG/SWD bitbang driver
Info : JTAG and SWD modes enabled
Info : clock speed 200 kHz
Info : JTAG tap: feroceon.cpu tap/device found: 0x20a023d3 (mfg: 0x1e9 (Marvell Semiconductors), part: 0x0a02, ver: 0x2)
Info : Embedded ICE version 0
Info : feroceon.cpu: hardware has 1 breakpoint/watchpoint unit
Info : Listening on port 3333 for gdb connections
Info : accepting 'telnet' connection on tcp/4444
Info : Halt timed out, wake up GDB.
Error: timed out while waiting for target halted
i can't halt it :/ and without it i can't acces nand...
without knowing what i'm doing i use this conf (pogo):
perhaps some address are not good for the stora.
# Pogoplug E02
 # modification joerg_999 14.03.2016
 # use this pogo.cfg taken from sheevaplug to use with Raspi direct or Buspirate jtag adapter
 # use raspberrypi-native mode
 # we use the Pins from SPI Interface (violett) 19,21,23,26 and 22, + 20 for GND
 # see GPIO schematic Raspi Raspi GPIO

 # source [find interface/buspirate.cfg]
 # source [find interface/sysfsgpio-raspberrypi.cfg]
 source [find interface/raspberrypi123-native.cfg]
 source [find target/feroceon.cfg]

$_TARGETNAME configure \
-work-area-phys 0x10000000 \
-work-area-size 65536 \
-work-area-backup 0
arm7_9 dcc_downloads enable
 # this assumes the hardware default peripherals location before u-Boot moves it
 set _FLASHNAME $_CHIPNAME.flash
 nand device $_FLASHNAME orion 0 0xd8000000
 proc pogo_init { } {
 # We need to assert DBGRQ while holding nSRST down.
 # However DBGACK will be set only when nSRST is released.
 # Furthermore, the JTAG interface doesn't respond at all when
 # the CPU is in the WFI (wait for interrupts) state, so it is
 # possible that initial tap examination failed. So let's
 # re-examine the target again here when nSRST is asserted which
 # should then succeed.
 jtag_reset 0 1
 feroceon.cpu arp_examine
 halt 0
 jtag_reset 0 0
 wait_halt
 arm mcr 15 0 0 1 0 0x00052078
 mww 0xD0001400 0x43000C30 ;# DDR SDRAM Configuration Register
 mww 0xD0001404 0x39543000 ;# Dunit Control Low Register
 mww 0xD0001408 0x22125451 ;# DDR SDRAM Timing (Low) Register
 mww 0xD000140C 0x00000833 ;# DDR SDRAM Timing (High) Register
 mww 0xD0001410 0x000000CC ;# DDR SDRAM Address Control Register
 mww 0xD0001414 0x00000000 ;# DDR SDRAM Open Pages Control Register
 mww 0xD0001418 0x00000000 ;# DDR SDRAM Operation Register
 mww 0xD000141C 0x00000C52 ;# DDR SDRAM Mode Register
 mww 0xD0001420 0x00000042 ;# DDR SDRAM Extended Mode Register
 mww 0xD0001424 0x0000F17F ;# Dunit Control High Register
 mww 0xD0001428 0x00085520 ;# Dunit Control High Register
 mww 0xD000147c 0x00008552 ;# Dunit Control High Register
 mww 0xD0001504 0x0FFFFFF1 ;# CS0n Size Register
 mww 0xD0001508 0x10000000 ;# CS1n Base Register
 mww 0xD000150C 0x0FFFFFF5 ;# CS1n Size Register
 mww 0xD0001514 0x00000000 ;# CS2n Size Register
 mww 0xD000151C 0x00000000 ;# CS3n Size Register
 mww 0xD0001494 0x003C0000 ;# DDR2 SDRAM ODT Control (Low) Register
 mww 0xD0001498 0x00000000 ;# DDR2 SDRAM ODT Control (High) REgister
 mww 0xD000149C 0x0000F80F ;# DDR2 Dunit ODT Control Register
 mww 0xD0001480 0x00000001 ;# DDR SDRAM Initialization Control Register
 mww 0xD0020204 0x00000000 ;# Main IRQ Interrupt Mask Register
 mww 0xD0020204 0x00000000 ;# "
 mww 0xD0020204 0x00000000 ;# "
 mww 0xD0020204 0x00000000 ;# "
 mww 0xD0020204 0x00000000 ;# "
 mww 0xD0020204 0x00000000 ;# "
 mww 0xD0020204 0x00000000 ;# "
 mww 0xD0020204 0x00000000 ;# "
 mww 0xD0020204 0x00000000 ;# "
 mww 0xD0020204 0x00000000 ;# "
 mww 0xD0020204 0x00000000 ;# "
 mww 0xD0020204 0x00000000 ;# "
 mww 0xD0020204 0x00000000 ;# "
 mww 0xD0020204 0x00000000 ;# "
 mww 0xD0020204 0x00000000 ;# "
 mww 0xD0020204 0x00000000 ;# "
 mww 0xD0020204 0x00000000 ;# "
 mww 0xD0020204 0x00000000 ;# "
 mww 0xD0020204 0x00000000 ;# "
 mww 0xD0020204 0x00000000 ;# "
 mww 0xD0020204 0x00000000 ;# "
 mww 0xD0020204 0x00000000 ;# "
 mww 0xD0020204 0x00000000 ;# "
 mww 0xD0020204 0x00000000 ;# "
 mww 0xD0020204 0x00000000 ;# "
 mww 0xD0020204 0x00000000 ;# "
 mww 0xD0020204 0x00000000 ;# "
 mww 0xD0020204 0x00000000 ;# "
 mww 0xD0020204 0x00000000 ;# "
 mww 0xD0020204 0x00000000 ;# "
 mww 0xD0020204 0x00000000 ;# "
 mww 0xD0020204 0x00000000 ;# "
 mww 0xD0020204 0x00000000 ;# "
 mww 0xD0020204 0x00000000 ;# "
 mww 0xD0020204 0x00000000 ;# "
 mww 0xD0020204 0x00000000 ;# "
 mww 0xD0020204 0x00000000 ;# "
 mww 0xD0010000 0x01111111 ;# MPP 0 to 7
 mww 0xD0010004 0x11113322 ;# MPP 8 to 15
 mww 0xD0010008 0x00001111 ;# MPP 16 to 23
 mww 0xD0010418 0x003E07CF ;# NAND Read Parameters REgister
 mww 0xD001041C 0x000F0F0F ;# NAND Write Parameters Register
 mww 0xD0010470 0x01C7D943 ;# NAND Flash Control Register
 }
 proc pogo_reflash_uboot { } {
 # reflash the u-Boot binary and reboot into it
 pogo_init
 nand probe 0
 nand erase 0 0x0 0xa0000
 nand write 0 uboot.kwb 0 oob_softecc_kw
 resume
 }
 proc pogo_reflash_uboot_env { } {
 # reflash the u-Boot environment variables area
 pogo_init
 nand probe 0
 nand erase 0 0xc0000 0x20000
 nand write 0 uboot-env.bin 0xc0000 oob_softecc_kw
 resume
 }
 proc pogo_load_uboot { } {
 # load u-Boot into RAM and execute it
 pogo_init
 load_image uboot.kwb
 verify_image uboot.kwb
 resume 0x800200
 }
thx for your help.
AloneTrio
|
Re: HOW2: Repair Pogo E02 with Raspberry PI (1,2 or 3) JTAG and OpenOCD November 24, 2018 05:27AM |
Admin Registered: 14 years ago Posts: 19,728 |
AloneTrio,
A few observations.
The config file that you use is for Pogo E02. The Stora has the same SoC, but there are differences.
So different u-boot image, envs image, and training sequence are needed.
1. This uboot.kwb should be the new Stora u-boot. Get the uboot.2017.07-tld-1.netgear_ms2110.mtd0.kwb from my release thread: https://forum.doozan.com/read.php?3,12381
2. This uboot-env.bin should be the default envs uboot.2016.05-tld-1.environment.img (also from https://forum.doozan.com/read.php?3,12381)
3. Here is the tricky part. The training sequence that joerg has is for Pogo E02.
You need to look at the Stora training sequence from my latest u-boot source for the Stora (from the GitHub) and incorporate the Stora parameters:
https://github.com/mibodhi/u-boot-kirkwood/blob/2017.07-kirkwood-tld-1/board/Marvell/netgear_ms2110/kwbimage.cfg
Once you get this JTAG working, your config will be the Stora config that will come in handy for future Stora unbricking.
-bodhi
===========================
Forum Wiki
bodhi's corner (buy bodhi a beer)
A few observations.
The config file that you use is for Pogo E02. The Stora has the same SoC, but there are differences.
So different u-boot image, envs image, and training sequence are needed.
1. This uboot.kwb should be the new Stora u-boot. Get the uboot.2017.07-tld-1.netgear_ms2110.mtd0.kwb from my release thread: https://forum.doozan.com/read.php?3,12381
load_image uboot.kwb
2. This uboot-env.bin should be the default envs uboot.2016.05-tld-1.environment.img (also from https://forum.doozan.com/read.php?3,12381)
nand write 0 uboot-env.bin 0xc0000 oob_softecc_kw
3. Here is the tricky part. The training sequence that joerg has is for Pogo E02.
mww 0xD0001400 0x43000C30 ;# DDR SDRAM Configuration Register
 mww 0xD0001404 0x39543000 ;# Dunit Control Low Register
 mww 0xD0001408 0x22125451 ;# DDR SDRAM Timing (Low) Register
 mww 0xD000140C 0x00000833 ;# DDR SDRAM Timing (High) Register
 mww 0xD0001410 0x000000CC ;# DDR SDRAM Address Control Register
 mww 0xD0001414 0x00000000 ;# DDR SDRAM Open Pages Control Register
 mww 0xD0001418 0x00000000 ;# DDR SDRAM Operation Register
 mww 0xD000141C 0x00000C52 ;# DDR SDRAM Mode Register
 mww 0xD0001420 0x00000042 ;# DDR SDRAM Extended Mode Register
 mww 0xD0001424 0x0000F17F ;# Dunit Control High Register
 mww 0xD0001428 0x00085520 ;# Dunit Control High Register
 mww 0xD000147c 0x00008552 ;# Dunit Control High Register
 mww 0xD0001504 0x0FFFFFF1 ;# CS0n Size Register
 mww 0xD0001508 0x10000000 ;# CS1n Base Register
 mww 0xD000150C 0x0FFFFFF5 ;# CS1n Size Register
 mww 0xD0001514 0x00000000 ;# CS2n Size Register
 mww 0xD000151C 0x00000000 ;# CS3n Size Register
 mww 0xD0001494 0x003C0000 ;# DDR2 SDRAM ODT Control (Low) Register
 mww 0xD0001498 0x00000000 ;# DDR2 SDRAM ODT Control (High) REgister
 mww 0xD000149C 0x0000F80F ;# DDR2 Dunit ODT Control Register
 mww 0xD0001480 0x00000001 ;# DDR SDRAM Initialization Control Register
 mww 0xD0020204 0x00000000 ;# Main IRQ Interrupt Mask Register
 mww 0xD0020204 0x00000000 ;# "
 mww 0xD0020204 0x00000000 ;# "
 mww 0xD0020204 0x00000000 ;# "
 mww 0xD0020204 0x00000000 ;# "
 mww 0xD0020204 0x00000000 ;# "
 mww 0xD0020204 0x00000000 ;# "
 mww 0xD0020204 0x00000000 ;# "
 mww 0xD0020204 0x00000000 ;# "
 mww 0xD0020204 0x00000000 ;# "
 mww 0xD0020204 0x00000000 ;# "
 mww 0xD0020204 0x00000000 ;# "
 mww 0xD0020204 0x00000000 ;# "
 mww 0xD0020204 0x00000000 ;# "
 mww 0xD0020204 0x00000000 ;# "
 mww 0xD0020204 0x00000000 ;# "
 mww 0xD0020204 0x00000000 ;# "
 mww 0xD0020204 0x00000000 ;# "
 mww 0xD0020204 0x00000000 ;# "
 mww 0xD0020204 0x00000000 ;# "
 mww 0xD0020204 0x00000000 ;# "
 mww 0xD0020204 0x00000000 ;# "
 mww 0xD0020204 0x00000000 ;# "
 mww 0xD0020204 0x00000000 ;# "
 mww 0xD0020204 0x00000000 ;# "
 mww 0xD0020204 0x00000000 ;# "
 mww 0xD0020204 0x00000000 ;# "
 mww 0xD0020204 0x00000000 ;# "
 mww 0xD0020204 0x00000000 ;# "
 mww 0xD0020204 0x00000000 ;# "
 mww 0xD0020204 0x00000000 ;# "
 mww 0xD0020204 0x00000000 ;# "
 mww 0xD0020204 0x00000000 ;# "
 mww 0xD0020204 0x00000000 ;# "
 mww 0xD0020204 0x00000000 ;# "
 mww 0xD0020204 0x00000000 ;# "
 mww 0xD0020204 0x00000000 ;# "
 mww 0xD0010000 0x01111111 ;# MPP 0 to 7
 mww 0xD0010004 0x11113322 ;# MPP 8 to 15
 mww 0xD0010008 0x00001111 ;# MPP 16 to 23
 mww 0xD0010418 0x003E07CF ;# NAND Read Parameters REgister
 mww 0xD001041C 0x000F0F0F ;# NAND Write Parameters Register
 mww 0xD0010470 0x01C7D943 ;# NAND Flash Control Register
You need to look at the Stora training sequence from my latest u-boot source for the Stora (from the GitHub) and incorporate the Stora parameters:
https://github.com/mibodhi/u-boot-kirkwood/blob/2017.07-kirkwood-tld-1/board/Marvell/netgear_ms2110/kwbimage.cfg
Once you get this JTAG working, your config will be the Stora config that will come in handy for future Stora unbricking.
-bodhi
===========================
Forum Wiki
bodhi's corner (buy bodhi a beer)
|
Re: HOW2: Repair Pogo E02 with Raspberry PI (1,2 or 3) JTAG and OpenOCD November 24, 2018 07:44AM |
Registered: 6 years ago Posts: 13 |
exact same result, but perhaps i missed something in the conf file :/
output :
the modified config file i used ( forget the name or the comments ) :
root@raspberrypi:~# openocd -f pogo.cfg
Open On-Chip Debugger 0.10.0+dev-00581-g1b864d6e (2018-11-24-00:25)
Licensed under GNU GPL v2
For bug reports, read
        http://openocd.org/doc/doxygen/bugs.html
BCM2835 GPIO config: tck = 11, tms = 25, tdi = 10, tdo = 9
BCM2835 GPIO nums: swclk = 25, swdio = 24
BCM2835 GPIO config: trst = 7
trst_only separate trst_push_pull
adapter speed: 200 kHz
adapter_nsrst_delay: 500
Info : auto-selecting first available session transport "jtag". To override use 'transport select <transport>'.
trst_and_srst separate srst_gates_jtag trst_push_pull srst_open_drain connect_deassert_srst
adapter_nsrst_delay: 200
jtag_ntrst_delay: 200
Warn : use 'feroceon.cpu' as target identifier, not '0'
pogo_load_uboot
Info : Listening on port 6666 for tcl connections
Info : Listening on port 4444 for telnet connections
Info : BCM2835 GPIO JTAG/SWD bitbang driver
Info : JTAG and SWD modes enabled
Info : clock speed 200 kHz
Info : JTAG tap: feroceon.cpu tap/device found: 0x20a023d3 (mfg: 0x1e9 (Marvell Semiconductors), part: 0x0a02, ver: 0x2)
Info : Embedded ICE version 0
Info : feroceon.cpu: hardware has 1 breakpoint/watchpoint unit
Info : Listening on port 3333 for gdb connections
output :
root@raspberrypi:~# nc localhost 4444
��������Open On-Chip Debugger
> halt
halt
Halt timed out, wake up GDB.
timed out while waiting for target halted

>
the modified config file i used ( forget the name or the comments ) :
root@raspberrypi:~# cat /usr/share/openocd/scripts/board/pogo.cfg
# Pogoplug E02
 # modification joerg_999 14.03.2016
 # use this pogo.cfg taken from sheevaplug to use with Raspi direct or Buspirate jtag adapter
 # use raspberrypi-native mode
 # we use the Pins from SPI Interface (violett) 19,21,23,26 and 22, + 20 for GND
 # see GPIO schematic Raspi Raspi GPIO

 # source [find interface/buspirate.cfg]
 # source [find interface/sysfsgpio-raspberrypi.cfg]
 source [find interface/raspberrypi123-native.cfg]
 source [find target/feroceon.cfg]

$_TARGETNAME configure \
-work-area-phys 0x10000000 \
-work-area-size 65536 \
-work-area-backup 0
#arm7_9 dcc_downloads enable
 # this assumes the hardware default peripherals location before u-Boot moves it
 set _FLASHNAME $_CHIPNAME.flash
 nand device $_FLASHNAME orion 0 0xd8000000
 proc pogo_init { } {
 # We need to assert DBGRQ while holding nSRST down.
 # However DBGACK will be set only when nSRST is released.
 # Furthermore, the JTAG interface doesn't respond at all when
 # the CPU is in the WFI (wait for interrupts) state, so it is
 # possible that initial tap examination failed. So let's
 # re-examine the target again here when nSRST is asserted which
 # should then succeed.
 jtag_reset 0 1
 feroceon.cpu arp_examine
 halt 0
 jtag_reset 0 0
 wait_halt
 arm mcr 15 0 0 1 0 0x00052078
 mww 0xD0001400 0x43000C30 ;# DDR SDRAM Configuration Register
 mww 0xD0001404 0x37543000 ;# Dunit Control Low Register
 mww 0xD0001408 0x22125451 ;# DDR SDRAM Timing (Low) Register
 mww 0xD000140C 0x00000833 ;# DDR SDRAM Timing (High) Register
 mww 0xD0001410 0x00000099 ;# DDR SDRAM Address Control Register
 mww 0xD0001414 0x00000000 ;# DDR SDRAM Open Pages Control Register
 mww 0xD0001418 0x00000000 ;# DDR SDRAM Operation Register
 mww 0xD000141C 0x00000C52 ;# DDR SDRAM Mode Register
 mww 0xD0001420 0x00000004 ;# DDR SDRAM Extended Mode Register
 mww 0xD0001424 0x0000F17F ;# Dunit Control High Register
 mww 0xD0001428 0x00085520 ;# Dunit Control High Register
 mww 0xD000147c 0x00008552 ;# Dunit Control High Register
 mww 0xD0001500 0x00000000 ;# CS[0]n Base address to 0x0
 mww 0xD0001504 0x03FFFFF1 ;# CS0n Size Register
 mww 0xD0001508 0x04000000 ;# CS1n Base Register
 mww 0xD000150C 0x03FFFFF5 ;# CS1n Size Register
 mww 0xD0001514 0x00000000 ;# CS2n Size Register
 mww 0xD000151C 0x00000000 ;# CS3n Size Register
 mww 0xD0001494 0x00120012 ;# DDR2 SDRAM ODT Control (Low) Register
 mww 0xD0001498 0x00000000 ;# DDR2 SDRAM ODT Control (High) REgister
 mww 0xD000149C 0x0000E40F ;# DDR2 Dunit ODT Control Register
 mww 0xD0001480 0x00000001 ;# DDR SDRAM Initialization Control Register
 mww 0xD0020204 0x00000000 ;# Main IRQ Interrupt Mask Register
 mww 0xD0020204 0x00000000 ;# "
 mww 0xD0020204 0x00000000 ;# "
 mww 0xD0020204 0x00000000 ;# "
 mww 0xD0020204 0x00000000 ;# "
 mww 0xD0020204 0x00000000 ;# "
 mww 0xD0020204 0x00000000 ;# "
 mww 0xD0020204 0x00000000 ;# "
 mww 0xD0020204 0x00000000 ;# "
 mww 0xD0020204 0x00000000 ;# "
 mww 0xD0020204 0x00000000 ;# "
 mww 0xD0020204 0x00000000 ;# "
 mww 0xD0020204 0x00000000 ;# "
 mww 0xD0020204 0x00000000 ;# "
 mww 0xD0020204 0x00000000 ;# "
 mww 0xD0020204 0x00000000 ;# "
 mww 0xD0020204 0x00000000 ;# "
 mww 0xD0020204 0x00000000 ;# "
 mww 0xD0020204 0x00000000 ;# "
 mww 0xD0020204 0x00000000 ;# "
 mww 0xD0020204 0x00000000 ;# "
 mww 0xD0020204 0x00000000 ;# "
 mww 0xD0020204 0x00000000 ;# "
 mww 0xD0020204 0x00000000 ;# "
 mww 0xD0020204 0x00000000 ;# "
 mww 0xD0020204 0x00000000 ;# "
 mww 0xD0020204 0x00000000 ;# "
 mww 0xD0020204 0x00000000 ;# "
 mww 0xD0020204 0x00000000 ;# "
 mww 0xD0020204 0x00000000 ;# "
 mww 0xD0020204 0x00000000 ;# "
 mww 0xD0020204 0x00000000 ;# "
 mww 0xD0020204 0x00000000 ;# "
 mww 0xD0020204 0x00000000 ;# "
 mww 0xD0020204 0x00000000 ;# "
 mww 0xD0020204 0x00000000 ;# "
 mww 0xD0020204 0x00000000 ;# "
 mww 0xD0010000 0x01111111 ;# MPP 0 to 7
 mww 0xD0010004 0x11113322 ;# MPP 8 to 15
 mww 0xD0010008 0x00001111 ;# MPP 16 to 23
 mww 0xD0010418 0x003E07CF ;# NAND Read Parameters REgister
 mww 0xD001041C 0x000F0F0F ;# NAND Write Parameters Register
 mww 0xD0010470 0x01C7D943 ;# NAND Flash Control Register
 }
 proc pogo_reflash_uboot { } {
 # reflash the u-Boot binary and reboot into it
 pogo_init
 nand probe 0
 nand erase 0 0x0 0xa0000
 nand write 0 uboot.kwb 0 oob_softecc_kw
 resume
 }
 proc pogo_reflash_uboot_env { } {
 # reflash the u-Boot environment variables area
 pogo_init
 nand probe 0
 nand erase 0 0xc0000 0x20000
 nand write 0 uboot-env.bin 0xc0000 oob_softecc_kw
 resume
 }
 proc pogo_load_uboot { } {
 # load u-Boot into RAM and execute it
 pogo_init
 load_image uboot.kwb
 verify_image uboot.kwb
 resume 0x800200
 }
|
Re: HOW2: Repair Pogo E02 with Raspberry PI (1,2 or 3) JTAG and OpenOCD November 24, 2018 04:58PM |
Admin Registered: 14 years ago Posts: 19,728 |
@joerg,
Please help alonetrio.
-bodhi
===========================
Forum Wiki
bodhi's corner (buy bodhi a beer)
Please help alonetrio.
-bodhi
===========================
Forum Wiki
bodhi's corner (buy bodhi a beer)
|
Re: HOW2: Repair Pogo E02 with Raspberry PI (1,2 or 3) JTAG and OpenOCD November 26, 2018 04:11AM |
Registered: 11 years ago Posts: 94 |
@ alonetrio
i am on a businesstrip this days, but for the first i would compair the start sequences for both sbc´s like bodhi said:
Startsequence Marvell/Sheevaplug (Pogo E02) and Startsequence Marvell/Netgear ms2110 and check the difference.
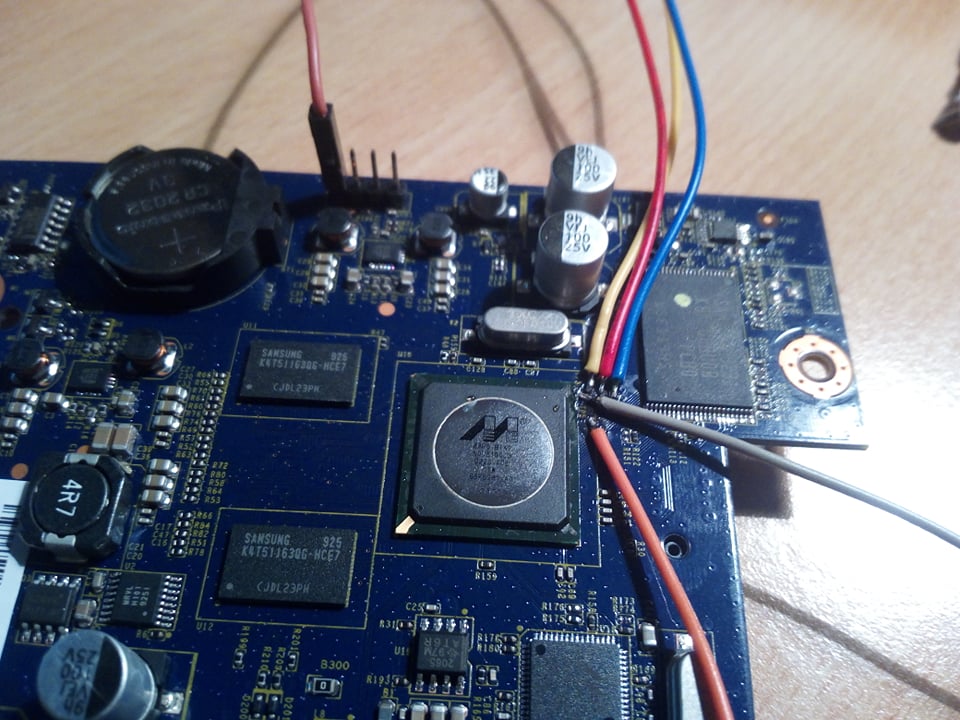
PS: the -work-area-phys 0x10000000 \ is wrong in your config, it should be 0x100000 !!!!
Edited 1 time(s). Last edit at 11/26/2018 04:48AM by joerg_999.
i am on a businesstrip this days, but for the first i would compair the start sequences for both sbc´s like bodhi said:
Startsequence Marvell/Sheevaplug (Pogo E02) and Startsequence Marvell/Netgear ms2110 and check the difference.
PS: the -work-area-phys 0x10000000 \ is wrong in your config, it should be 0x100000 !!!!
Edited 1 time(s). Last edit at 11/26/2018 04:48AM by joerg_999.
|
Re: HOW2: Repair Pogo E02 with Raspberry PI (1,2 or 3) JTAG and OpenOCD December 10, 2019 09:42PM |
Registered: 12 years ago Posts: 19 |
I cannot get my Pogoplug E02 to reflash the u-Boot binary, or to load u-Boot into RAM and execute it.
I am running openocd on a Raspberry PI 3B. This is openocd v 0.10.
Can anybody figure what is wrong? I have a feeling that some part opf the setup is not right, because I cannot even load uboot and execute it.
Trying to reflash
Trying to load & run:
I am running openocd on a Raspberry PI 3B. This is openocd v 0.10.
Can anybody figure what is wrong? I have a feeling that some part opf the setup is not right, because I cannot even load uboot and execute it.
Trying to reflash
Quote
raspberrypi>openocd -f pogo.cfg
Open On-Chip Debugger 0.10.0+dev-00974-g678fb4f6 (2019-12-10-15:24)
Licensed under GNU GPL v2
For bug reports, read
http://openocd.org/doc/doxygen/bugs.html
Info : auto-selecting first available session transport "jtag". To override use 'transport select <transport>'.
Warn : use 'feroceon.cpu' as target identifier, not '0'
pogo_load_uboot
Info : Listening on port 6666 for tcl connections
Info : Listening on port 4444 for telnet connections
Info : BCM2835 GPIO JTAG/SWD bitbang driver
Info : JTAG and SWD modes enabled
Info : clock speed 200 kHz
Info : JTAG tap: feroceon.cpu tap/device found: 0x20a023d3 (mfg: 0x1e9 (Marvell Semiconductors), part: 0x0a02, ver: 0x2)
Info : Embedded ICE version 0
Info : feroceon.cpu: hardware has 1 breakpoint/watchpoint unit
Info : Listening on port 3333 for gdb connections
Info : accepting 'telnet' connection on tcp/4444
requesting target halt and executing a soft reset
target halted in ARM state due to debug-request, current mode: Supervisor
cpsr: 0xa00000d3 pc: 0x00000000
MMU: disabled, D-Cache: disabled, I-Cache: disabled
Error: timed out while waiting for target halted
Error: error executing hosted NAND write
Error: Unable to write data to NAND device
failed writing file uboot.kwb to NAND flash 0 at offset 0x00000000
============================================
raspberrypi>telnet localhost 4444
Trying 127.0.0.1...
Connected to localhost.
Escape character is '^]'.
Open On-Chip Debugger
> pogo_init
> soft_reset_halt
requesting target halt and executing a soft reset
target halted in ARM state due to debug-request, current mode: Supervisor
cpsr: 0xa00000d3 pc: 0x00000000
MMU: disabled, D-Cache: disabled, I-Cache: disabled
> pogo_init
> nand probe 0
NAND flash device 'NAND 128MiB 3.3V 8-bit (Hynix)' found
> nand erase 0 0x0 0xa0000
erased blocks 0 to 4 on NAND flash device #0 'NAND 128MiB 3.3V 8-bit'
> nand write 0 uboot.kwb 0 oob_softecc_kw
timed out while waiting for target halted
error executing hosted NAND write
Unable to write data to NAND device
failed writing file uboot.kwb to NAND flash 0 at offset 0x00000000
Trying to load & run:
Quote
raspberrypi>openocd -f pogo.cfg
Open On-Chip Debugger 0.10.0+dev-00974-g678fb4f6 (2019-12-10-15:24)
Licensed under GNU GPL v2
For bug reports, read
http://openocd.org/doc/doxygen/bugs.html
Info : auto-selecting first available session transport "jtag". To override use 'transport select <transport>'.
Warn : use 'feroceon.cpu' as target identifier, not '0'
pogo_load_uboot
Info : Listening on port 6666 for tcl connections
Info : Listening on port 4444 for telnet connections
Info : BCM2835 GPIO JTAG/SWD bitbang driver
Info : JTAG and SWD modes enabled
Info : clock speed 200 kHz
Info : JTAG tap: feroceon.cpu tap/device found: 0x20a023d3 (mfg: 0x1e9 (Marvell Semiconductors), part: 0x0a02, ver: 0x2)
Info : Embedded ICE version 0
Info : feroceon.cpu: hardware has 1 breakpoint/watchpoint unit
Info : Listening on port 3333 for gdb connections
Info : accepting 'telnet' connection on tcp/4444
target halted in Thumb state due to debug-request, current mode: Supervisor
cpsr: 0x400000f3 pc: 0xffff0a42
MMU: enabled, D-Cache: enabled, I-Cache: enabled
requesting target halt and executing a soft reset
target halted in ARM state due to debug-request, current mode: Supervisor
cpsr: 0x400000d3 pc: 0x00000000
MMU: disabled, D-Cache: disabled, I-Cache: disabled
===========================================
raspberrypi>telnet localhost 4444
Trying 127.0.0.1...
Connected to localhost.
Escape character is '^]'.
Open On-Chip Debugger
> pogo_init
target halted in Thumb state due to debug-request, current mode: Supervisor
cpsr: 0x400000f3 pc: 0xffff0a42
MMU: enabled, D-Cache: enabled, I-Cache: enabled
> soft_reset_halt
requesting target halt and executing a soft reset
target halted in ARM state due to debug-request, current mode: Supervisor
cpsr: 0x400000d3 pc: 0x00000000
MMU: disabled, D-Cache: disabled, I-Cache: disabled
> pogo_init
> load_image uboot.kwb
524288 bytes written at address 0x00000000
downloaded 524288 bytes in 62.109913s (8.243 KiB/s)
> verify_image uboot.kwb
verified 524288 bytes in 1.868883s (273.960 KiB/s)
> resume 0x800200
>
^^^^^^^^^ Nothing happens. Uboot does not start. Nothing on serial console. ^^^^^^^^^^^^^^^^^^^^
|
Re: HOW2: Repair Pogo E02 with Raspberry PI (1,2 or 3) JTAG and OpenOCD December 11, 2019 12:59AM |
Admin Registered: 14 years ago Posts: 19,728 |
> load_image uboot.kwb
Which uboot.kwb were you using? you could try uboot.2017.07-tld-1.pogo_e02.mtd0.kwb. See if you will get different result.
.
-bodhi
===========================
Forum Wiki
bodhi's corner (buy bodhi a beer)
Which uboot.kwb were you using? you could try uboot.2017.07-tld-1.pogo_e02.mtd0.kwb. See if you will get different result.
.
-bodhi
===========================
Forum Wiki
bodhi's corner (buy bodhi a beer)
|
Re: HOW2: Repair Pogo E02 with Raspberry PI (1,2 or 3) JTAG and OpenOCD December 11, 2019 02:47PM |
Registered: 12 years ago Posts: 19 |
I exactly followed the instructions in the first post.
softlinked: uboot.kwb -> uboot.2017.07-tld-1.pogo_e02.mtd0.kwb
I switched the JTAG & serial over to another pogoplug E02 that is good. Didn't try flashing, because I'm scared to corrupt this one.
So I tried downloading the uboot.kwb and running it, according to the proc pogo_load_uboot in
/usr/share/openocd/scripts/board/pogo.cfg.
It loads and verifies, but it will not run. It just comes back and gives me another prompt. Uboot does not start, the LED does not go on and nothing comes out on the serial console. Is the resume going to the right address? Does something in the boot ROM not like something it sees in the kwb that is in memory?
I will try seeing if I can copy the (good) uboot that is flashed in the NVRAM and get that one to start up. The first post in this thread is somewhat old, I wonder if something changed between then and now.
softlinked: uboot.kwb -> uboot.2017.07-tld-1.pogo_e02.mtd0.kwb
I switched the JTAG & serial over to another pogoplug E02 that is good. Didn't try flashing, because I'm scared to corrupt this one.
So I tried downloading the uboot.kwb and running it, according to the proc pogo_load_uboot in
/usr/share/openocd/scripts/board/pogo.cfg.
It loads and verifies, but it will not run. It just comes back and gives me another prompt. Uboot does not start, the LED does not go on and nothing comes out on the serial console. Is the resume going to the right address? Does something in the boot ROM not like something it sees in the kwb that is in memory?
Quote
> load_image uboot.kwb
524288 bytes written at address 0x00000000
downloaded 524288 bytes in 62.109913s (8.243 KiB/s)
> verify_image uboot.kwb
verified 524288 bytes in 1.868883s (273.960 KiB/s)
> resume 0x800200
>
I will try seeing if I can copy the (good) uboot that is flashed in the NVRAM and get that one to start up. The first post in this thread is somewhat old, I wonder if something changed between then and now.
|
Re: HOW2: Repair Pogo E02 with Raspberry PI (1,2 or 3) JTAG and OpenOCD December 11, 2019 06:20PM |
Admin Registered: 14 years ago Posts: 19,728 |
Ray,
Flash u-boot image to the bricked Pogo. You got nothing to lose with that unit.
Update:
I see. There was a timeout error.
-bodhi
===========================
Forum Wiki
bodhi's corner (buy bodhi a beer)
Edited 2 time(s). Last edit at 12/11/2019 06:26PM by bodhi.
Flash u-boot image to the bricked Pogo. You got nothing to lose with that unit.
Update:
I see. There was a timeout error.
-bodhi
===========================
Forum Wiki
bodhi's corner (buy bodhi a beer)
Edited 2 time(s). Last edit at 12/11/2019 06:26PM by bodhi.
|
Re: HOW2: Repair Pogo E02 with Raspberry PI (1,2 or 3) JTAG and OpenOCD December 12, 2019 04:49PM |
Admin Registered: 14 years ago Posts: 19,728 |
I've asked joerg to visit the forum and help looking at the log.
-bodhi
===========================
Forum Wiki
bodhi's corner (buy bodhi a beer)
-bodhi
===========================
Forum Wiki
bodhi's corner (buy bodhi a beer)
|
Re: HOW2: Repair Pogo E02 with Raspberry PI (1,2 or 3) JTAG and OpenOCD December 18, 2019 06:21AM |
Registered: 11 years ago Posts: 94 |
hello rayvt
maybe the post1 starttime is old but its not outdated and works until now.
first, care about this: the important thing is the status "ARM state
second,
you cant go further and erase or flash if you dont get the right output here:
also both uboot and uboot-envs are up to date:
i tried this procedure on several Pogos and always with success.
-joerg_999
Edited 1 time(s). Last edit at 12/18/2019 06:29AM by joerg_999.
maybe the post1 starttime is old but its not outdated and works until now.
first, care about this: the important thing is the status "ARM state
 > pogo_init
 > soft_reset_halt    # normaly it works without, if it fails, press reset button on Pogo

 # You normally get this event (the important thing is the status "ARM state"):
 # target state: halted
 # target halted in ARM state due to debug-request, current mode: Supervisor ## OK
 # cpsr: 0x000000d3 pc: 0xffff0000
 # MMU: disabled, D-Cache: disabled, I-Cache: disabled

 # If you get the following output, again:
 # target state: halted
 # target halted in Thumb state due to debug-request, current mode: Supervisor ## not OK !
 # cpsr: 0x200000f3 pc: 0xffff0a8a
 # MMU: enabled, D-Cache: enabled, I-Cache: enabled
 # T2 Is initialized with the command:
second,
you cant go further and erase or flash if you dont get the right output here:
 # T2 We verify that the nand is well recognized:
 > nand probe 0
 # NAND flash device 'NAND 128MiB 3.3V 8-bit (Hynix)' found ## OK

 # T2 If you see this output, start from the beginning:
 > nand probe 0
 # unknown NAND flash device found, manufacturer id: 0x00 device id: 0x00 ## not OK!
 # in procedure 'nand'
also both uboot and uboot-envs are up to date:
## download uboot Pogo E02 and create Symlink:
 wget -c www.dropbox.com/s/vgbshmiq3o14btp/uboot.2017.07-tld-1.pogo_e02.bodhi.tar
 tar -xf uboot.2017.07-tld-1.pogo_e02.bodhi.tar
 ln -s uboot.2017.07-tld-1.pogo_e02.mtd0.kwb uboot.kwb

## download u-boot envs and create Symlink:
 wget -c www.dropbox.com/s/4smmw2wr4ugayz9/uboot.2016.05-tld-1.environment.bodhi.tar
 tar -xf uboot.2016.05-tld-1.environment.bodhi.tar
 ln -s uboot.2016.05-tld-1.environment.img uboot-env.bin
i tried this procedure on several Pogos and always with success.
-joerg_999
Edited 1 time(s). Last edit at 12/18/2019 06:29AM by joerg_999.
|
Re: HOW2: Repair Pogo E02 with Raspberry PI (1,2 or 3) JTAG and OpenOCD December 18, 2019 10:56AM |
Registered: 12 years ago Posts: 19 |
Well, I'm going crazy here.
After trying (and failing) to write a good uboot into NAND, I switched the JTAG cable over to another Pogoplue E02 that works. I wanted to find a procedure which would load a Linux system so I could try to use nandwrite to flash the uboot.
First step was to use JTAG to load a uboot and execute it.
As I mentioned earlier, the current uboot (uboot.2017.07-tld-1.pogo_e02.mtd0.kwb) would load but would not run.
After the "resume 0x800200", nothing happened. No led, no serial console output.
Eventually I decided to try loading the old old original Pogoplug uboot.
load_image uboot.mtd0.dockstar.original.kwb 0x800000
resume 0x800200
WORKED!! I got console access. Could even load the rescue system from mtdN. Very limited uboot, though. It could not successfully run the rescue system, which complained it couldn't get a valid machid.
So then I moved up to:
load_image uboot.mtd0.pinkpogo.jeff-2010-10-23.kwb 0x800000
resume 0x800200
That also worked.
So then I moved up to:
load_image uboot.mtd0.pinkpogo.davygravy-2012-02-20.kwb 0x800000
resume 0x800200
No good. Nothing happened. No led, no serial console output. Obviously something changed in the uboot between the 2010 version and the 2012 version. Because none of the versions after Jeff's 2010 version will run when loaded by the JTAG.
By this time, my wife was asking why I was spending several days trying to unbrick a $10 computer. Wanted to know why I just didn't use one of the Raspberry PI Zero-W's that we bought for $3.14 last year at the Microcenter sale. Good question.
So anyway, I then switched the JTAG cable back to the bricked Pogoplug. Nada. I think that this unit had a hardware failure. The JTAG on it used to work but now it does not work anymore.
|
Re: HOW2: Repair Pogo E02 with Raspberry PI (1,2 or 3) JTAG and OpenOCD December 18, 2019 02:27PM |
Registered: 11 years ago Posts: 94 |
rayvt, your wife is right, but i spent the time to learn more about how to handle things like bootloader, envs and repair SBCs and routers with broken uboot. First i started to repair broken Pogos with Buspirate (very old, from 2012 and slow but works also fine) and later i tried to use the common Raspi erverybody have laying around.
The result is this thread.
But like bodhi noticed, your timout is strange, maybe you can try another adapter speed and/or try more often if the first time fails :
use 2000 kHz instead of 200 khz
in my case it worked, but i had some reports from people where it didnt work with the higher speed.
One point at the end: use short cables to connect! max 30cm its about 11inch
good luck!
-joerg_999
|
Re: HOW2: Repair Pogo E02 with Raspberry PI (1,2 or 3) JTAG and OpenOCD December 18, 2019 05:18PM |
Registered: 8 years ago Posts: 377 |

